Batch processing workflows
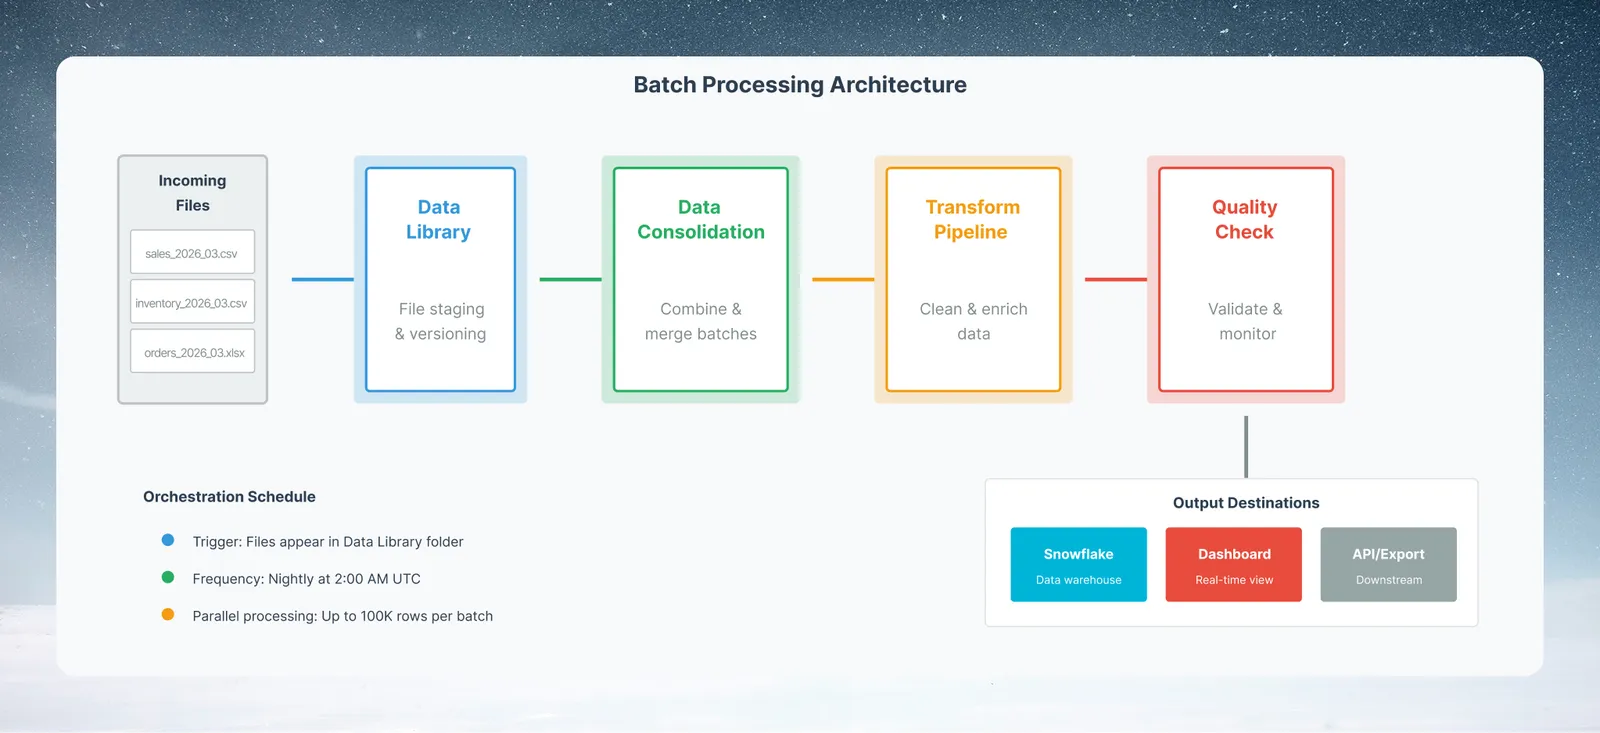
Every organization receives data in batches: vendor feeds on Monday morning, system exports at end-of-day, partner files on the 1st of the month. The challenge is processing them reliably, with quality checks, without an engineering team to monitor the pipeline.
This guide is for operations managers, data engineers, and analysts. It covers the end-to-end pattern for batch processing in Mammoth: ingesting files, applying transformations, validating quality, and routing outputs to downstream systems.
What you will build: A batch processing pipeline that ingests incoming files automatically, transforms and validates them, and delivers clean data to your downstream systems.
When to use batch processing
Batch processing is the right pattern when:
- Data arrives as files (CSV, Excel, and other supported formats) rather than through live connections
- Files arrive on a schedule (daily, weekly, monthly) rather than continuously
- Files keep arriving in volume
- You need reliable error handling and quality gates
- Processing time is less critical than accuracy
For near-real-time requirements, see Operational dashboards.
Example scenario: retail partner sales files
Example: A CPG manufacturer receives daily sales data from many retail partners. Each partner sends their file in a slightly different format. The manufacturer needs to consolidate all files into a single dataset, validate them, and have clean data available in the warehouse by 7 AM for the sales team's morning reports.
File arrival window: 10 PM–2 AM
Processing window: 2 AM–4 AM
Data available by: 7 AM (comfortable buffer)
Step 1: Set up the intake folder
- In your Mammoth project's Data Library, create a folder:
Incoming/RetailPartnerFiles - Have your team upload each partner's file to this folder (or pull files in from SFTP or cloud storage with a connector)
- Any file uploaded to this folder is picked up by the Data Consolidation automation you create in Step 3
Step 2: Build a normalization pipeline
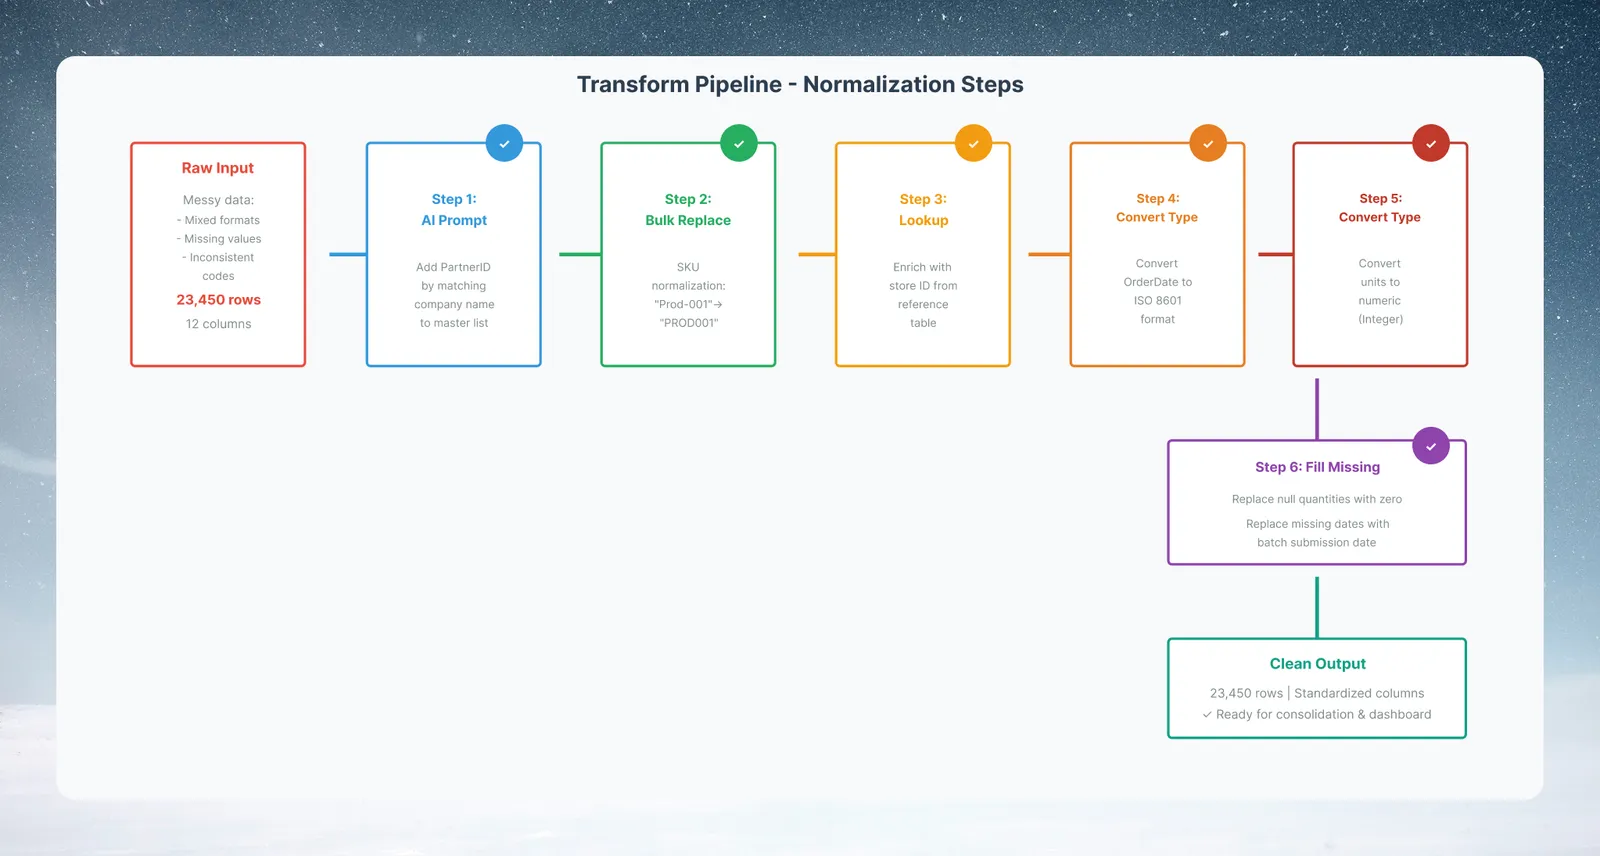
Data Consolidation requires every file in the folder to match the destination dataset's schema, so normalize each partner's format first:
- Load one representative file per partner format as its own dataset
- Build a transform pipeline that produces the standard output schema:
PartnerID(Add column, then Label & Insert Values with the partner's ID)ProductCode_canonical(Bulk Replace to standardize SKU formats)StoreID_canonical(Lookup against the store master)SalesDate(Convert column type to date)Units(convert to number, handle nulls)Revenue(convert to number, handle nulls)
- Use Send to dataset at the end of each partner's pipeline to write the standard-schema output to your consolidated master dataset (Update Method Combine data)
If all your partners already send the same layout, skip this step and consolidate the raw files directly in Step 3.
Step 3: Set up a Data Consolidation automation
- Open Automations in the project sidebar → New Automation → Data Consolidation
- Select the source folder:
Incoming/RetailPartnerFiles - Optionally turn on Only process files matching a name pattern and enter text that the file names contain (matching is not case sensitive)
- Select the destination dataset: your consolidated retail sales master, with its update method set to Combine with older data
- Name the automation and create it
The consolidation fires whenever a new file is uploaded to the folder; there is no schedule to set. Check the automation's status in the Automations list and in Monitor, since a file whose columns do not match the destination dataset makes the consolidation fail.
Step 4: Build the quality gate
After consolidation, run quality checks before the data reaches downstream systems.
-
Add a Data Check task to the consolidated dataset's pipeline (see Data quality monitoring for the full pattern)
-
Minimum checks for batch processing:
- Row count compared with the prior run (for example, changed by more than 10%)
- Null percentage on key fields (ProductCode, StoreID, SalesDate)
- Value range on SalesDate (all records should be within the expected window)
- Unique values or a Custom prompt check for duplicates (same file submitted twice by the same partner)
-
Set the fail action to Pause the pipeline so downstream delivery waits until the data is fixed or approved, and turn on Notify on failure
-
If all checks pass, the pipeline continues to delivery
Step 5: Send to downstream systems
Once quality checks pass, deliver clean data:
To a warehouse (for BI tools):
- Open your consolidated View → Export → Databases → BigQuery, PostgreSQL, SQL Server, or Redshift
- Table:
retail_sales_consolidated - For BigQuery, choose the Update Method: Replace (full refresh), Combine (append), or Merge
- The export is a task at the end of the pipeline, so it runs each time the pipeline runs
To a Mammoth dashboard (for ops team):
- The consolidated View powers the dashboard automatically, with no additional task needed
- The dashboard reflects the latest consolidated data as soon as the pipeline completes
Via Live Link (for downstream API consumers):
- Open your consolidated View → Export → Live link
- Copy the URL, which updates on every pipeline run. Share with downstream systems that pull via API or auto-refresh.
Step 6: Handle errors and exceptions
Batch pipelines need explicit error handling:
File-level errors:
- If a partner file has schema changes (new column, missing column), the consolidation fails rather than loading mismatched data
- Watch the automation's status in Monitor and the Automations list, and fix or re-normalize the file before re-uploading
Record-level exceptions:
- Create an Exceptions View with a Conditional Filter that keeps records failing your rules
- Send exceptions to a separate dataset (Send to dataset) for manual review
- Do not silently drop bad records; surface them
Recovery pattern:
- Because consolidation in Combine mode appends rows, re-uploading a file that already loaded adds its rows again. Use
PartnerID + SalesDate + StoreIDas your deduplication key (Remove duplicate rows) to guard against that
Performance tips for high-volume runs
For high-volume datasets (10M+ rows per run):
| Optimization | How to implement | Impact |
|---|---|---|
| Filter early | Apply date and entity filters as first transform tasks | Reduces rows processed downstream |
| Remove unneeded columns | Use Remove column early in the pipeline | Reduces data carried through every later task |
| Avoid row-level AI on full dataset | Use Bulk Replace or standard tasks instead of Generative AI where possible | Reduces API cost and time |
Results to expect
- Incoming files are consolidated automatically as they are uploaded
- Quality checks run on every pipeline run and can pause delivery of bad data
- Clean data reaches your warehouse or dashboard without manual file handling