Salesforce to data warehouse integration
This guide is for data engineers and BI developers who want a clean, queryable version of their CRM data in a data warehouse, without the messy field names, polymorphic IDs, and inconsistent stage values that come out of Salesforce directly. Mammoth sits between Salesforce and the warehouse to handle the transformation, so you control what lands there.
If your warehouse is Snowflake: Mammoth supports Snowflake as a data source today, not as an export destination—a pipeline's output cannot be written directly into Snowflake yet. This guide uses BigQuery as the worked example, since it is the destination with the most complete write-mode support (Replace, Combine, or Merge). The same Send to destinations pattern also works with PostgreSQL, SQL Server, or Amazon Redshift if one of those is your stack. If Snowflake is a hard requirement, land the cleaned data in one of those destinations (or as a file via SFTP) and load it into Snowflake with your own pipeline outside Mammoth.
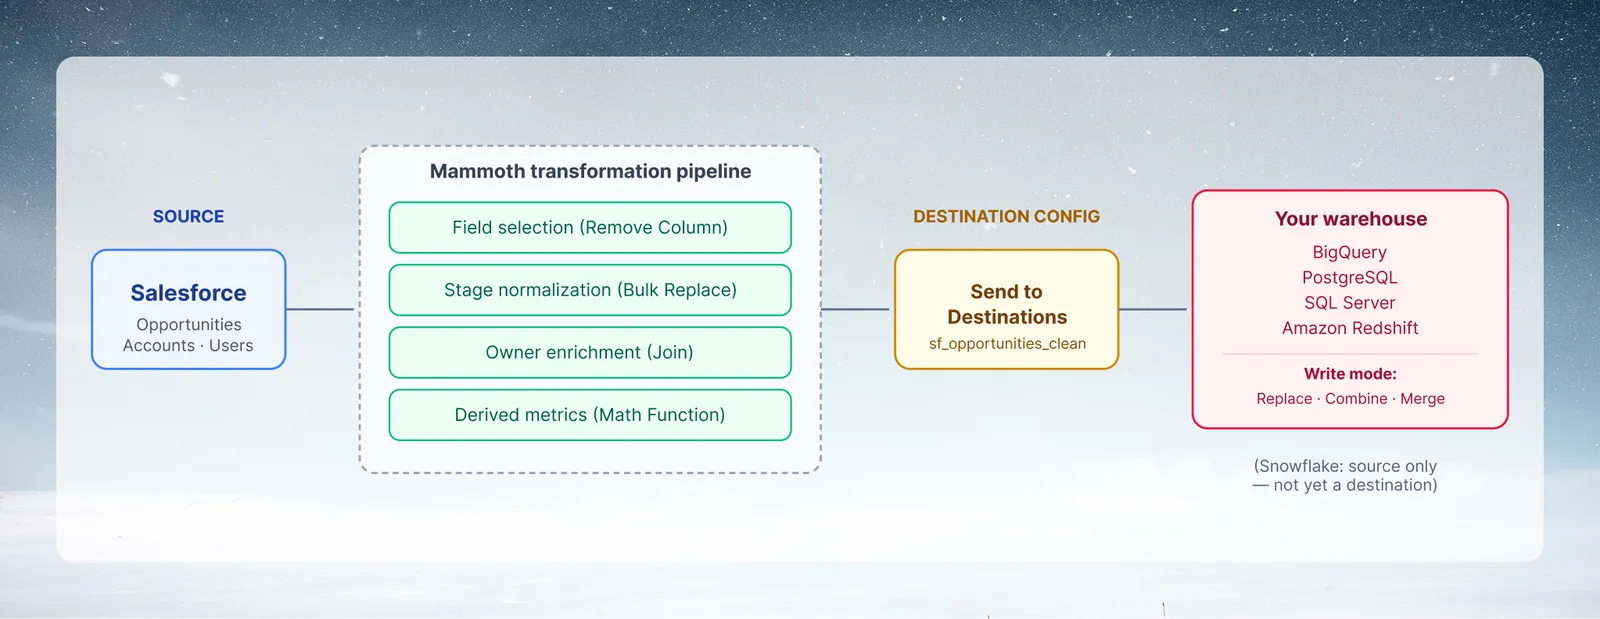
What you will build
- A Salesforce dataset pulling Opportunities, Accounts, and Users
- A transformation pipeline: field selection, normalization, derived metrics
- A Send to destinations task writing to BigQuery (or PostgreSQL, SQL Server, or Redshift)
- A Dataset Refresh automation keeping the warehouse table fresh daily
Step 1: Connect Salesforce
Follow the Salesforce connector guide to authenticate and create your dataset, selecting Opportunity, Account, and User (for owner names).
Field selection: Salesforce Opportunity objects have 100+ fields. For the warehouse, keep only what downstream analytics will use. This reduces transfer time and keeps the destination table clean:
Id,Name,StageName,Amount,CloseDate,ProbabilityOwnerId,AccountId,CreatedDate,LastModifiedDateLeadSource,Type,ForecastCategoryName- Any custom fields your team uses for qualification or segmentation
Use Remove Column to drop everything else before transformation begins.
Step 2: Transform
Normalize stage names
Bulk Replace on StageName to map all variants to canonical stages. This is the most impactful transformation, because downstream SQL becomes WHERE StageName = 'Closed Won' instead of a multi-value IN clause.
Flatten owner information
Bring in readable owner details from the User object with Join on OwnerId ↔ User.Id:
- Bring in
User.NameasOwnerName - Bring in
User.Region(or a custom territory field) asOwnerRegion
Add derived metrics
Using Math Function:
DaysToClose = CloseDate - CreatedDate: for historical pipeline velocity analysisAgeInStage = TODAY() - LastModifiedDate: for stale deal identification
Step 3: Configure the warehouse destination
- In your pipeline, open Export → Databases (for a Mammoth-managed BigQuery or PostgreSQL table) or Send to destinations → external Google BigQuery (for your own project), or PostgreSQL, SQL Server, or Redshift if that is your warehouse.
- Enter the target table name—for example,
sf_opportunities_clean. - For external BigQuery, choose the Update Method:
| Write mode | Behavior | Use when |
|---|---|---|
| Replace | Deletes all existing rows and inserts fresh data every run | Full refresh: simplest and always consistent, but slower for very large tables |
| Combine | Appends new rows without touching existing ones | Building history over time |
| Merge | Updates rows matching a reference column, inserts rows with no match | Keeping a current-state table in sync |
For Salesforce Opportunities: Merge on Id is usually the right choice—it keeps the table current without duplicating records that have not changed. Merge requires you to select Id as the Reference column in the destination form.
Other external destinations (PostgreSQL, SQL Server, Redshift) use the same Send to destinations flow with their own connection fields—see the full destination reference for each one's exact form.
Step 4: Schedule the refresh
Add a Dataset Refresh automation on the Salesforce dataset. Daily, before business hours, is a common cadence for warehouse syncs. Check the Automation list for run status, since a failed run means downstream queries and dashboards are working off stale data.
Incremental considerations: For large Salesforce orgs (100k+ opportunities), a full daily pull may be slow. Add a Conditional Filter on LastModifiedDate to keep only records changed in roughly the last 48 hours. Combined with Merge write mode at the destination, this keeps the warehouse table current without re-processing unchanged records every run.
Downstream usage in BigQuery
Once the data lands in BigQuery, your team can query it directly:
-- Pipeline velocity by quarter
SELECT
  DATE_TRUNC(CloseDate, QUARTER) AS quarter,
  OwnerRegion,
  COUNT(*) AS deals,
  SUM(Amount) AS total_acv,
  AVG(DaysToClose) AS avg_days_to_close
FROM `project.dataset.sf_opportunities_clean`
WHERE StageName = 'Closed Won'
GROUP BY 1, 2
ORDER BY 1 DESC;
Common issues
| Issue | Cause | Fix |
|---|---|---|
| Destination write fails (permission error) | Mammoth's warehouse user lacks write/create permissions on the target table | Grant INSERT/CREATE TABLE (or your warehouse's equivalent) to the Mammoth-connected role |
| Merge fails | Reference column does not exist in both the View and the destination table, or types don't match | Confirm Id exists in both with compatible types |
| Salesforce fields missing at the destination | Field-level security on the Salesforce integration user | Grant field visibility in the Salesforce profile |
| Destination not updating after pipeline runs | Auto-sync is off on the View or the destination | Check Auto-sync on both; see Send to destinations troubleshooting |