PDF Extraction
PDF Extraction lets you pull structured data out of PDF files and images using AI. Upload a document to your Data Library, choose what to import, and Mammoth converts the content into a dataset you can query, transform, and share.
Before you start
- The PDF or image file must be uploaded to your Data Library before starting extraction.
- If your workspace has its own AI provider key, the extraction uses that key, so the key needs enough credit or quota. Mammoth shows a message above the extraction options when a workspace key is in use.
- PDF and image upload is available when enabled for your workspace.
- PDF extraction can depend on your plan. If Extract Data is restricted, Mammoth prompts you to upgrade.
Limits to know before you start:
- Mammoth extracts up to 2,000 pages per document (see limits and quotas)
- Large documents can take a while to process. If an extraction takes longer than Mammoth can wait, it tells you the extraction may still finish and to reopen the file in a few minutes
- Scanned PDFs require clear image quality—low-resolution scans produce poor results
- Password-protected PDFs are supported. After uploading, Mammoth shows "Access to this file is protected by a password". Enter the File password and submit—once it is accepted, the normal extraction flow proceeds.
Supported file types
| Type | Notes |
|---|---|
PDF (.pdf) | Works best with text-based PDFs; scanned PDFs require clear image quality |
PNG (.png) | |
JPEG (.jpg, .jpeg) | |
TIFF (.tif, .tiff) | Mammoth converts the TIFF to a PDF |
HEIC (.heic, .heif) | Mammoth converts the file to a JPEG |
WebP (.webp) |
Step 1: Upload your file
Upload your PDF or image to the Data Library.
Once the upload completes, the file appears in the Data Library. Click the file row to open the preview panel on the right. You'll see the message "We need your input before we process this file" and a card that says "Extract the Data from the file to access it:" with an Extract Data button:
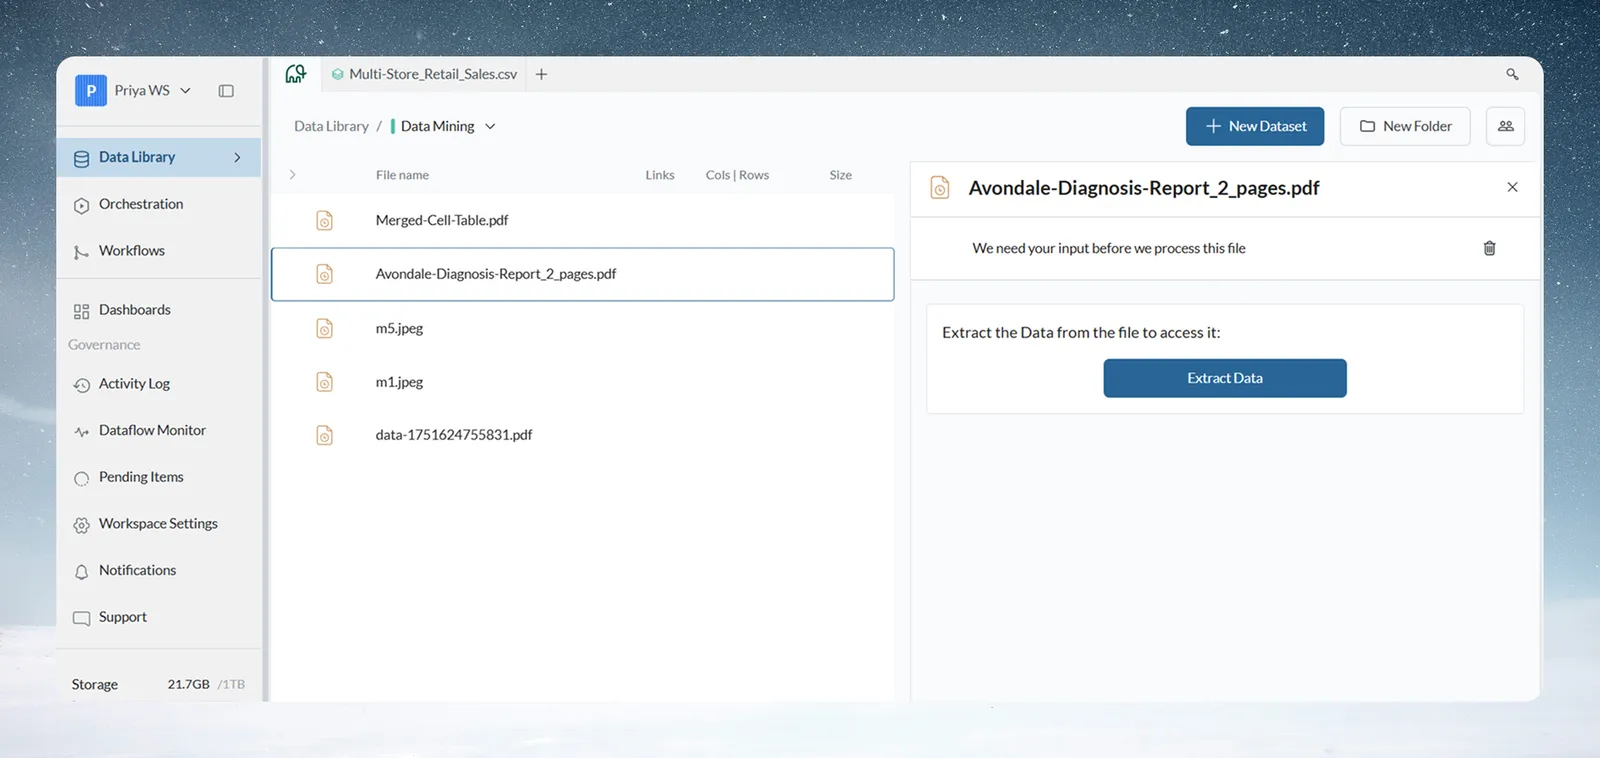
Step 2: Choose what to import
Click Extract Data. The Review data import modal opens, with your file name and type under the title. The file is shown on the left. On the right, under What to import, choose one of three options:
| Option | What it does |
|---|---|
| Only tables | Imports just the detected tables |
| All content | Imports the detected tables and the surrounding text |
| Custom | Imports exactly what you describe |
Custom shows a text box with the placeholder "Describe what to import from this PDF…". Under TRY: you can click either suggestion to fill the box: Convert all content into tables or Extract existing tables only.
Click Extract. Extraction never starts automatically, because reading the document takes time and may use your AI provider key's quota. For Custom, Extract stays disabled until you write an instruction, and Mammoth shows "Describe what to import first".
Write effective prompts
| Example | Why it works | |
|---|---|---|
| Good | "Extract the invoice number, vendor name, invoice date (MM/DD/YYYY), and total amount (numeric) from this invoice" | Specific field names, expected data types, clear scope |
| Good | "Get all line items: product name, quantity, unit price, and line total" | Matches the table structure in the doc |
| Good | "Extract only the summary table on page 1" | Narrows scope to avoid noise |
| Vague | "Get the data" | No field names—AI guesses what's important |
| Vague | "Extract the table" | Ambiguous when there are multiple tables |
| Vague | "Get the numbers" | No column names or context |
Prompt tips:
- Specify expected data types:
"total amount (numeric)","date (MM/DD/YYYY format)" - Use exact field names that match your column naming expectations
- Mention the page number if data is on a specific page
- If the result isn't right, change what to import and extract again without re-uploading the file
Step 3: Review the extracted tables
While Mammoth reads the document, it shows progress such as "Processing PDF - Page 3 of 10". When extraction completes, the right pane lists the detected tables under What to import: {option} (for Custom, your prompt appears next to it).
For each detected table:
- A checkbox to include or exclude it
- The label Table N, with the page it came from and its column and row counts
- A preview of its data when you click it
The pane header shows how many tables Mammoth found, or "N of M selected" when there are several.
Not what you wanted? Click the pencil icon (Change what to import) to go back to the options, then extract again. The file doesn't need to be re-uploaded.
Step 4: Create your dataset(s)
Select the tables you want to keep, then click Looks right. Mammoth opens the Save dataset step (Save N datasets if you selected several tables):
- One table selected: the dataset name is filled in from the file name. Click the pencil icon to rename it. You can also choose how it refreshes: Manual (re-upload a new file when there is one, and the same instructions replay over it) or When a new file arrives (watch a Mammoth folder for new files and add them to the dataset using the same instructions). The automatic option depends on your plan.
- Multiple tables selected: Mammoth lists the tables to import, and one set of instructions produces all the datasets.
If a new file looks different from the one you saved, Mammoth pauses the update and asks you, so your data is never changed silently.
Click Create dataset (or Create dataset + automation when you set up automatic refresh). Click Back to return to the tables.
In the footer of the review modal, the Delete file after tables are converted into datasets checkbox removes the source file from your Data Library once the datasets are created. It is useful for keeping your library clean when processing many files.
Each selected table becomes a separate dataset in your Data Library. Once created, the dataset works exactly like any other Mammoth dataset—you can transform, view, share, and connect it to pipelines.
Example PDF extraction prompts
Invoice processing
"Extract invoice number, vendor name, invoice date, due date, and total amount from this supplier invoice"
Report data collection
"Extract the department name, report period, and all KPI values from this monthly performance report"
Form processing
"Extract applicant name, years of experience, current employer, and desired salary"
Bank statement reconciliation
"Extract statement date, beginning balance, ending balance, total deposits, and total withdrawals"
Contract data
"Extract party names, effective date, contract value, and termination clause from this agreement"
Research table extraction
"Extract all data from the results table on page 3—include the variable name, N, mean, and standard deviation columns"
Troubleshoot PDF extraction
Extract Data is restricted
PDF extraction depends on your plan. Follow the upgrade prompt, or ask your workspace admin.
Extraction returns incomplete or incorrect data
- Refine your instruction to be more specific—mention the page number, table header text, or exact column names
- Try Only tables if the document has clearly formatted tables
- For scanned PDFs, higher image quality yields better results
No tables found message appears
The extraction completed but found nothing matching your choice. Try:
- Switching from Only tables to All content
- Broadening your Custom instruction—for example, remove page number restrictions
- Checking the file preview on the left to confirm the expected content is visible
Some pages were not extracted
Some pages had more data than your plan can extract. Use the Upgrade your plan link in the message to extract larger pages.
Quota error from your AI provider key
Mammoth shows "Your key has insufficient quota, no tables could be extracted. Please update your key or check your usage limits." If some tables were extracted first, it says so. Update the key or check your usage limits with your AI provider, then extract again.
Extraction takes a long time
Large or complex PDFs can take a while to process, and multi-page scanned documents take longest. If it takes longer than Mammoth can wait, Mammoth says the extraction may still finish—reopen the file in a few minutes to see the result.
Mammoth could not find the extraction in progress
Mammoth shows "We couldn't find the extraction that was in progress. Please try again." Start the extraction again.
TIFF, HEIC, or WebP files not extracting
These formats are supported but confirm the file is not corrupted or unusually compressed. If the extraction fails consistently, try converting to PDF or PNG first.
Extraction fails with an error
- The document may use non-standard fonts or be heavily image-based—try re-scanning at higher resolution or converting to a text-based PDF