Batch Management
Every time you add data to a Mammoth dataset—whether uploading files, refreshing connections, or running consolidations—you create a batch. Think of batches as individual data versions that preserve history.
Understanding batches helps when your data changes over time, for example monthly financial reports, daily inventory snapshots, or data consolidated from several locations.
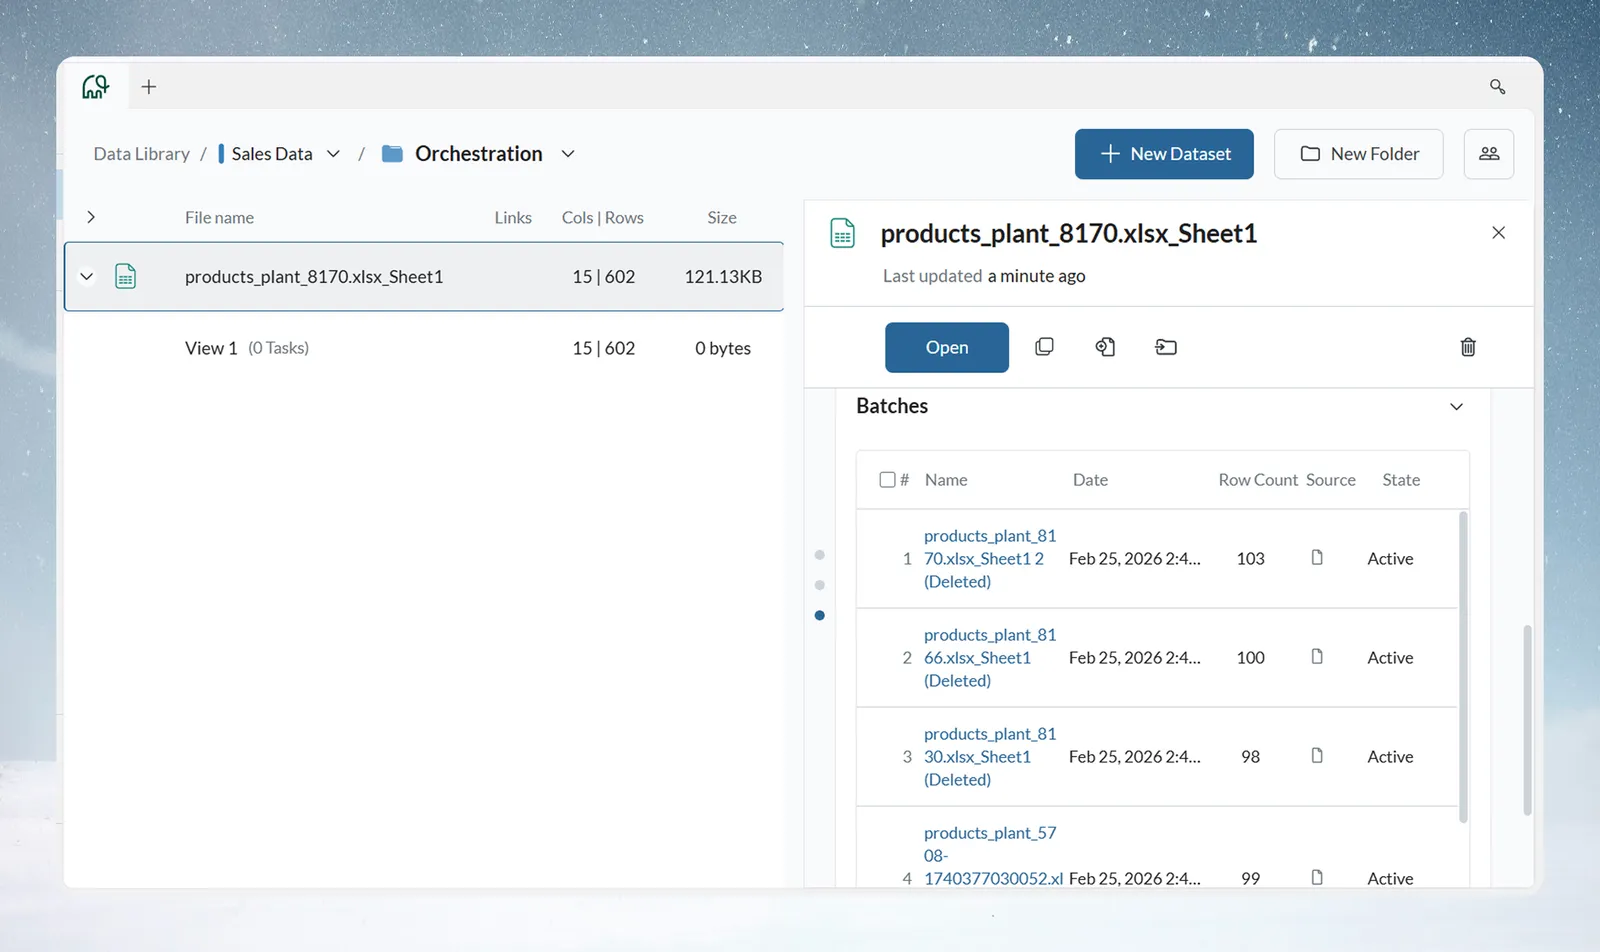
Understanding batches
What is a batch?
A batch represents a single data import or version within your dataset. Each batch maintains its own identity, metadata, and audit trail while contributing to the unified dataset view.
Key characteristics
- Independent Identity: Each batch has unique name, timestamp, and source information
- Historical Preservation: All batches remain accessible for analysis and rollback
- Metadata Rich: Captures source file, row count, and creation details
- Transformation Ready: Pipeline tasks apply across all batches automatically
Dataset-batch relationship
Sales Dataset
├── April_Sales_North.csv (127 rows) - Batch 1
├── April_Sales_South.csv (143 rows) - Batch 2
└── June_Sales_Combined.csv (298 rows) - Batch 3
    Total Dataset: 568 rows across 3 batches
Why batches matter
Complete Audit Trail: Track exactly what data came from where and when. Essential for compliance, debugging, and stakeholder confidence.
Version Control: Roll back to previous states, compare versions, or analyze data evolution over time without complex backup systems.
Flexible Analysis: View specific batches, compare batch-to-batch changes, or analyze data by source while maintaining the unified dataset view.
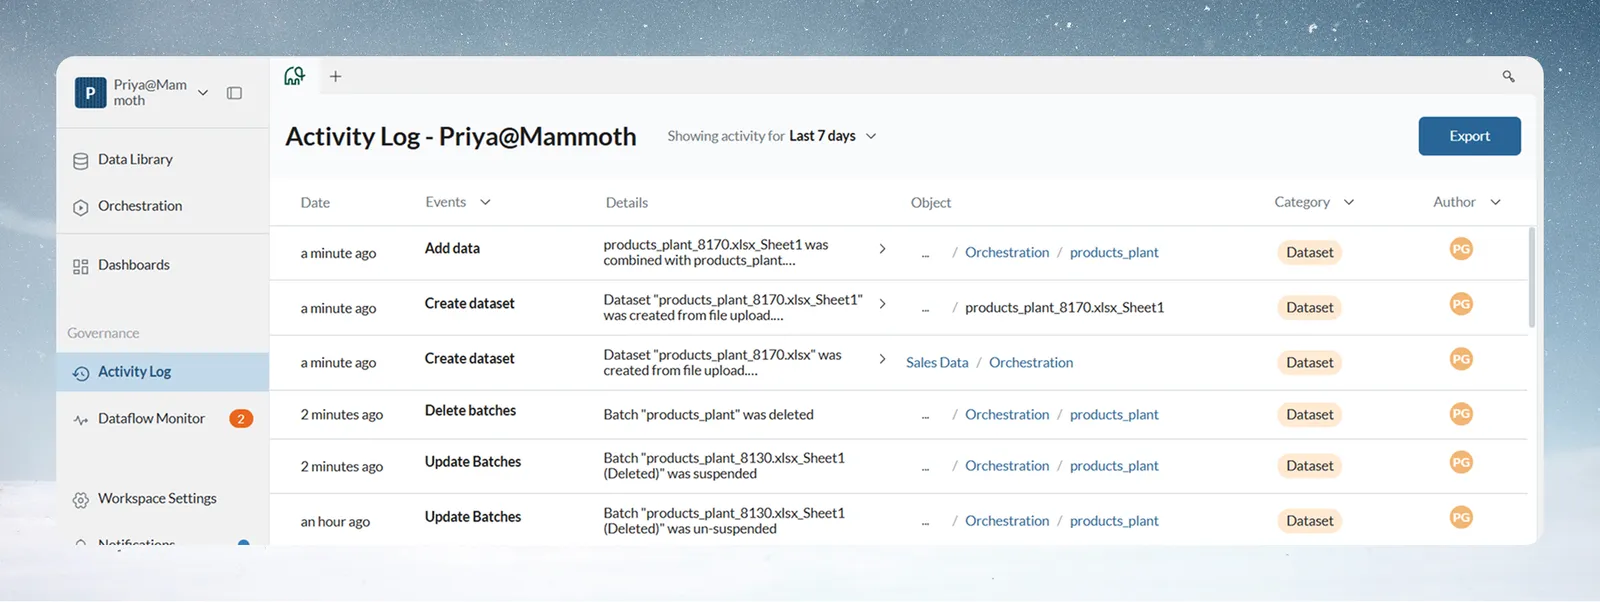
Batch creation methods
Automatic batch creation
Batches are created automatically through multiple pathways—no manual version management required:
File Upload
- Each file upload becomes a new batch
- Batch inherits filename as identifier
- Timestamp automatically captured
Data Consolidation
- Automated file processing creates batches per source file
- No manual batch management is needed
Dataset Refresh
- In Combine mode, Live Connection updates create new batches and preserve historical data with each refresh
- In Replace mode, a refresh deletes the previous batches and adds one new batch
- Scheduled refresh maintains complete lineage in the Activity Log
Combine vs replace: Choosing your update strategy
The most critical batch decision is choosing how new data integrates with existing data. Mammoth provides two distinct approaches serving different business needs.
Combine mode (append strategy)
Purpose: Add new data while preserving all historical information
How it Works: New data becomes an additional batch alongside existing batches. Dataset grows with each addition, maintaining a complete historical view.
Best for:
- Building Historical Datasets: Monthly sales reports accumulating year-over-year data
- Transaction Processing: Daily transaction files building complete financial history
- Multi-Location Consolidation: Regional data files combining into enterprise view
- Audit Trail Requirements: Regulatory compliance needing complete data lineage
Example:
Initial State: April_Sales_Data.csv (127 rows)
Add in Combine Mode: June_Sales_Data.csv (127 rows)
Result: Dataset with 254 rows
  ├── Batch 1: April data (127 rows)
  └── Batch 2: June data (127 rows)
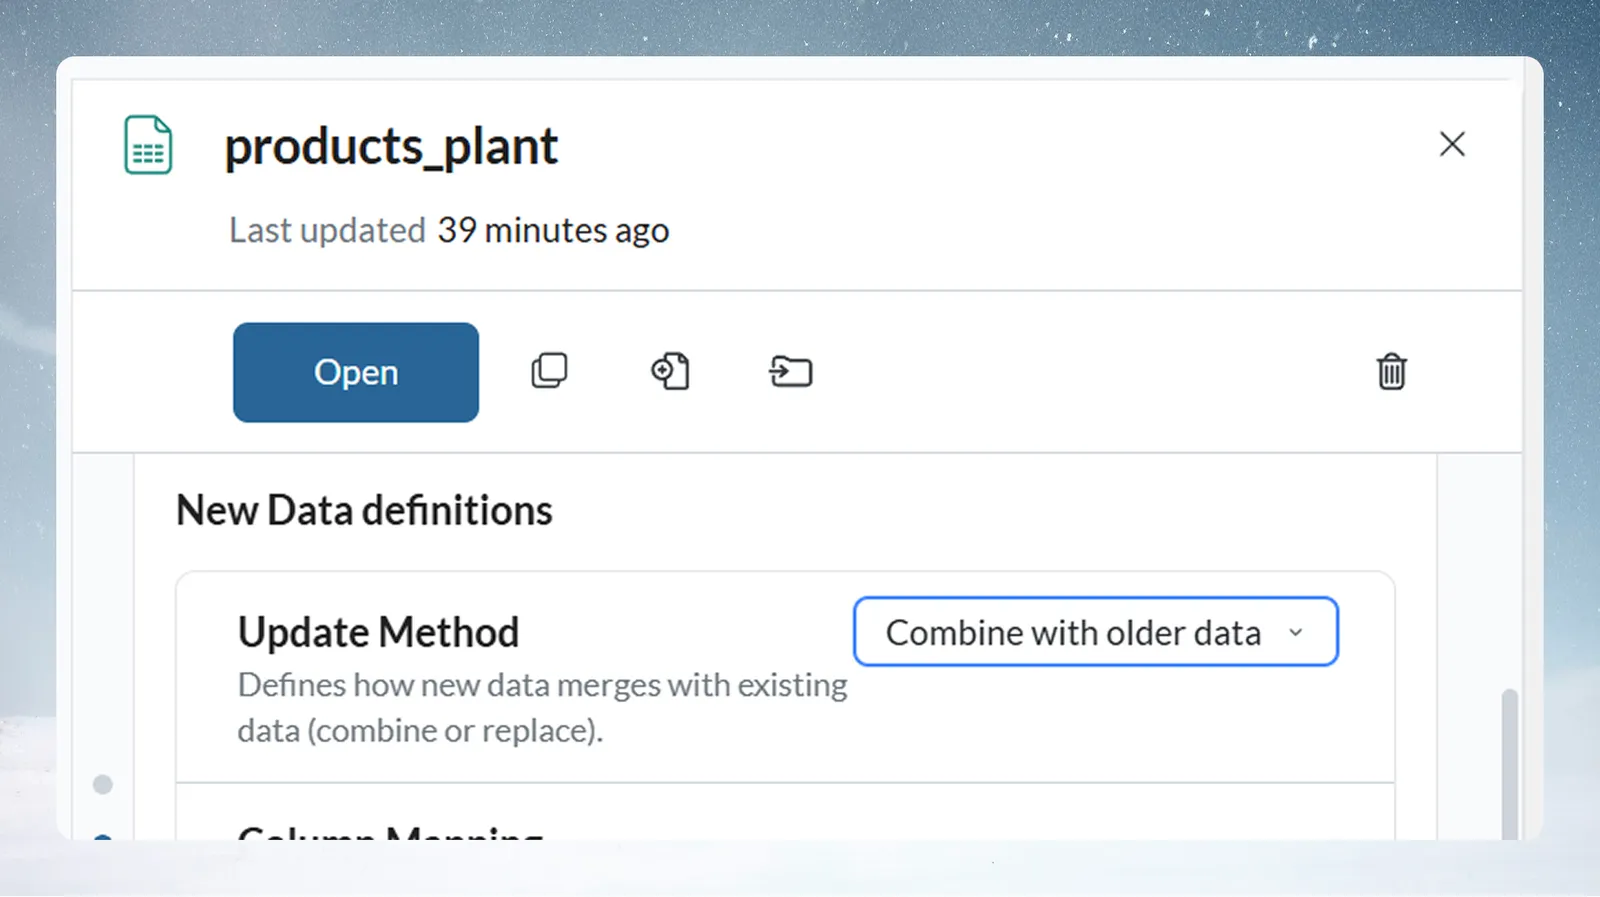
Replace mode (overwrite strategy)
Purpose: Replace entire dataset content with fresh data
How it Works: New data completely replaces previous dataset content. Previous batches are deleted, dataset maintains a consistent size. If every previous batch was suspended, the new batch is created suspended.
Best for:
- Current State Reporting: Daily inventory snapshots where only today matters
- Latest Data Only: Pricing tables, employee directories, current status reports
- Error Correction: Fixing incorrect data uploads
- Fixed Dataset Size: Maintaining consistent memory footprint
Example:
Initial State: Yesterday_Inventory.csv (1,000 items)
Replace Mode: Today_Inventory.csv (1,050 items)
Result: Dataset with 1,050 rows
  └── Only today's data (previous data removed)
Use Replace Mode cautiously—previous data cannot be recovered once replaced. Consider backing up important historical data before replacing.
Batch operations interface
Adding data to datasets
Open the Add or Replace data dialog from the dataset's menu in the Data Library, or with the Add new data button in the header of the Batches (N) section of the dataset's preview panel. Both are available only for file-based datasets, and Add new data is not shown on the standalone Dataset Settings page. See Add or replace data for the full walkthrough.
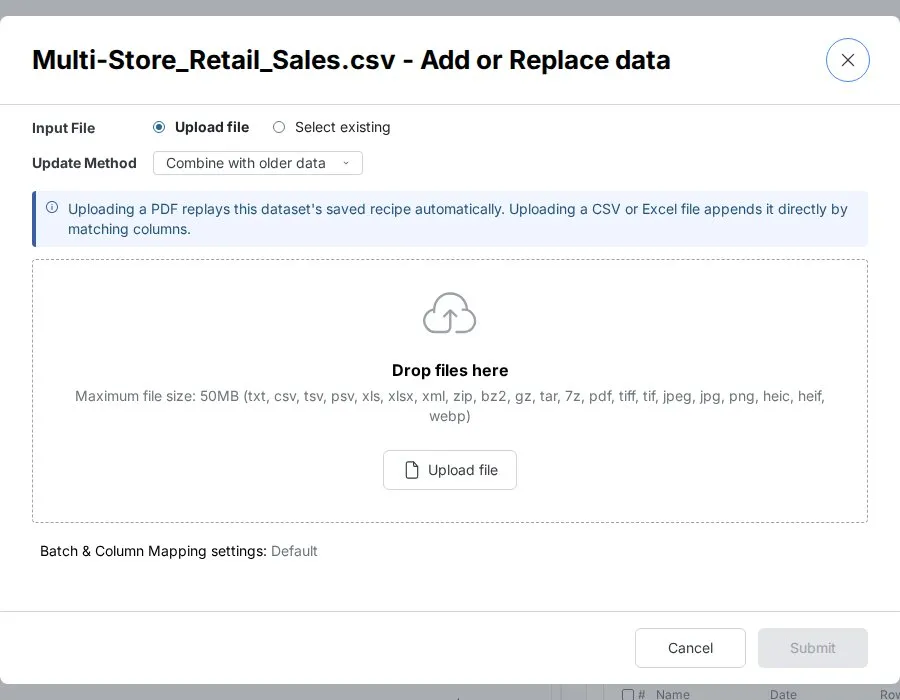
The dialog is titled with the dataset name followed by Add or Replace data.
Input File:
- Upload file: Drag-and-drop or browse for a single file. A callout explains that uploading a PDF replays the dataset's saved recipe automatically, while uploading a CSV or Excel file appends it directly by matching columns.
- Select existing: Pick another dataset, or an unprocessed PDF, from the project.
Update Method:
- "Combine with older data": Append mode preserving history
- "Replace the older data": Overwrite mode for current-state data
- The dropdown is in the dialog and saves to the dataset as soon as you change it, without waiting for Submit. It applies to both Upload file and Select existing.
Column mapping:
- For files other than PDFs, a Batch & Column Mapping settings row shows Default or Custom. Select it to open Combine / Replace Settings, where you choose Map with existing columns or Create new column mapping, and set what happens If column type doesn't match (convert the destination column to text, convert incompatible values to null, or do not update the dataset).
- Replace and use the new file's columns: shown only when Update Method is Replace and the file is not a PDF. Select it when the file has new or renamed columns; the dataset's columns become the file's columns.
After you select Submit, the dialog closes and the new batch appears in the Batches list. It reads Applying recipe while Mammoth structures it, or Pending when it needs your input (a column mapping, a sheet selection, or a file password). Select a pending row to resolve it.
Batch information display
Open your dataset's preview panel in the Data Library and expand the Batches (N) section to see the complete batch inventory. The Batches view is reachable from several places, not just the Data Library—see Accessing the Batches View below for all entry points.
Displayed information
| Field | Description |
|---|---|
| Name | Source filename or custom identifier. Select it to preview the batch |
| Date | Exact creation date and time |
| Row Count | Records contributed by this batch |
| Source | The origin type of the batch data, displayed as an icon indicating whether data was loaded via file upload, database connector, or a Combine Dataset operation |
| State | Active, Suspended, or Pending Delete (waiting for approval under a retention policy) |
Available actions
- Delete—Permanently delete the selected batches (irreversible)
- Suspend / Unsuspend—Temporarily exclude without deletion
- Add new data—A button in the Batches (N) section header (file-based datasets only) that opens the Add or Replace data dialog
The list shows 10 batches per page. Use the previous and next arrows to move between pages.
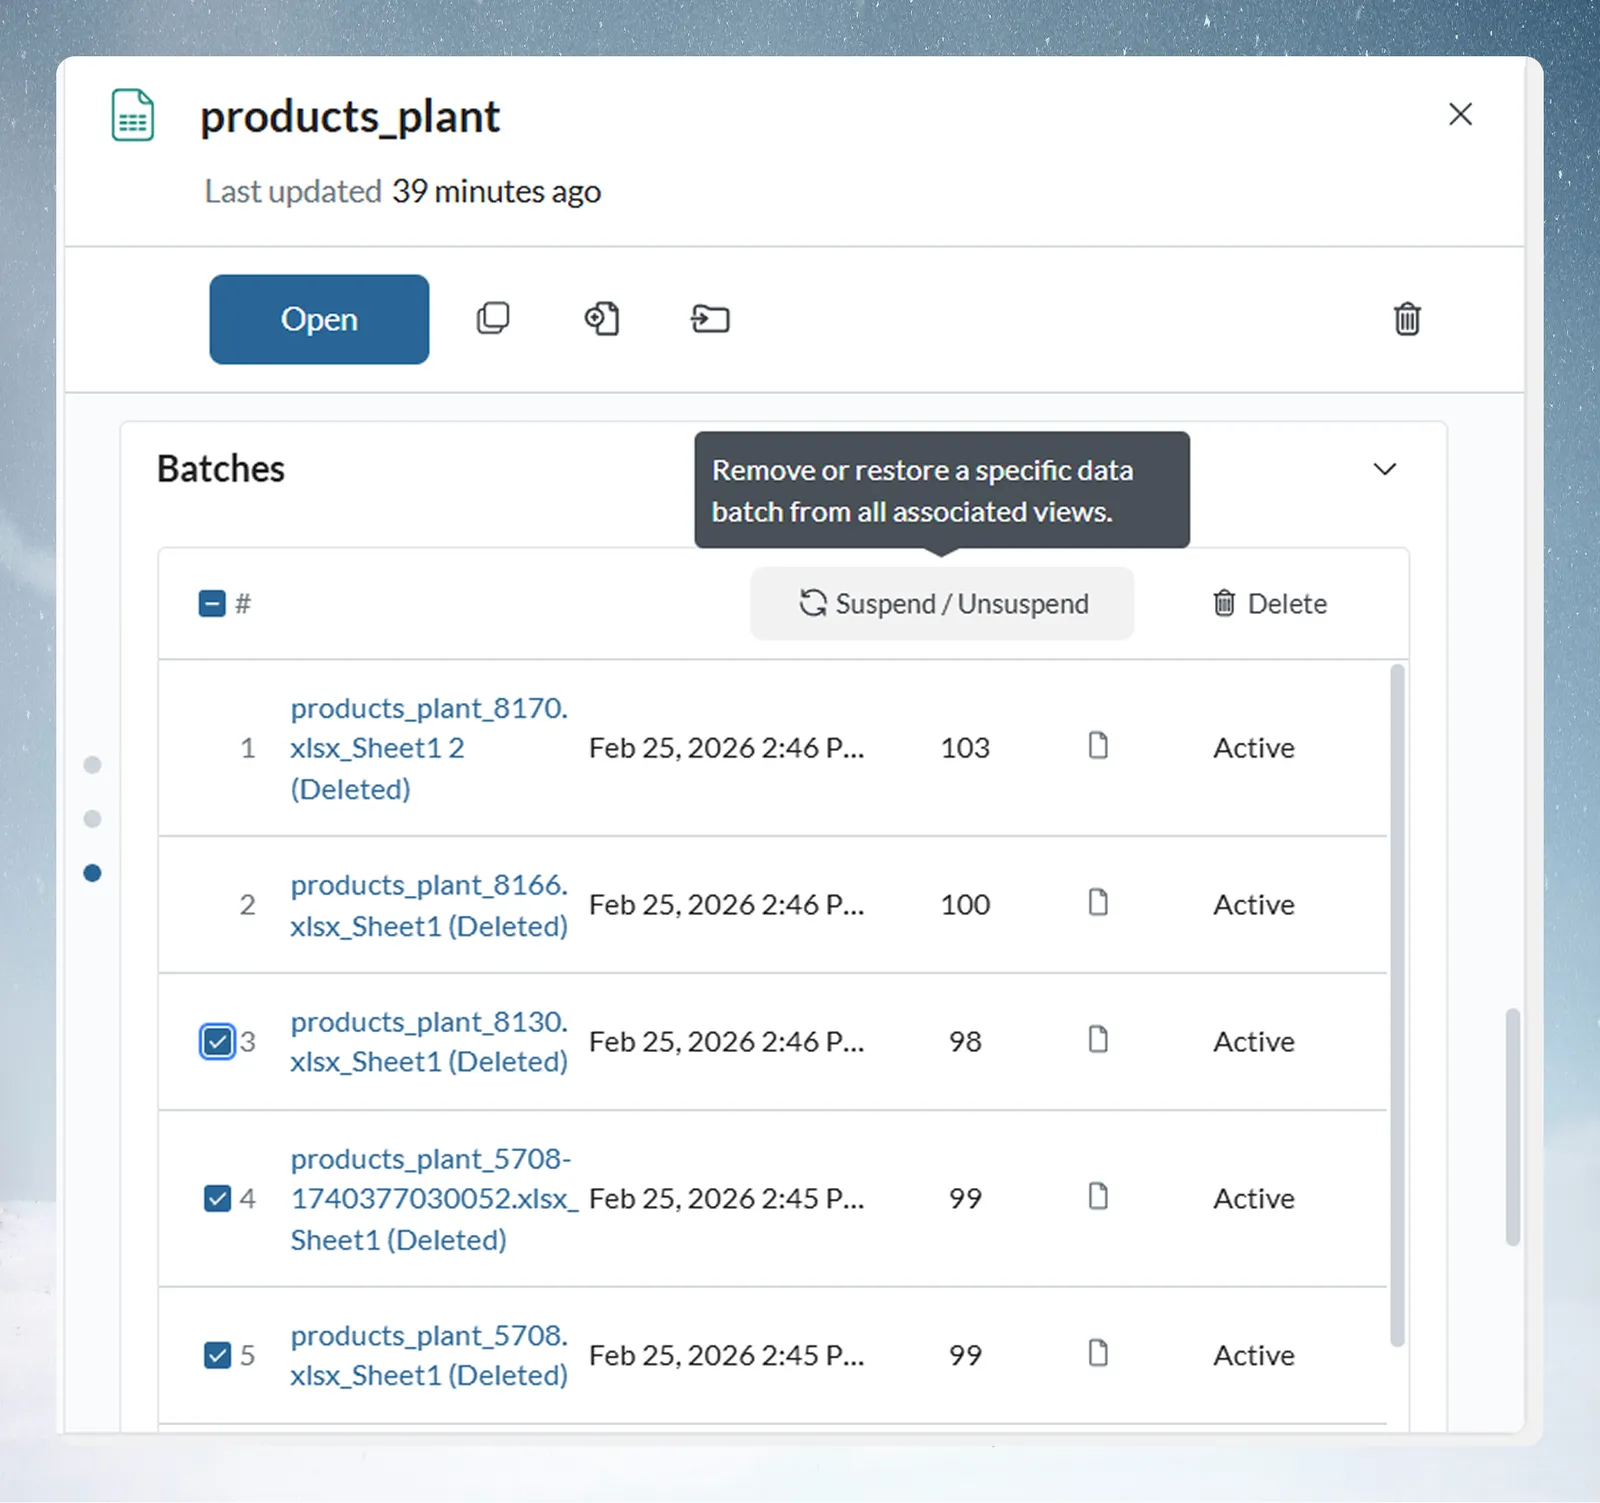
Batch lifecycle operations
Suspend
Temporarily disable a batch without deletion. Suspended batches are immediately excluded from Views and pipeline execution but can be reactivated with a single click. No data or metadata is lost.
Best for: Impact testing, data quality quarantine, seasonal exclusions, and rollback preparation before committing to a permanent removal.
Remove
Permanently delete a batch with the Delete button. This action is irreversible and requires confirmation. Use Remove only when data is no longer needed for analysis or compliance.
Best for: Data quality cleanup, outdated data exclusion, and compliance-driven retention policy enforcement. A retention policy can also delete batches for you.
| Property | Suspend | Remove |
|---|---|---|
| Data Preserved | Yes | No |
| Metadata | Yes | Yes |
| Recovery | Instant (one-click) | Not recoverable via UI. Batches removed by a retention policy are also permanent; their metadata stays in the Activity Log |
| Best Use | Temporary exclusion, testing | Permanent exclusion |
Batch retention policy
A retention policy deletes or suspends batches automatically so a dataset doesn't keep growing. Each dataset can have one policy. Whether you can set one up depends on your plan.
To create a policy, expand Batches (N) in the dataset's preview panel and select Set up retention policy below the batch list. The Retention Policy dialog offers three rule types:
- Time-based: Delete or suspend batches older than a number of minutes, hours, days, weeks, or months. The default is to delete batches older than 90 days.
- Count-based: Keep the latest N batches and delete or suspend the rest. The default is 10.
- Condition-based: Describe the rows to remove in plain language, then select Generate to create a condition shown as SQL. Select Test config to see how many rows across how many batches match. This rule permanently deletes matching rows and cannot suspend.
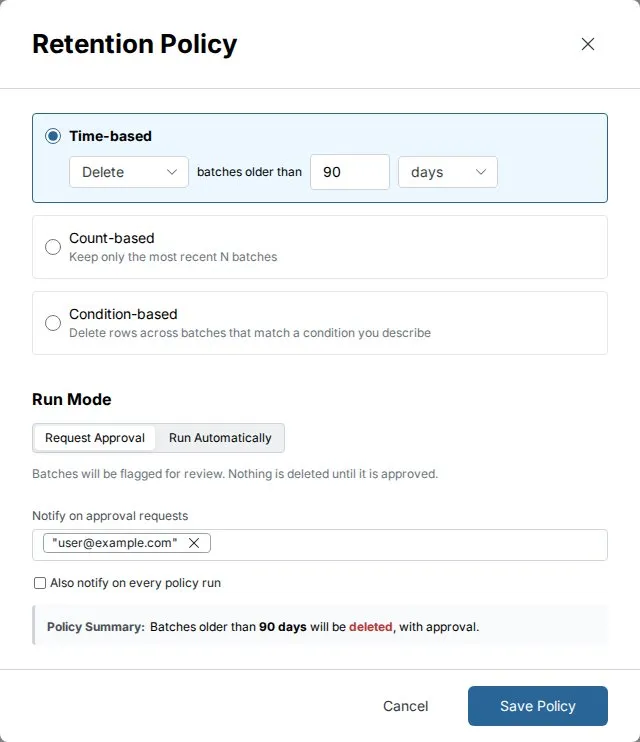
Set Run Mode to one of:
- Request Approval (default): The policy flags batches for review, and nothing is deleted or suspended until someone approves.
- Run Automatically: The policy deletes or suspends matching batches on schedule without approval. When the action is delete, Mammoth asks you to confirm with Save and run automatically, because deleted batches can't be recovered.
Add at least one recipient to notify. Recipients get an email for approval requests, and you can select Also notify on every policy run in approval mode. The Policy Summary at the bottom of the dialog restates the rule in a sentence. The policy runs daily.
Review and approve
Once a policy exists, a banner at the top of the Batches section shows its status (Active, Suspended, or the number of batches pending), the rule summary, the last run, and the next run.
- Run Policy runs the policy now. With approval required, it requests approval; with Run Automatically, it executes immediately.
- Approve All, or Delete N batches / Suspend N batches, approves the pending batches. Pending rows show a Delete or Suspend button and the state Pending Delete.
- Configure (the gear icon) opens the policy to edit, disable, or select Delete Policy. Deleting the policy leaves the dataset and its existing batches unchanged.
In Monitor, Pending Retentions lists policies waiting for a decision with Review and Approve, and Active Retentions shows policies that are currently deleting or suspending. The Activity Log records Data Retention runs.
Exposing batch information as columns
Batch metadata can be surfaced as regular dataset columns, making it available for filtering, grouping, and analysis across all Views. This is particularly useful when working with multi-batch datasets where identifying which batch a row belongs to is critical for analysis.
Accessing the batches view
The Batches view—and the Add Batch Info to Dataset action inside it—is reachable from four places:
-
Data Library—Batches section. Open the dataset preview panel from the Data Library, select Batches from the section navigation. This shows the full batch inventory table (Name, Date, Row Count, Source, State) with Suspend / Unsuspend and Delete actions, plus Add Batch Info to Dataset below the batch list.
-
Data Editor—Column Manager. Open the dataset View and launch the Column Manager from the inline action bar at the left edge of the data grid. Click Add batch info to open the field-selection panel (this entry point opens the field-selection panel only, not the full batch inventory table).
-
Data Editor—Pipeline Source card. At the top of the pipeline panel, the Source step shows your originating file or connection. Click the ⓘ info icon at the right of the Source card to open a Batches modal with the same inventory table, Suspend / Unsuspend and Delete actions, and Add Batch Info to Dataset link. This icon is disabled until the dataset has been saved.
-
Data Editor—Manage dataset settings. In the view tab bar at the bottom of the Data Editor, click the settings control labeled Manage dataset settings. This opens the same Dataset Settings page used by the Data Library preview panel—select Batches from the left panel to reach the same inventory table and Add Batch Info to Dataset link.
Selecting metadata fields
Regardless of the access point, the same selection panel appears. Choose one or more of the following fields to add as columns:
- Batch ID
- Date
- Source (JSON)
- Name
- Row Count
Fields already added are ticked; clear one to remove its column. Click Submit to confirm. All added columns are automatically prefixed with batch_[column name] and applied across all Views of the dataset.
Note: Adding batch columns affects all Views of the dataset, not just the current View.
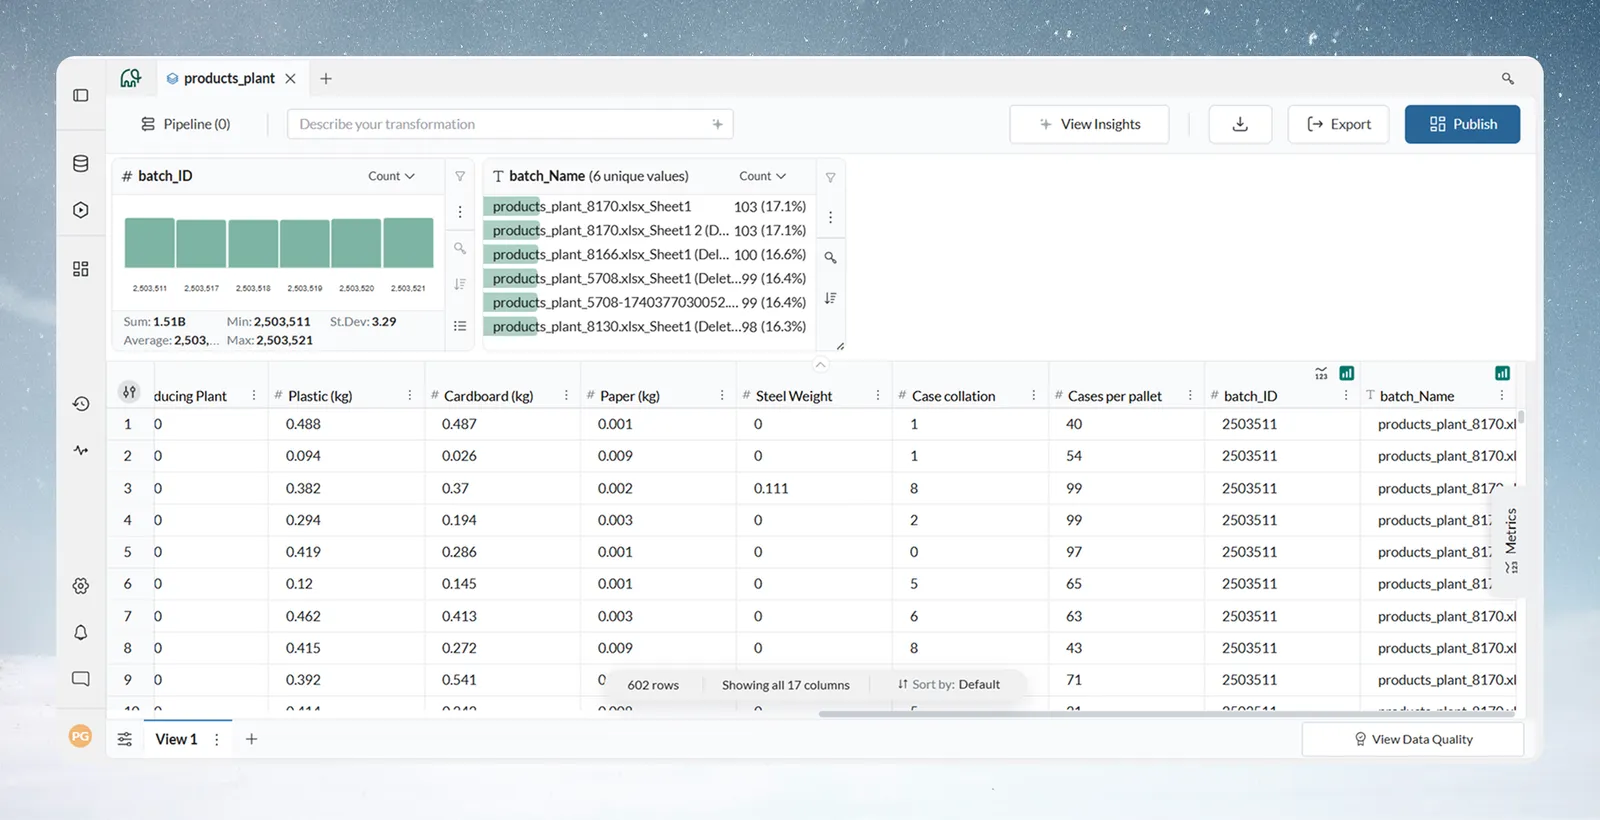
Batch management best practices
Choosing combine vs replace
Use Combine when:
- Building reports requiring historical comparison
- Accumulating transactional data over time
- Multiple data sources contribute to a unified view
- Audit trails and compliance documentation are required
Use Replace when:
- Only the current state matters (inventory, pricing, status)
- Dataset size must remain consistent
- Previous data becomes obsolete daily or weekly
- Real-time dashboards require the latest data only
Batch naming strategies
Use meaningful, consistent filenames before upload. Batch names are derived from filenames and are your primary tool for filtering and identifying data sources later.
Sales_North_Region_Q2_2024.csv—descriptive and sortabledata_export_final_v3.csv—avoid: no context, no date, ambiguous version
Recommended convention: Location_YYYY_MM_DD.csv—creates meaningful batch names and enables easy filtering by location or date range.
Troubleshoot batches
Column mapping issues on Combine
Verify column names for case sensitivity and spacing. Use manual mapping override for non-standard column names and confirm data types match between batches.
Unexpected row counts
Check whether Combine or Replace mode was selected. Review batch-level row counts in the Batches section and look for duplicates across batches.
Batch not visible in analysis
Confirm the batch shows as Active in the Batches section. Check whether the batch was accidentally suspended and verify that transformations re-ran after the batch was added.
Historical data missing after batch addition
Check whether Replace mode was selected accidentally (irreversible). Look for suspended batches in the Batches section, check whether a retention policy removed them, and review the Activity Log for removal actions.
Batch not showing updated data after Replace
Hard-refresh the browser (Ctrl+Shift+R on Windows, Cmd+Shift+R on Mac) and confirm the Replace operation completed successfully in the Activity Log.