REST API
The REST API connector imports data from any HTTP/HTTPS JSON endpoint into Mammoth as a dataset. Unlike other connectors that authenticate to a specific service, this connector lets you connect to any REST API endpoint—internal services, SaaS APIs, custom backends, or public data sources.
Setting up a REST API connection defaults to an AI-assisted chat: describe the API in plain language and Mammoth's assistant asks for the URL, credentials, and other details it needs, testing the connection as it goes. A Classic form is also available if you'd rather fill in every field yourself—click Classic form at any point during the chat to switch.
Before you start
You need:
- The base URL of the API you want to connect to (e.g.,
https://api.example.com) - Authentication credentials if the API requires them (API key, Bearer token, Basic auth credentials, or an OAuth 2.0 app's client ID and secret)
- Knowledge of the API endpoint path and expected response structure
Step 1: Select the REST API connector
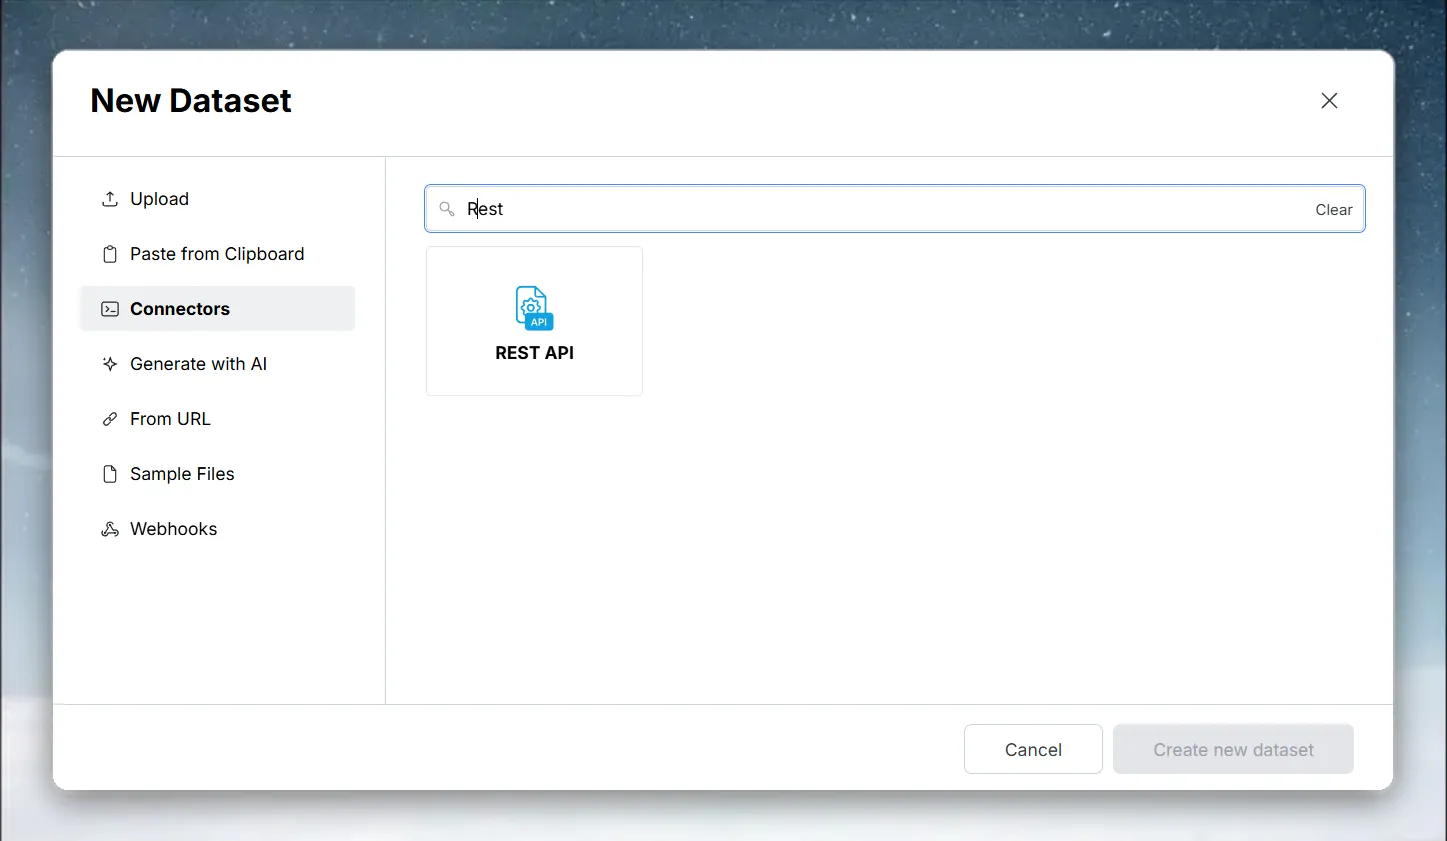
- In Mammoth, go to Data Library and click + New Dataset
- Select Connectors
- Search for REST API
- Click the REST API tile
Step 2: Set up the connection with the AI assistant (default)
By default, Mammoth opens a chat panel—Mammoth Analytics AI Assistance—instead of a static form.
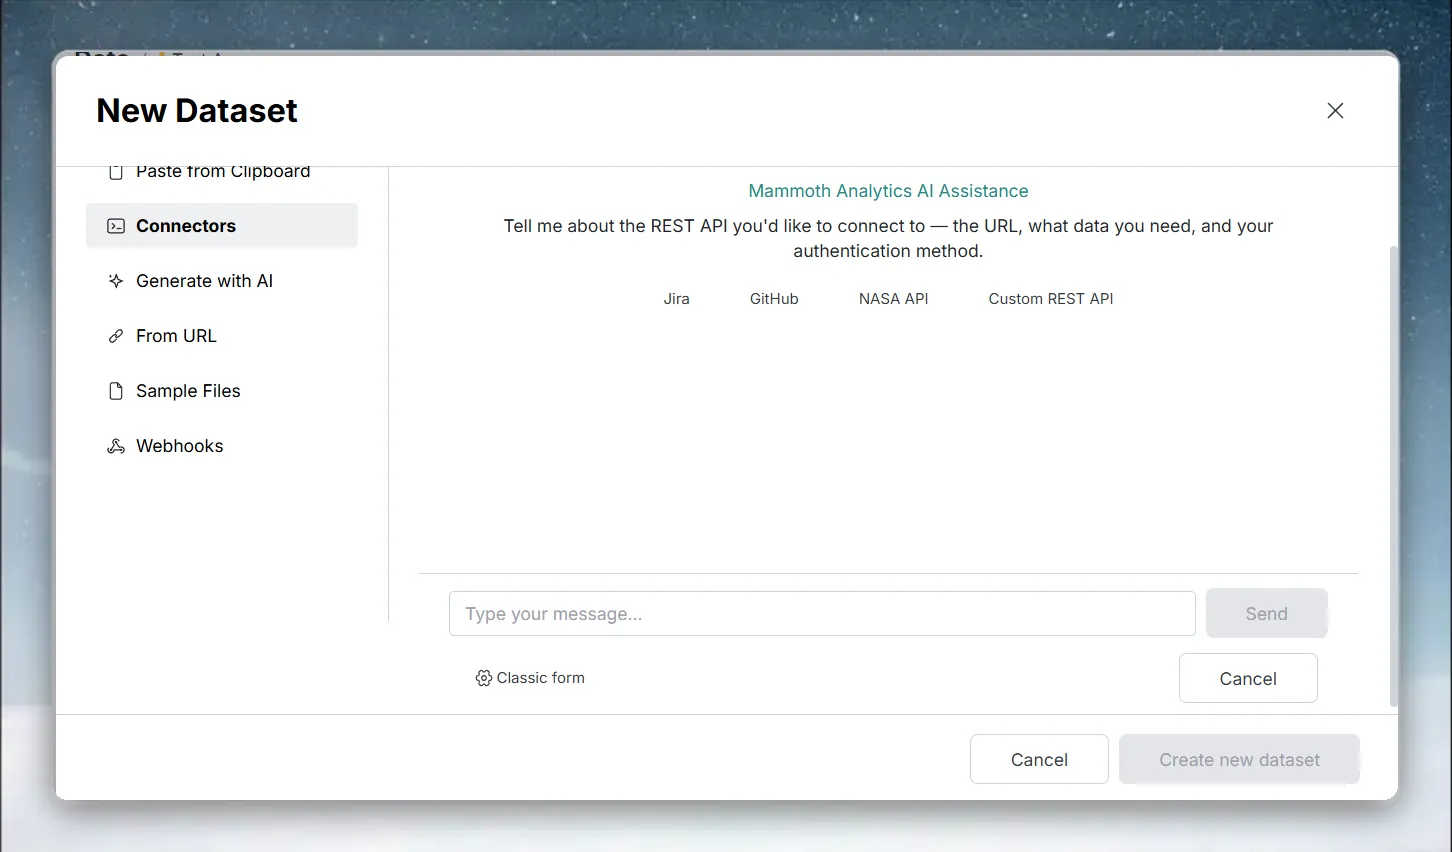
- Type what you want to connect to and why—for example, "Connect to the NASA API and pull the astronomy picture of the day"—or click one of the example chips (Jira, GitHub, NASA API, Custom REST API) to start from a template
- The assistant asks follow-up questions as needed (base URL, endpoint, auth type) and may show an inline credential form in the chat when it needs a key, token, or username/password—fill it in and click Submit without leaving the conversation
- For OAuth-based APIs, the assistant shows an Authorize Access button that sends you to the provider's login in the same browser tab; once you approve access, you return to Mammoth and the chat resumes
- The assistant tests the connection and endpoint for you—messages such as "Connection test passed" or "Connection test failed" and "Endpoint test passed" or "Endpoint test failed" appear inline, along with a Sample data preview when the test succeeds
- If you already have a saved REST API connection, the assistant may show a connection picker so you can reuse it, or click Connect new account to create a new one
- Once the assistant confirms the setup, it may ask you to choose which columns to keep (Select columns to import). Click Apply, or Skip / Keep all to keep every column
- Click Done once the dataset is created
Tip: Switch to the classic form anytime. Click Classic form in the chat panel to switch to the traditional field-based setup described below instead—useful if you already know the exact configuration and want to skip the conversation.
Step 3: Or configure the connection manually (classic form)
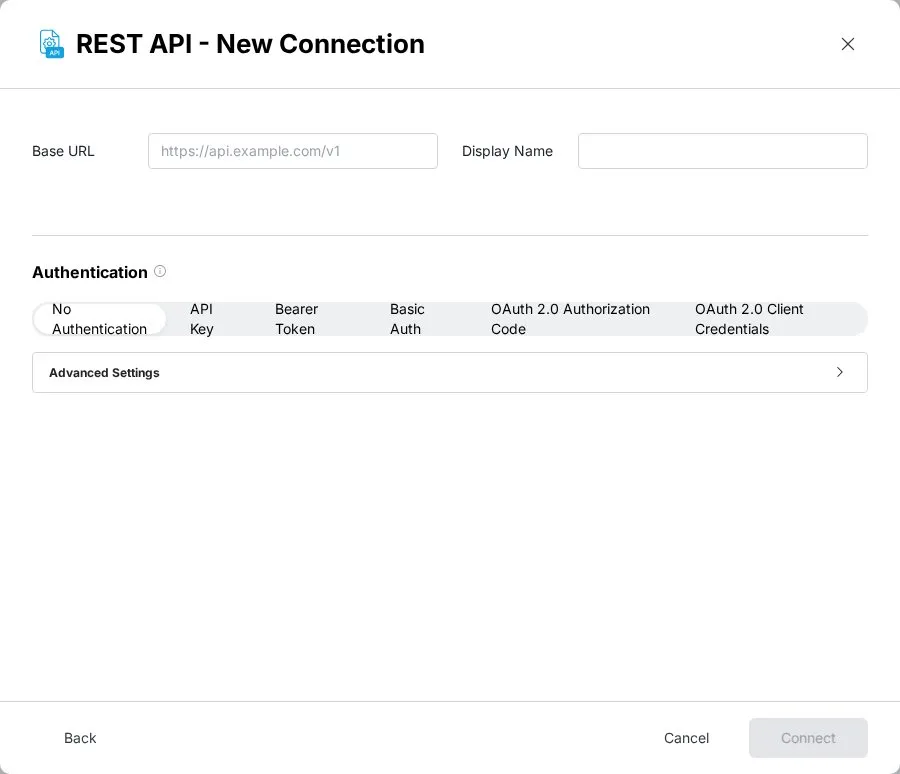
Click Classic form to open the field-based connection setup instead of the AI chat. The REST API - New Connection dialog opens.
Basic settings
| Field | Description | Example |
|---|---|---|
| Base URL | The root URL for all requests—endpoint paths are appended to this | https://api.example.com/v2 |
| Display Name | A label for this connection (defaults to the Base URL if left blank) | Example API |
Authentication
Select the authentication type used by your API:
| Auth Type | When to use | Fields required |
|---|---|---|
| No Authentication | Public APIs with no authentication | — |
| API Key | APIs that accept a key in a header or query parameter | Key Name and Key Value (Param Name and Param Value for a query parameter); choose Header or Query Parameter |
| Bearer Token | APIs that use Authorization: Bearer <token> | Bearer Token |
| Basic Auth | APIs that use HTTP Basic authentication | Username and Password |
| OAuth 2.0 Authorization Code | APIs that require a full OAuth 2.0 login flow | Client ID, Client Secret, Authorization URL, Token URL, and optional Scopes |
| OAuth 2.0 Client Credentials | Server-to-server APIs that issue a client ID and secret | Client ID, Client Secret, Token URL, and optional Scopes |
API Key placement
- Header—sends the key as a request header (for example,
X-API-Key: your-key-here) - Query Parameter—appends the key to the URL (for example,
?api_key=your-key-here)
OAuth 2.0 Authorization Code adds three extra fields under Advanced Settings: Redirect URI (defaults to https://redirect.mammoth.io/redirect/oauth2 if left blank), a Client Auth Method selector (Client Secret POST or Client Secret Basic), and a Use PKCE (Proof Key for Code Exchange) toggle for providers that require or support PKCE. Clicking Connect with this auth type sends you to the provider's login page in the same browser tab rather than saving immediately. OAuth 2.0 Client Credentials has no browser sign-in: Mammoth requests the access token from the Token URL.
Advanced settings (optional)
Expand Advanced Settings to configure:
| Setting | Description | Default |
|---|---|---|
| Timeout (sec) | How long Mammoth waits for a response before timing out | 30 |
| Rate Limit (req/s) | Maximum requests per second to send (helps avoid API rate limits) | Unlimited |
| Verify SSL Certificate | Verify the server's SSL certificate | Enabled |
Click Connect to save the connection (or to start the OAuth redirect, for OAuth 2.0 Authorization Code). If saving fails, the error message appears at the bottom of the dialog.
Step 4: Configure the REST API endpoint
After saving the connection, select it under Existing Connections. The Endpoint Configuration screen opens, where you configure the specific endpoint to import data from.
Endpoint settings
| Field | Description | Example |
|---|---|---|
| Endpoint Path | The path appended to your base URL | /users or /reports/daily |
| HTTP Method | The request method | GET (default) or POST |
| Request Body | JSON body for POST requests | {"start": "2024-01-01"} |
Mammoth shows the full URL (base URL plus endpoint path) in a callout as you type the endpoint path.
Data root path
The Data Root Path tells Mammoth where to find the array of records within the JSON response. Most APIs return data nested inside a wrapper object.
| Response structure | Data Root Path |
|---|---|
Top-level array: [{...}, {...}] | $ (default) |
Nested: {"data": [{...}, {...}]} | $.data |
Deeply nested: {"result": {"items": [...]}} | $.result.items |
After testing the endpoint, Mammoth suggests available root paths based on the actual response structure—click a suggestion to apply it automatically.
Flatten nested JSON
The Flatten Nested JSON toggle (enabled by default) converts nested objects into flat columns using dot notation. For example, a field {"address": {"city": "NYC"}} becomes a column named address.city.
Step 5: Configure REST API pagination (optional)
If the API returns data across multiple pages, configure pagination so Mammoth fetches all records.
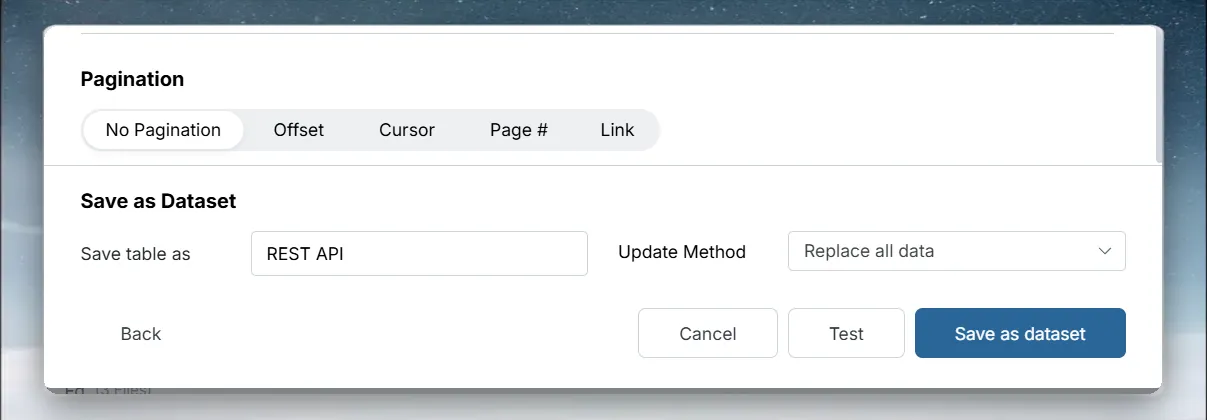
Select a pagination type:
| Type | Use when | Required settings |
|---|---|---|
| No Pagination | API returns all data in one response | — |
| Offset | API uses limit and offset query parameters | Page Size (default 100) |
| Cursor | API returns a cursor token for the next page | Cursor Path (where to find the next cursor in the response) |
| Page # | API uses a page query parameter | Page Size (default 100) |
| Link | API returns pagination links in the Link HTTP header (RFC 5988) | — |
Advanced pagination settings
Click Advanced options to expand:
- Limit Param and Offset Param—customize if the API uses non-standard names (for example,
countinstead oflimit) - Cursor Param—customize the query parameter name for the cursor value
- Page Param—customize the query parameter name for the page number
- Max Pages—set a limit to stop fetching after N pages (useful for large datasets during testing). Leave it empty to fetch all pages
Step 6: Test and save the REST API dataset
Click Test to run a sample request. Mammoth shows:
- The HTTP status code (for example,
200 OK) - A success or error message
- Suggested data paths: based on the response—click one to use it as the Data Root Path
In the Save as Dataset section, enter a name in Save table as, choose an Update Method (Replace all data or Add new data), and click Save as dataset. The dataset appears in the Data Library.
REST API configuration examples
Public API with no auth
Base URL:        https://api.open-meteo.com
Endpoint Path:   /v1/forecast?latitude=40.71&longitude=-74.01&hourly=temperature_2m
Data Root Path:  $.hourly
Pagination:      No Pagination
SaaS API with a Bearer token and cursor pagination
Base URL:        https://api.example.com/v2
Auth:            Bearer — your-token-here
Endpoint Path:   /events
Data Root Path:  $.data
Pagination:      Cursor — cursor path: $.next_cursor
Internal API with an API key header and offset pagination
Base URL:        https://internal.mycompany.com/api
Auth:            API Key → Header → X-API-Key: secret-key
Endpoint Path:   /records
Data Root Path:  $.results
Pagination:      Offset — page size: 500
Troubleshoot REST API connections
Test returns 401 or 403
- Check the authentication type and credentials are correct
- For API Key auth, confirm whether the key should go in a Header or Query Parameter—check your API documentation
The request times out
- The API may be slow to respond—increase the Timeout (sec) value in Advanced Settings
- Check that the Base URL is reachable from the internet (some internal APIs require VPN or IP whitelisting)
Data root path not found
- Use the suggested paths shown after a successful test
- Check the raw JSON response structure in your API documentation or test the endpoint in a tool like Postman first
Only partial data imported
- If the API uses non-standard parameter names (for example,
countinstead oflimit), click Advanced options under Pagination and update the parameter names to match - Set Max Pages to a small number (for example, 5) to verify pagination is working before importing the full dataset
SSL certificate error
- Disable Verify SSL Certificate in Advanced Settings if you're connecting to an internal API with a self-signed certificate