First-time workspace setup
This guide is for Workspace Owners, IT administrators, and team leads setting up a new Mammoth workspace. It covers general settings, team invitations, project structure, and API access, in four steps. Start with Before you begin, then follow Step 1 through Step 4.
What is a workspace?
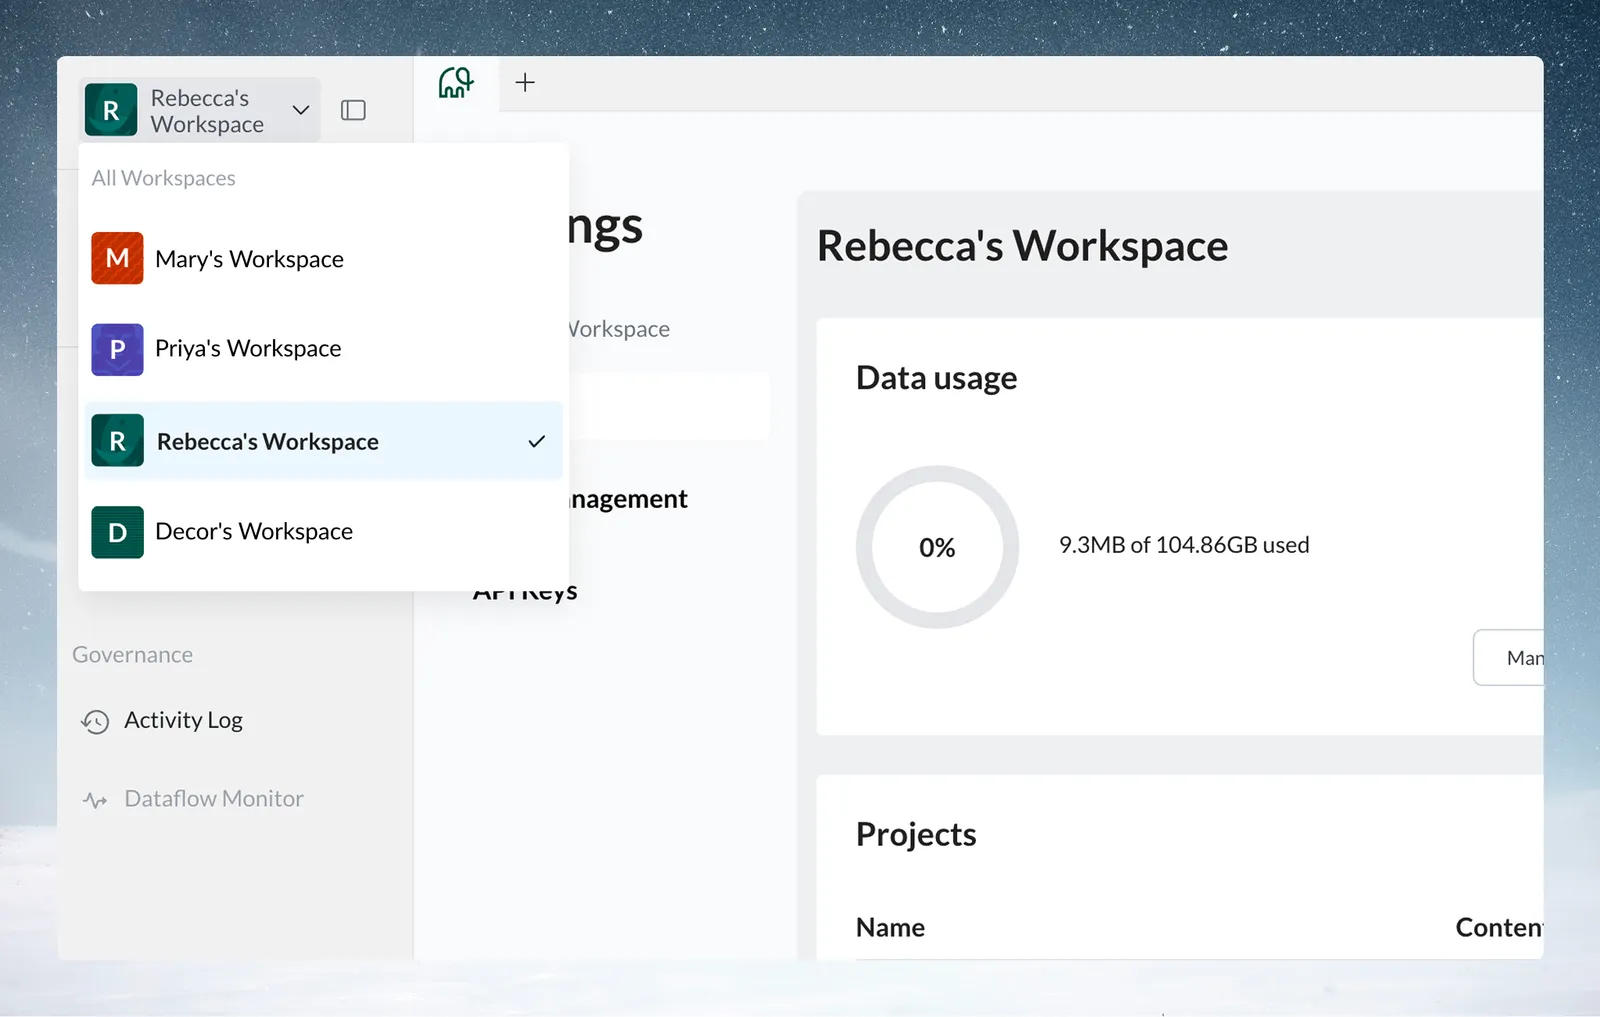
A workspace in Mammoth is tied directly to your subscription and billing. It contains all your projects, datasets, users, and security settings.
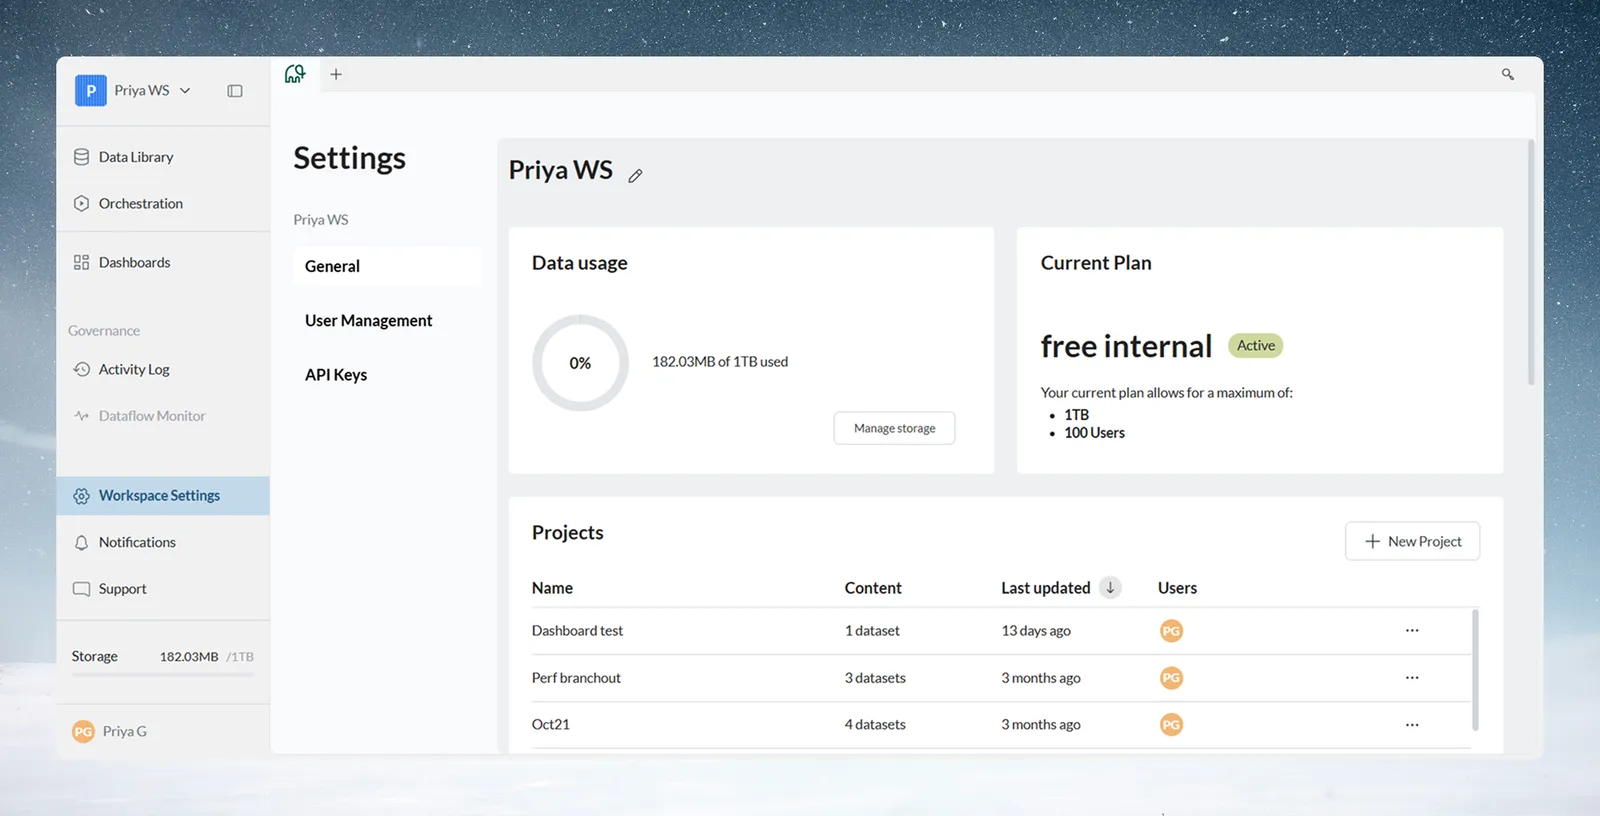
The person who creates the workspace becomes the Workspace Owner, with administrative control that includes billing management, user invitations, and API keys. Workspace Members are team members you invite, with permissions based on their roles.
Profile: Your identity across workspaces
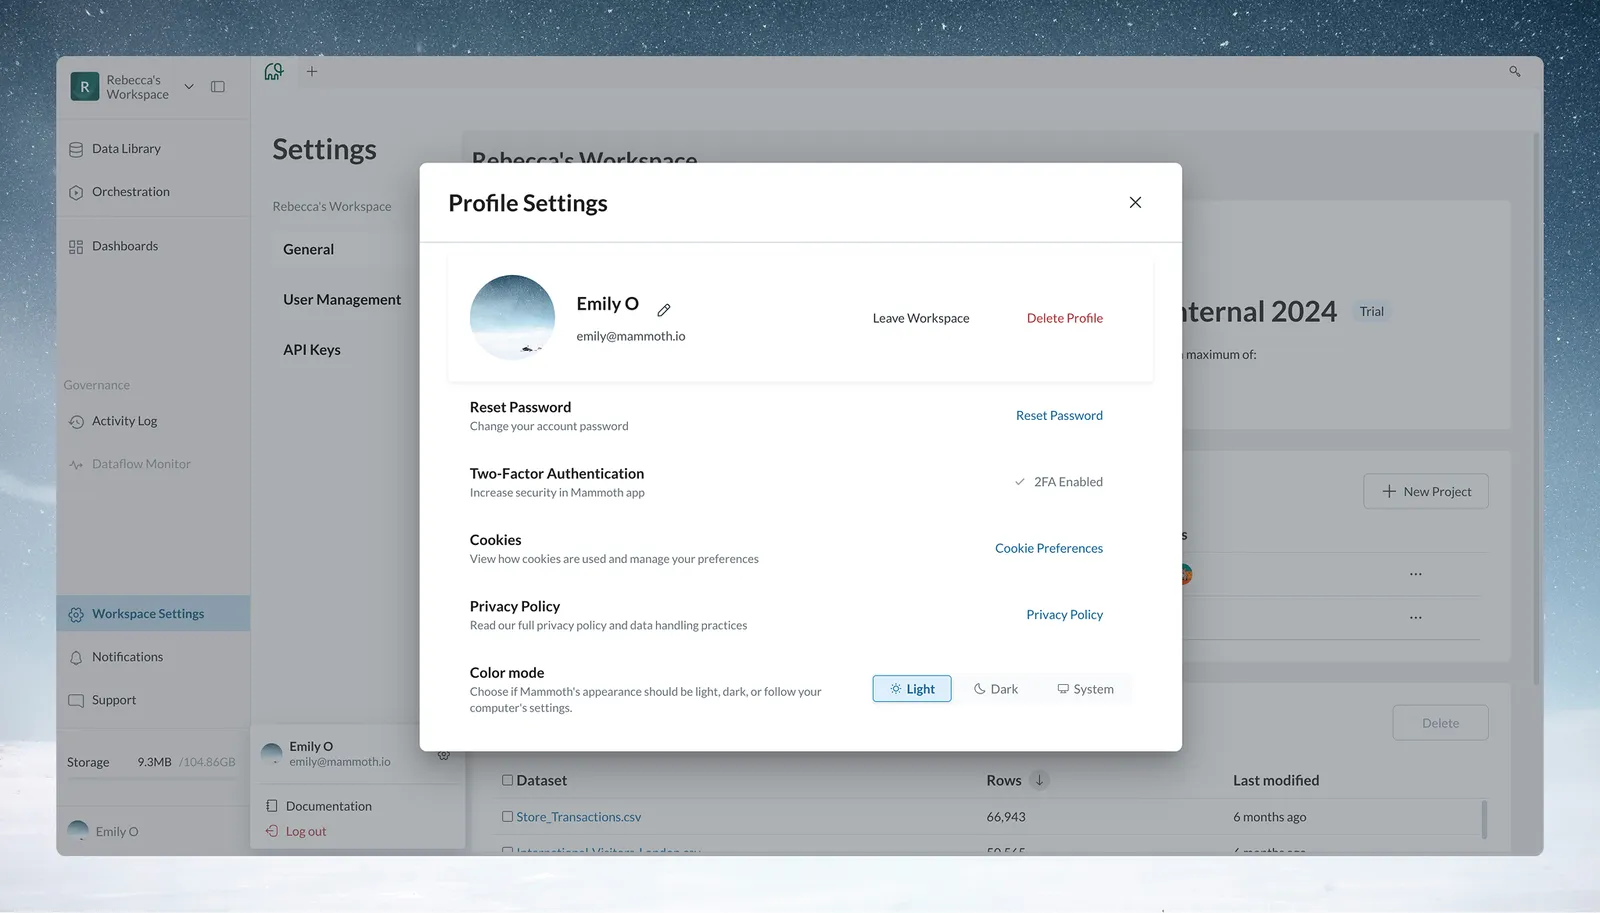
A Profile is your personal Mammoth account tied to your email address. It represents your identity across the platform.
Your Profile controls sign-in credentials and MFA, personal settings, and access to one or more Workspaces.
One Profile can access multiple Workspaces, but it does not contain data itself. Data always lives inside a Workspace.
Analogy: A Profile is like an employee badge. It gives you access to buildings, but it isn't the building.
Who should complete the workspace setup
The Workspace Owner, an IT administrator, or the team lead responsible for data operations should complete this setup. The person needs authority to decide team structure, security policies, and project organization.
Before you begin
Gather the following information before starting your workspace configuration:
- Team members list: Names, email addresses, and intended roles for each person
- Project structure plan: Organize by department, client, or workflow based on your organization
- Data sources inventory: Databases, APIs, and cloud storage you'll connect to
- Security requirements: SSO, MFA, or IP restrictions for your organization
- Integration needs: API usage or connections to external tools like Tableau or PowerBI
Choose a project structure pattern
Three common patterns suit different organizations:
Department-based structure: Sales, Finance, Operations with each department as a separate project. Best for organizations where teams work independently on their own data.
Client-based structure: Client_A, Client_B, Internal projects. Ideal for consulting firms or agencies managing data for multiple clients.
Process-based structure: Raw_Data, Transformation, Reporting projects following your data pipeline flow. Works well for centralized data teams managing organizational workflows.
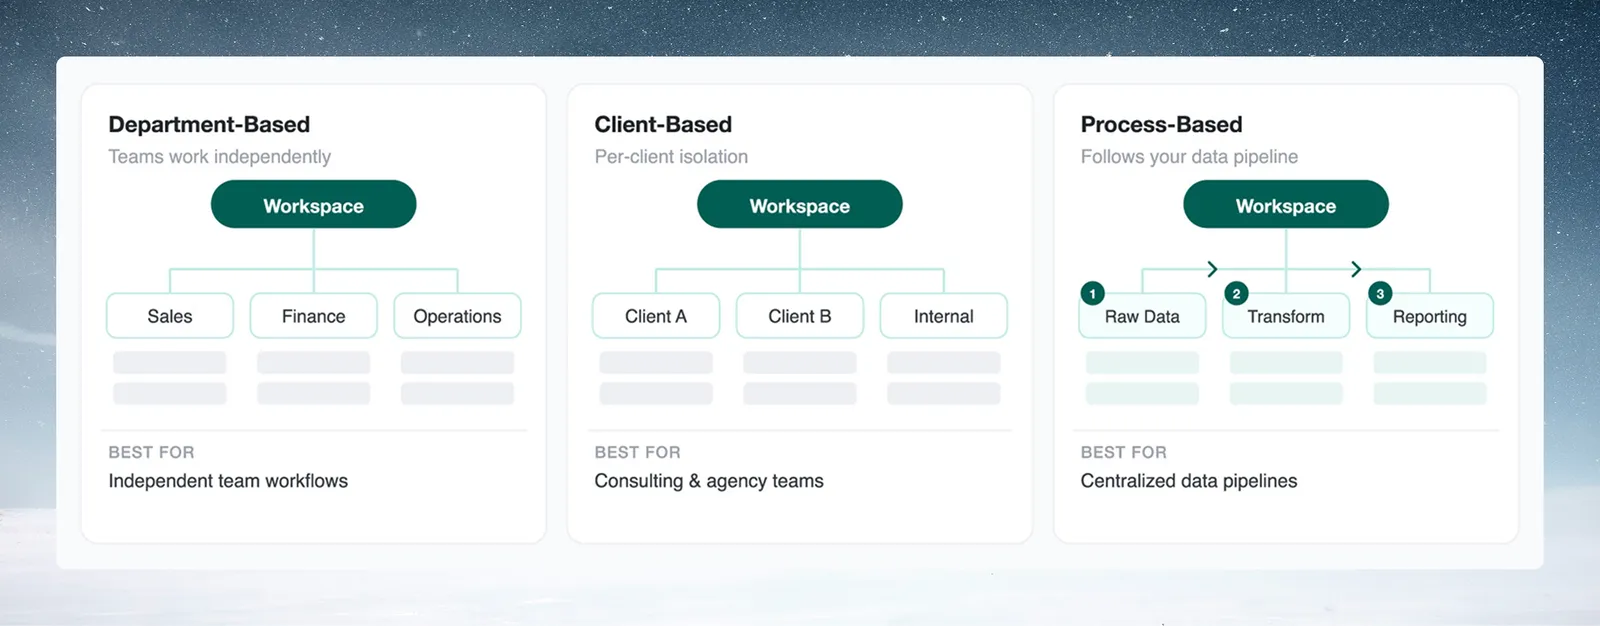
Start with two or three projects. You can add more later.
Open Workspace Settings
Click Workspace Settings at the bottom of the left sidebar. The settings page opens with a list of sections on the left.
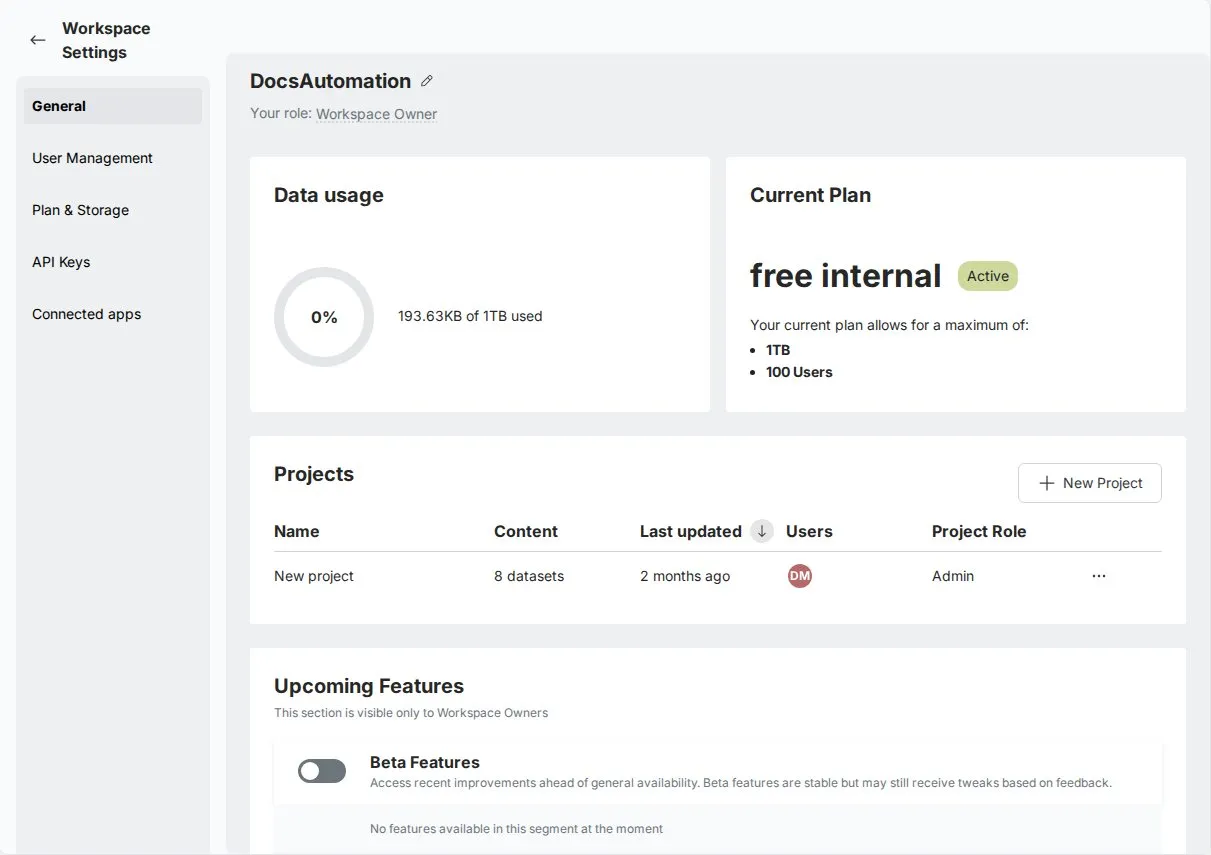
The settings are organized into these sections:
- General: Workspace name, storage usage, current plan, projects, and upcoming features
- User management: Inviting team members and managing roles
- API keys: Programmatic access to Mammoth, external AI provider keys, and OAuth apps
- Plan & storage: Subscription plan details and storage management
- Connected apps: Third-party apps you allowed to access your Mammoth data
Step 1: Configure general settings
The General section provides an overview of the workspace.
Rename the workspace
Update the workspace name using the pencil icon. Use a clear and identifiable name to help users distinguish between multiple workspaces.
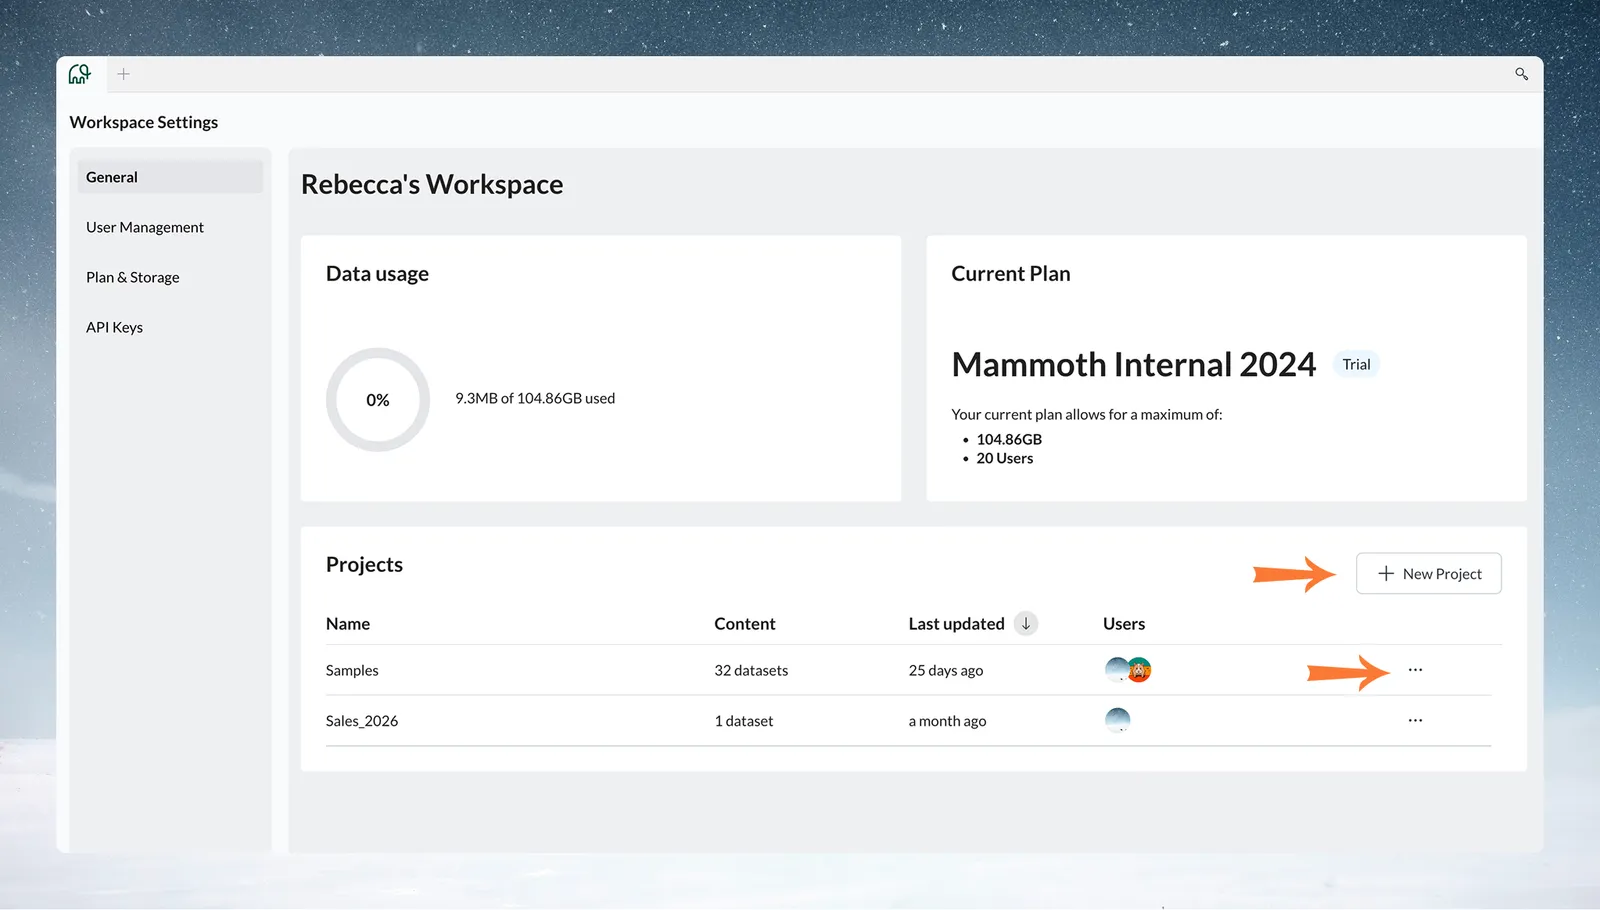
Storage usage and plan
- Storage usage: Displays current storage consumption for the workspace
- Current plan: Shows the active subscription plan
These sections are read-only and provide visibility into workspace status.
Projects in General settings
View all projects within the workspace along with their dataset count, last updated time, and assigned users. Create new projects using New Project or access additional actions from the overflow menu (⋯).
Step 2: Invite your team
Invite team members and assign roles from the User Management section. Assigning the right role at the start prevents permission issues later.
Prerequisite: You are a Workspace Owner.
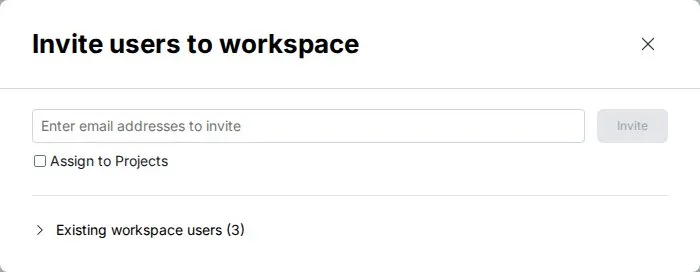
Invite users to the workspace
- Click the Invite Users button in the User Management section
- Enter email addresses for team members you want to invite
- You can add multiple addresses separated by commas, semicolons, spaces, or on separate lines
- Optionally check Assign to Projects and pick the projects invited users should join
- Click Invite
Expected result: Invited users receive an email invitation.
Workspace and project roles
Workspace Member is the default and safest starting role for most team members. They can work with data in projects where they're specifically granted access.
Project Admin should be assigned to department heads or team leads who will manage specific projects and add people to their teams.
Project Editor is appropriate for data analysts and business users who will work with data but won't manage project access or team membership.
Workspace Owner is the person who created the workspace. Another user can be promoted to Owner later with Make workspace owner in the user's three-dot menu, and a workspace can have multiple Owners.
Recommended starting role
Start everyone as Workspace Member and give them Project Admin or Project Editor roles once you've created projects. This prevents access to data before project boundaries are established.
Invited team members create their Mammoth accounts from the email invitation and gain access to your workspace.
Step 3: Projects in a workspace
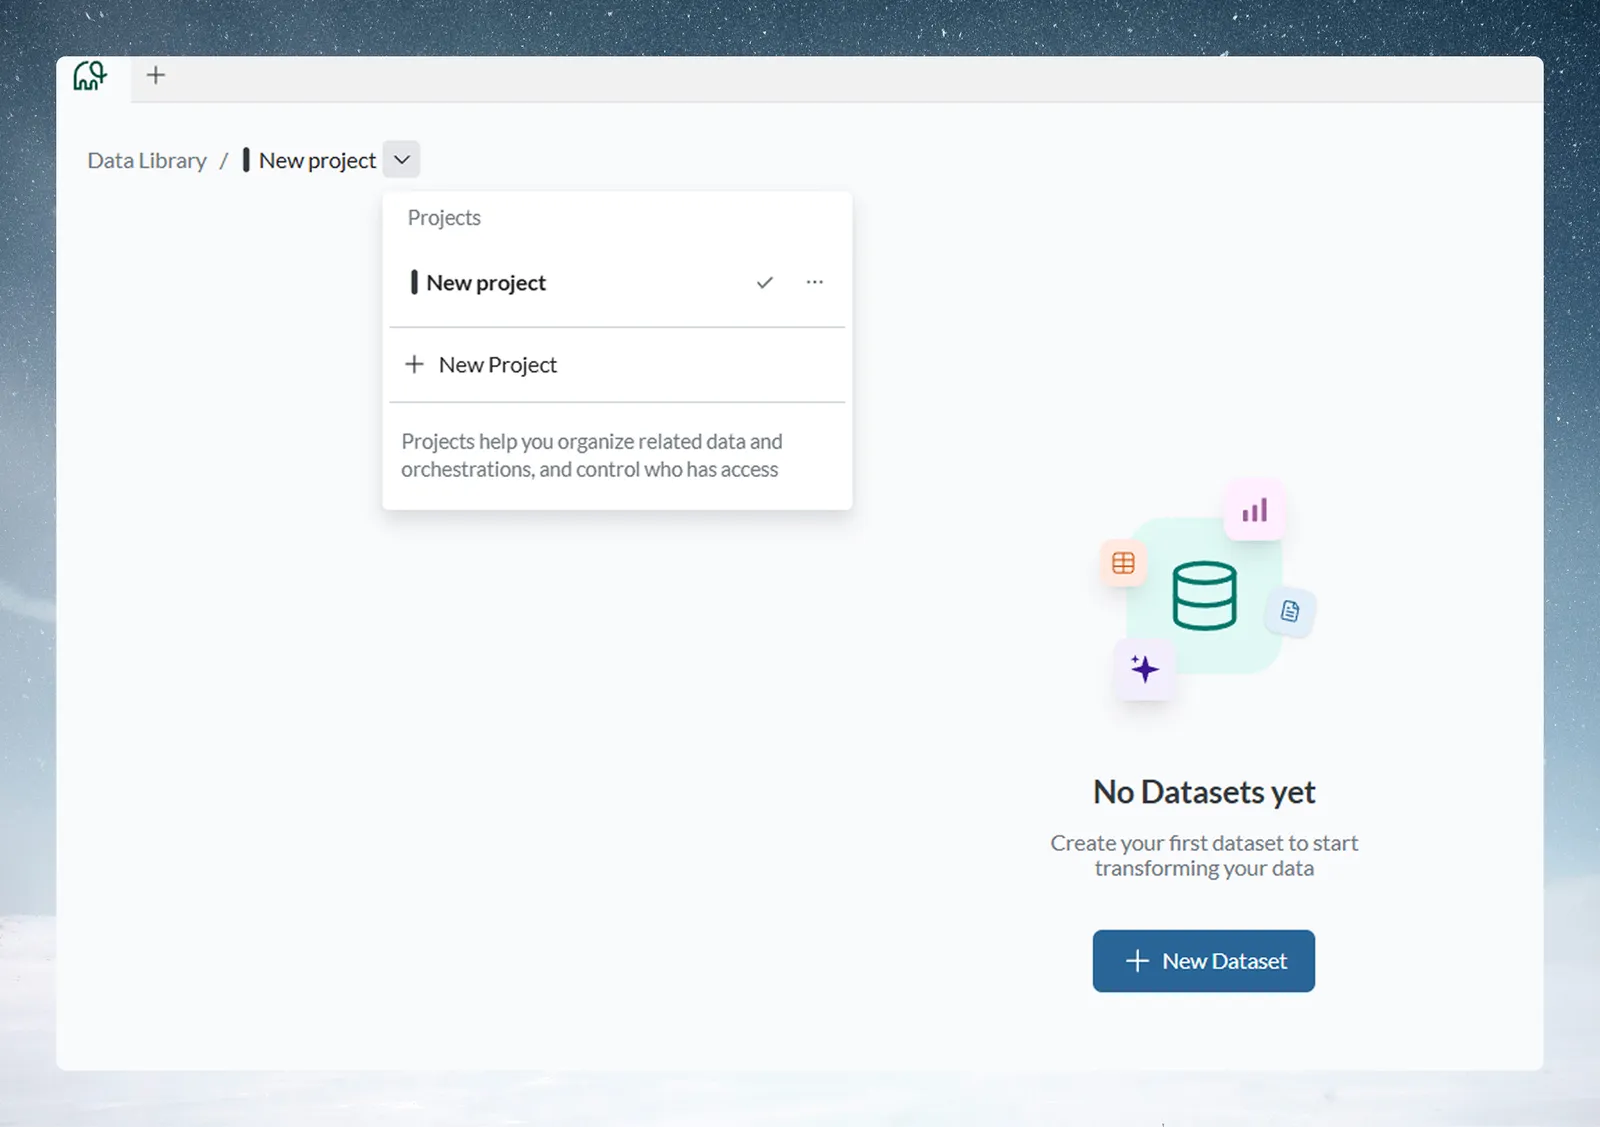
When a workspace is created, Mammoth automatically creates a default project named New project. This lets you start working without creating a project first.
You can rename, manage, or delete this project, or create additional projects as needed.
Default project behavior
- Every workspace includes a pre-created project called New project
- You are assigned as Project Admin by default
- The project can be renamed, managed, or deleted from the project menu
Managing projects
To manage a project, go to the Data Library and click the project selector (the dropdown arrow next to the current project name). Each project in the list shows an overflow menu icon (...) on hover.
What you see in this menu depends on your role within that project:
Project Admins see the full set of options:
- Project Settings: rename the project, set how it handles dates, and control who can access it
- Manage Users: add or remove workspace members and assign their project roles
- Leave Project
- Delete Project
Project Editors see only:
- Leave Project
- Delete Project, greyed out
Project Settings and Manage Users are not visible to Editors. If you cannot see these options, you have been added to the project as an Editor. Contact your Project Admin to request a role change.
Configuring project settings
Project Admins access Project Settings from the project overflow menu. The modal contains these configuration areas:
Project Name: Rename the project at any time. Use clear, descriptive names that indicate purpose. Examples: SALES_Pipeline, CLIENT_Acme, Q3-Analysis.
Set how this project handles dates: Check this box to choose how dates are read in CSV, Excel, and PDF files uploaded to the project (Day first or Month first), and the starting format for new date columns in the project. This is particularly useful when ingesting data from multiple sources with inconsistent date formatting.
Who can access: Controls project visibility and membership. Three options are available:
- Everyone in this workspace: All workspace members can see and access this project without a specific invitation. Use this for shared reference data or company-wide reporting projects.
- Some people in this workspace: Only selected individuals can access this project. When you choose this option, a user list appears showing all workspace members. Check the box next to each person you want to add and assign their role (Admin or Editor) from the dropdown. Use this for department-specific or client-specific projects where data should be restricted.
- Only me: The project is private and visible only to you. Use this for personal analysis, experimentation, or sensitive work in progress.
Click Save changes to apply your settings.
Expected result: The project uses the new name, date handling, and access setting.
Recommended starter projects
A Sandbox or "Testing" project** for experimentation without affecting production data. Team members can practice transformations and test pipelines here safely.
At least one production project based on your organizational pattern:
- Department-based: Create your first department project
- Client-based: Create your first client project
- Process-based: Create your raw data ingestion project
A "Shared Resources" project for data that multiple teams need access to, such as company-wide reference data, organizational hierarchies, or common lookup tables.
Project naming conventions
- Use clear, descriptive names that indicate the project's purpose
- Include department names or client identifiers
- Consider using prefixes to group related projects visually
- Examples:
SALES_Pipeline,SALES_Reports,CLIENT_Acme,CLIENT_Beta
Each project isolates its data. Live Connections and datasets in one project cannot be accessed from other projects.
Step 4: Configure API access
API keys enable integration with external tools such as Tableau, Power BI, custom applications, and automation workflows. Decide whether you need API access before generating keys.
Check whether you need API access
You need API access if you are:
- Integrating with BI tools (Tableau, Power BI, Looker)
- Building custom applications that consume Mammoth data
- Automating data workflows with external systems
- Using programmatic data access for advanced use cases
Skip this step if your team will only use the Mammoth web interface at first. You can generate API tokens later.
Create an API token
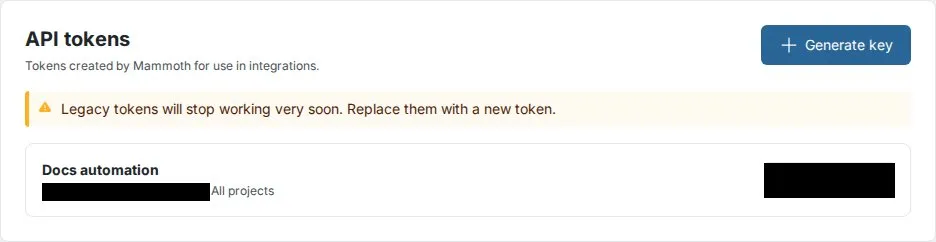
- Open the API keys section and click Generate key in the API tokens card
- In the Create API key dialog, enter a descriptive name like "Tableau Integration" or "Production Automation"
- Optionally turn on Project scoped and select a project to limit the key to that project
- Click Create key
- Click Copy secret, then Done
- Store the secret securely in your password manager or secrets management system
Mammoth displays the secret only once. If you lose it, generate a new key.
Add external API keys for AI features
To use AI-powered transformations such as Generative AI or advanced text processing, configure an external API key:
- Go to the API keys section
- Click Add external key
- Select the AI provider and click Next
- Choose the model
- Enter a key name and your API key
- Click Add External Key
Expected result: The key appears in the External API Keys table.
Treat API tokens like passwords. Don't commit them to code repositories, share them over unsecured channels, or store them in plain text files. Delete unused tokens.
Post-setup checklist
Confirm that you have completed these configuration steps:
- Workspace name configured
- Team members invited with roles matching their responsibilities
- Initial projects created
- API tokens generated if integration needs were identified during planning
- External API keys added for AI features if using Generative AI or advanced text processing
Next steps after configuration
After configuring the workspace:
- Wait for team acceptance: Team members need to accept invitations and sign in
- Upload first dataset: Create a Live Connection or upload files
- Build first pipeline: Apply transformations (see the Quick start)
- Set up an automation: Automate recurring data processing workflows
- Create first dashboard: Share insights with stakeholders
Ongoing workspace maintenance
Monthly tasks:
- Review user activity to identify inactive accounts or access issues
- Monitor storage usage (General section, under Storage usage)
Quarterly tasks:
- Audit the project structure against organizational needs
Security maintenance:
- Rotate API tokens periodically
- Review user permissions and remove access for departed team members
Common setup scenarios
Small team (5 to 10 users)
Structure:
- Flat organization with 3 to 5 projects by department
- All users as Workspace Members with manual project invitation
This approach suits teams where access is coordinated informally.
Enterprise department (50 or more users)
Structure:
- One workspace per major department
- 10 to 15 projects organized by function or team
- Mix of roles including Members and Project Admins
- API integration with enterprise systems
- MFA enforcement (a plan feature included on Pro)
This structure adds governance for larger organizations.
Consulting firm (multiple clients)
Structure:
- One workspace with client-based project isolation
- One project per client plus one internal project
- External users for clients with limited access
- API tokens for client reporting automation
- Strict project isolation preventing cross-client data visibility
Troubleshooting workspace setup
User didn't receive invitation email
- Check their spam or junk folder first
- Verify email address spelling in your invitation list
- Resend the invitation with Reinvite in the Invite users dialog
- Contact your IT department if corporate email filtering blocks external invitations
Can't find workspace settings
- Check the bottom of the left sidebar for Workspace Settings
- Confirm you're the Workspace Owner (most settings are Owner-only)
- Ask an existing Workspace Owner to make you an Owner if needed
Storage limit reached
- Check current usage in Workspace Settings → General → Storage usage
- Delete unnecessary datasets or batches no longer needed
- Upgrade your subscription plan for additional storage capacity
Team member can't access project
- Verify they've been invited to the workspace and activated their account
- Check project-specific permissions ensuring they've been granted access
- Ensure they completed account activation by clicking the invitation email link
API token not working
- Verify the token was copied correctly without extra spaces or line breaks
- Check that the key hasn't been removed in the API keys section
Related pages
For ongoing workspace administration, see Workspace management and Projects.