Creating a workspace
A workspace is your dedicated environment in Mammoth Analytics where you manage your data, projects, team members, and settings. Each workspace is isolated—users, data, and configurations are separate from other workspaces you may own or belong to.
This guide is for anyone creating their first workspace or adding another one. Start with What you'll need, then follow Step 1 through Step 5.
What you'll need
To create a workspace, you need:
- A Mammoth Analytics account: Sign up at mammoth.io if you don't have one yet
- A workspace name: Something descriptive, such as "Marketing Analytics", "Sales Dashboard", or "Product Data Lab"
How to create a workspace
Step 1: Find the workspace selector
- Sign in to Mammoth Analytics at app.mammoth.io
- Look at the top-left corner of the application, where your current workspace name appears with a dropdown arrow
Step 2: Open the Create New Workspace dialog
- Click the workspace dropdown (top-left) to see a list of your workspaces
- At the top of the dropdown, click + Create New Workspace
- A dialog appears where you enter your workspace name
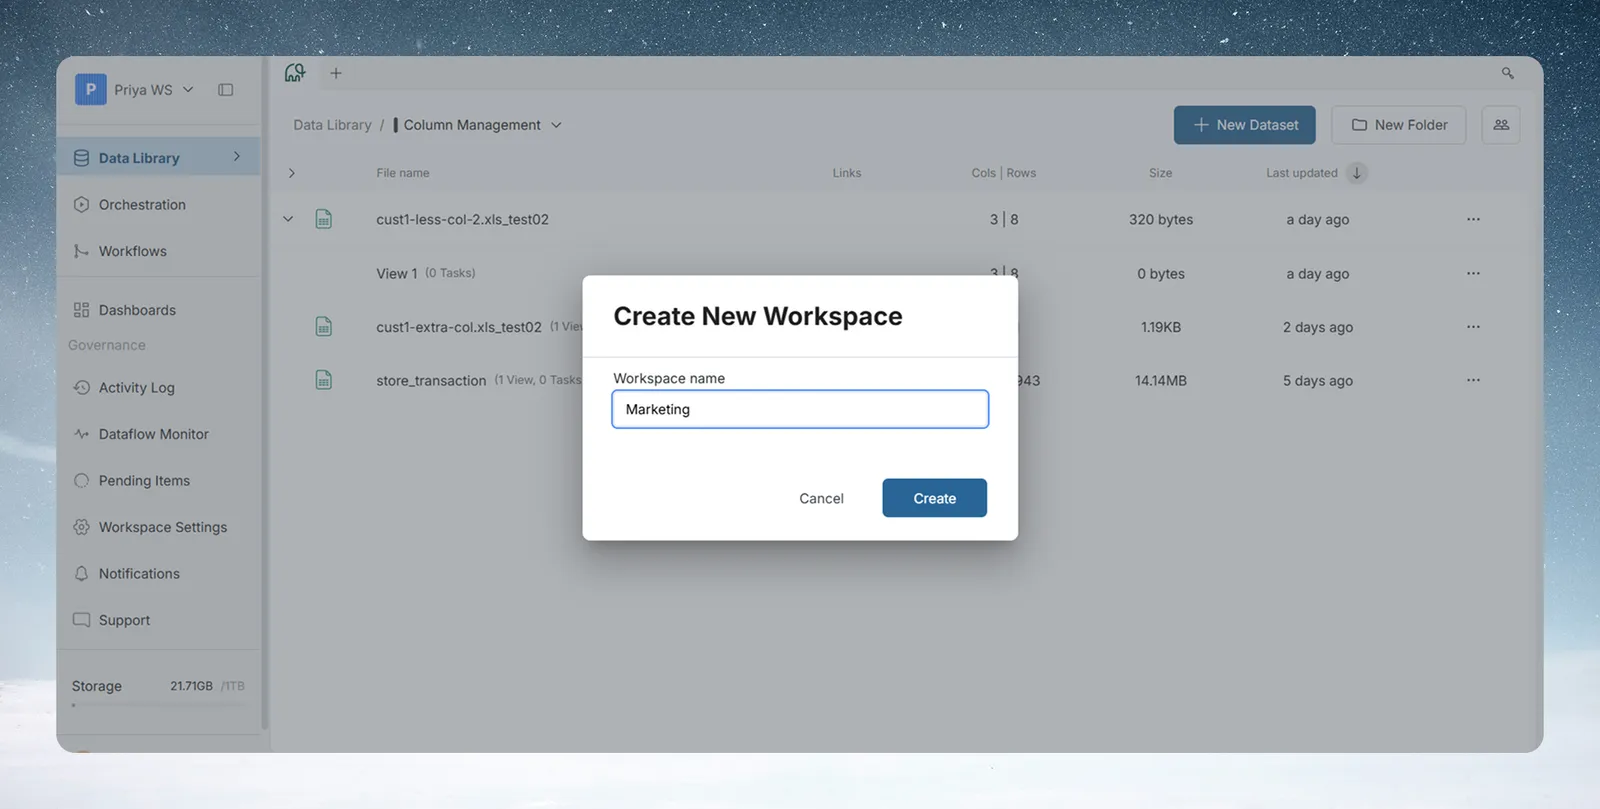
Step 3: Enter a workspace name
The dialog only asks for one thing:
| Field | Details |
|---|---|
| Workspace name | Enter a descriptive name. This appears in the top-left dropdown and all workspace management pages. Examples: "Marketing Analytics", "Sales Dashboard", "Product Data Lab" |
Click Create to proceed. There's no plan picker in this dialog. Plan selection happens on the next screen.
Step 4: Choose a plan
If the new workspace doesn't have a plan yet, Mammoth takes you to a plan-selection screen showing the available self-serve plans with a Monthly / Annually billing toggle. Each plan card has a trial button (for example, Start with Pro trial).
On this screen you either pick a plan, or use the Delete workspace link at the bottom to remove the workspace you just created. If you meant to switch accounts instead, use Log out in the same location.
Step 5: Start using the workspace
Expected result: Your workspace is created, and Mammoth switches you to it. You see:
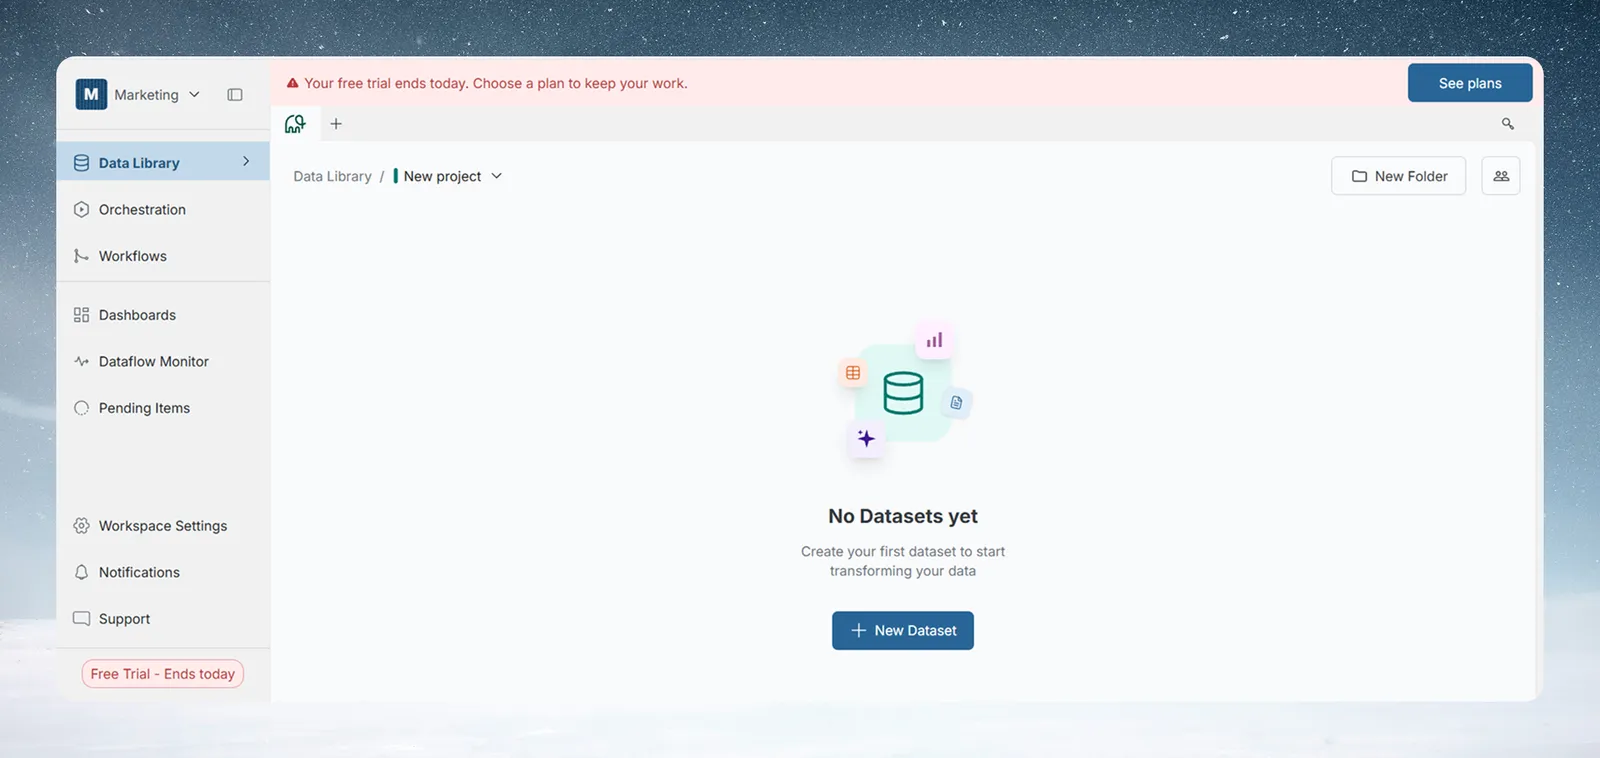
- Workspace name in the top-left dropdown, such as "Marketing"
- A default project named "New project", ready for data
- Data Library showing "No Datasets yet", ready for your first dataset
- Left sidebar with navigation (Data Library, Automations, Dashboards, etc.)
- Free Trial banner, if you are on a trial plan, showing when your trial ends
You can start uploading data immediately or create additional projects from the project selector in the top breadcrumb.
What happens after creation
Automatic setup
- Your new workspace is active immediately and ready to use
- You're automatically set as the Workspace Owner with full permissions
- A default project named "New project" is created automatically
Your new workspace includes
- Data Library: Ready to receive your first dataset
- Empty state: The Data Library shows "No Datasets yet" until you create a dataset
- Navigation sidebar with access to all Mammoth features (Data Library, Automations, Dashboards, etc.)
- Workspace name displayed in the top-left dropdown
- Plan information banner, if applicable: Shows plan status and any relevant alerts
Next steps
Once your workspace is created, you can:
| Task | Where to start |
|---|---|
| Invite team members | Workspace Settings → User Management → Invite Users |
| Upload your first dataset | Data Library |
| Upgrade your plan | Workspace Settings → Plan & Storage |
| Set up API access | Workspace Settings → API Keys |
| Create projects | Project selector in the top breadcrumb → New Project |
Workspace naming conventions
Choose workspace names that clearly describe their purpose:
Good names:
- "Marketing Analytics Q2-Q3"
- "Financial Reporting - FY2024"
- "Customer Insights - Product Team"
- "Sales Pipeline Dashboard"
Avoid vague names:
- "Workspace 1" or "Test"
- "My Data"
- Single letters
Plans and billing
Mammoth offers Free, Starter, Team, Pro, and Enterprise plans. Enterprise is arranged through sales. Paid plans can be billed Monthly or Annually. For current pricing and plan comparisons, see Workspace Settings → Plan & Storage or contact sales.
Changing your plan later
You can change or upgrade your plan at any time.
Prerequisite: You are a Workspace Owner.
- Go to Workspace Settings (bottom-left sidebar) → Plan & Storage
- Click the upgrade button
- Select a new plan and confirm
Expected result: Plan changes don't affect your data or projects.
Frequently asked questions
Q: Can I change the workspace name after creating it?
A: Yes. Go to Workspace Settings → General → click the edit (pencil) icon next to the workspace name.
Q: How many workspaces can I create?
A: You can create multiple workspaces. Each workspace is independent and has its own plan.
Q: What if I forget my workspace name?
A: Click the workspace dropdown (top-left) to see all workspaces you own or belong to.
Q: Can I delete a workspace after creating it?
A: Yes, self-serve. You don't need to contact support. Go to Workspace Settings → Plan & Storage and click Delete workspace, or use the Delete workspace link if you're still on the plan-selection screen. You need the Workspace Owner role. Mammoth asks you to confirm that you understand this cancels your subscription and deletes your workspace.
Q: Do I lose my old workspace when I create a new one?
A: No. All your workspaces remain accessible in the workspace dropdown. You can switch between them anytime.
Q: What if the workspace creation fails?
A: Check:
- Your internet connection is stable
- You have an active Mammoth Analytics account
- Try refreshing the page and retrying
If issues persist, contact Support.
Related articles
- Workspace settings: Manage workspace name, users, plans, and API keys
- Creating a project: Organize your data into projects
- User management: Add collaborators to your workspace
- Plan and storage: Upgrade your plan and manage storage
Need help? Check the troubleshooting guide or contact Mammoth Support.