Add a connector with the connector workspace
This page shows how to bring data from any connector into Mammoth: find the source in the Connectors launcher, connect it, pick the tables and columns you want in the connector workspace, and save them as a dataset. Every connector page links here for the shared steps and adds only what is specific to that source.
Open the Connectors launcher
- Go to the Data Library and click New dataset.
- In Where do you want to add data from?, choose Connectors.
You can also go to Data → Connections and click New Connection, which opens the same launcher on its own.
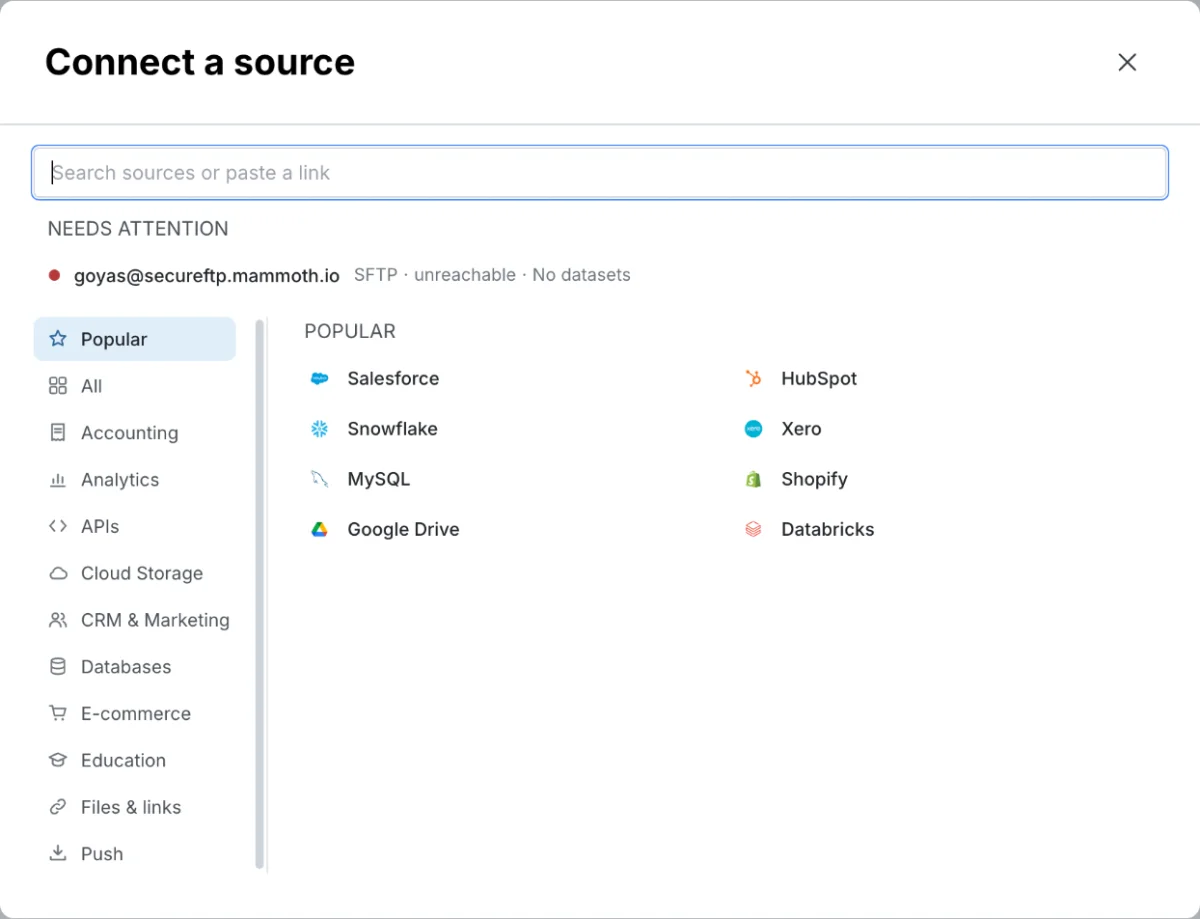
The launcher has a search box (Search sources or paste a link) and a list of sources grouped in a left-hand menu:
- Popular: your existing connections (Your connections) and the most-used sources
- All: every connector on your plan
- One entry per category, such as Databases, Cloud Storage, CRM & Marketing, Analytics, E-commerce, Accounting and APIs
- Files & links: a file at a URL
- Push: a webhook that other systems send data to (see Webhooks)
If you type a source Mammoth has no connector for, the launcher offers Build {source} with the agent, which builds a connector for an API (see REST API).
Connect the source
What happens when you click a source depends on its type:
- Databases and warehouses (PostgreSQL, MySQL, SQL Server, Oracle Database, Amazon Redshift, Snowflake, Google BigQuery, Databricks, Apache Hadoop, SAP HANA, MongoDB): the connection form opens first. Fill in the fields listed on the connector's page and click Connect. Once Mammoth has connected, the connector workspace opens on your tables.
- Every other source (cloud apps, drives, file servers): Mammoth opens the connector workspace straight away with the Chat open. The chat starts by connecting the source and shows a card that asks for the connection details, or a button to sign in to the service. Fill it in or sign in.
- An existing connection under Your connections: the workspace opens on that connection, with nothing to re-enter.
Analysts who can't create connections see New sources are added by this project's admins. and can click Copy a request to send an admin what they need.
Work in the connector workspace
The connector workspace is a page in the Data Library (Data → Connections) with three parts. On a narrow screen they appear as the tabs Tables, Your table and Chat; on a wide screen they sit side by side.
Tables
The list of tables, objects or files the connection can read. Use Filter tables to narrow it.
- For a database, click a table to open its rows with the query that read them above. See Query and preview database data for the SQL view.
- For a cloud app (CRM, marketing, accounting, analytics), click a table to see its columns and sample rows, then tick the columns you want. Ticked columns gather in Your table.
- For a drive or file server, browse the folders and open a file. A spreadsheet opens to its tabs. If a file can't open in the panel yet, ask the agent in the chat to import it.
If a table you expect is missing, click Refresh list, or ask the agent in the chat to find it.
Your table
The table you are building, with one column for each column you ticked. Each column header shows which table it comes from. You can rename a column by clicking its name. Click Preview 100 rows to see sample rows before saving.
Chat
This connector's chat. Ask it what you want in the table, or what a source returns, and it can pick tables and columns for you. Clicks you make in Tables show up in the chat. On a database, the chat starts closed: click Ask AI to open it.
Save the data as a dataset
- Click Save as dataset.
- Enter a Dataset name and pick the folder under Save in.
- Choose how the dataset stays current under Keep it up to date:
- For a cloud app or Google Sheets: Daily or Manual.
- For a database query: Daily at 06:00 or Only when I ask, and what happens On each refresh (see Choose what happens on each refresh).
- For a file from a drive or file server, the dataset is saved once: Mammoth shows Saved once. Scheduled refresh for files is coming. To bring in new files on a schedule, use a File Collection automation.
- Click Save (for a database query, the button in the dialog is Save as dataset).
Mammoth reads the source in full, which can take a few minutes for a large table. You can leave the page while it saves. When it finishes, click Open dataset.
For a database query, choosing Daily at 06:00 creates a Dataset Refresh automation named Daily refresh · {dataset name}, whose first run is the next morning. You can change its schedule later under Data → Automation.
Pick up a connector you didn't finish
A connector you open but don't save stays as a draft. The launcher lists drafts at the top with their state, such as Not connected yet or Connected · pick your columns. Click Continue on a draft to reopen it.
Connections that need attention, such as an expired key, appear under Needs attention with a Fix button that opens the connection on the Data → Connections page.
Related pages
- Connectors: every connector and its page
- Query and preview database data
- Network requirements & IP whitelisting
- Dataset Refresh