Add rows to a dataset or replace its data
The Add data dialog loads new data into a dataset you already have. You can add new rows on top of the existing data, or replace it, from a file upload or from another dataset in the project. Open the dataset's panel in the Data Library and click Add data ("Append a batch, or swap the file for a newer one"). You need Edit-level access to the dataset.
Use it to:
- load the latest period into a running dataset (add);
- swap a dataset's data for a refreshed export (replace);
- merge two datasets that share the same columns.
To put the rows of two or more datasets together from the list (tick them, then Combine), see Combine datasets. Its Batches in one dataset option finishes in this dialog.
Note: The operation runs in the background. You don't need to wait on the dialog. Track progress in the Batches section of the dataset panel (under Settings & history) or in the Activity Log.
Open the Add data dialog
- In the Data Library, click a dataset row to open the dataset panel.
- Click Add data.
You can also choose Add data from the row's ⋯ menu, or from the Batches section under Settings & history.
Add data is offered for datasets you upload files into. Datasets fed by a connection offer Retrieve instead, and datasets that follow a file link offer Get the latest.
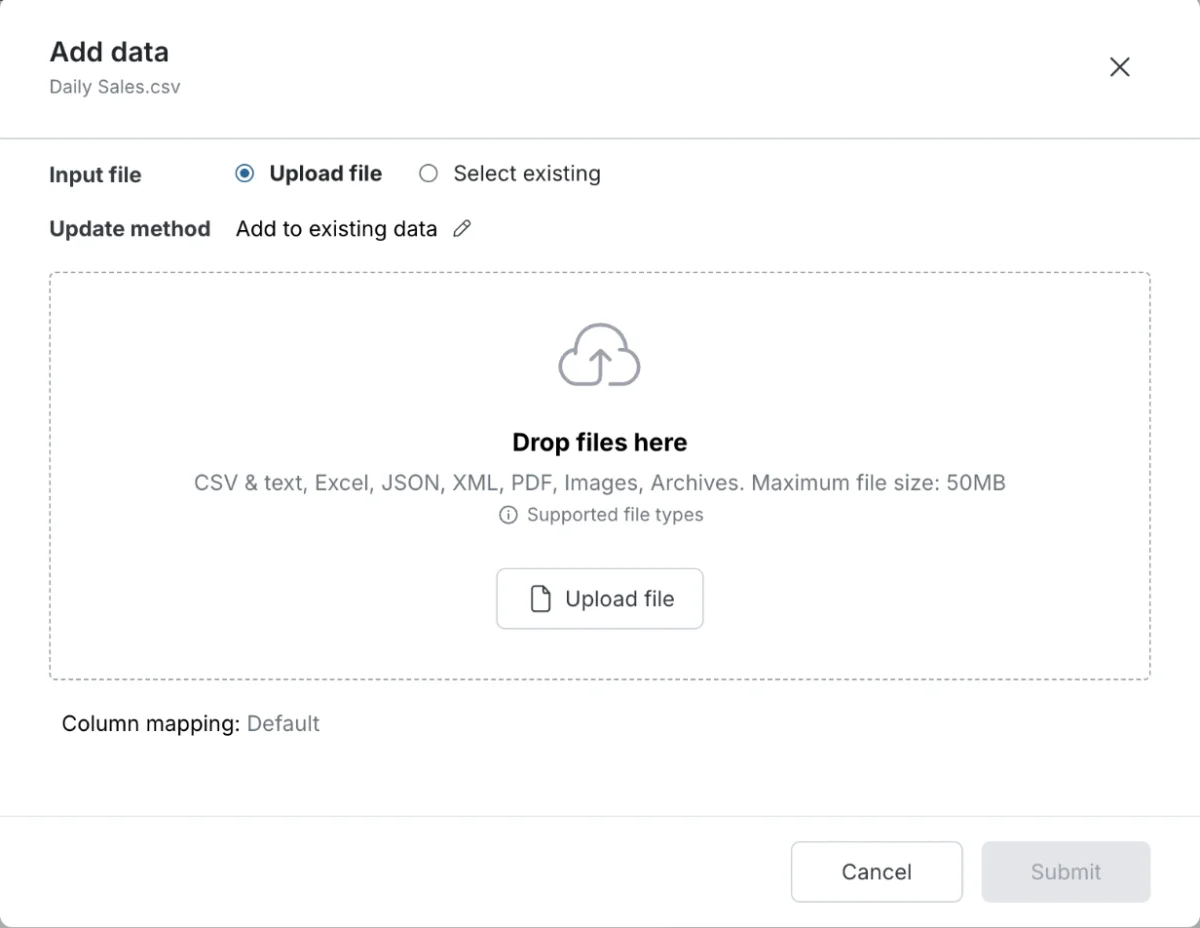
The dialog is titled Add data, with the dataset name beneath. It has an Input file row and an Update method row.
| Your situation | Input file | Go to |
|---|---|---|
| You have a new file (CSV, Excel and so on) to load | Upload file | Add a file to a dataset |
| You want data from another dataset in your project | Select existing | Add another dataset's rows to a dataset |
Choose add or replace: the update method
| Method | What it does | Best for |
|---|---|---|
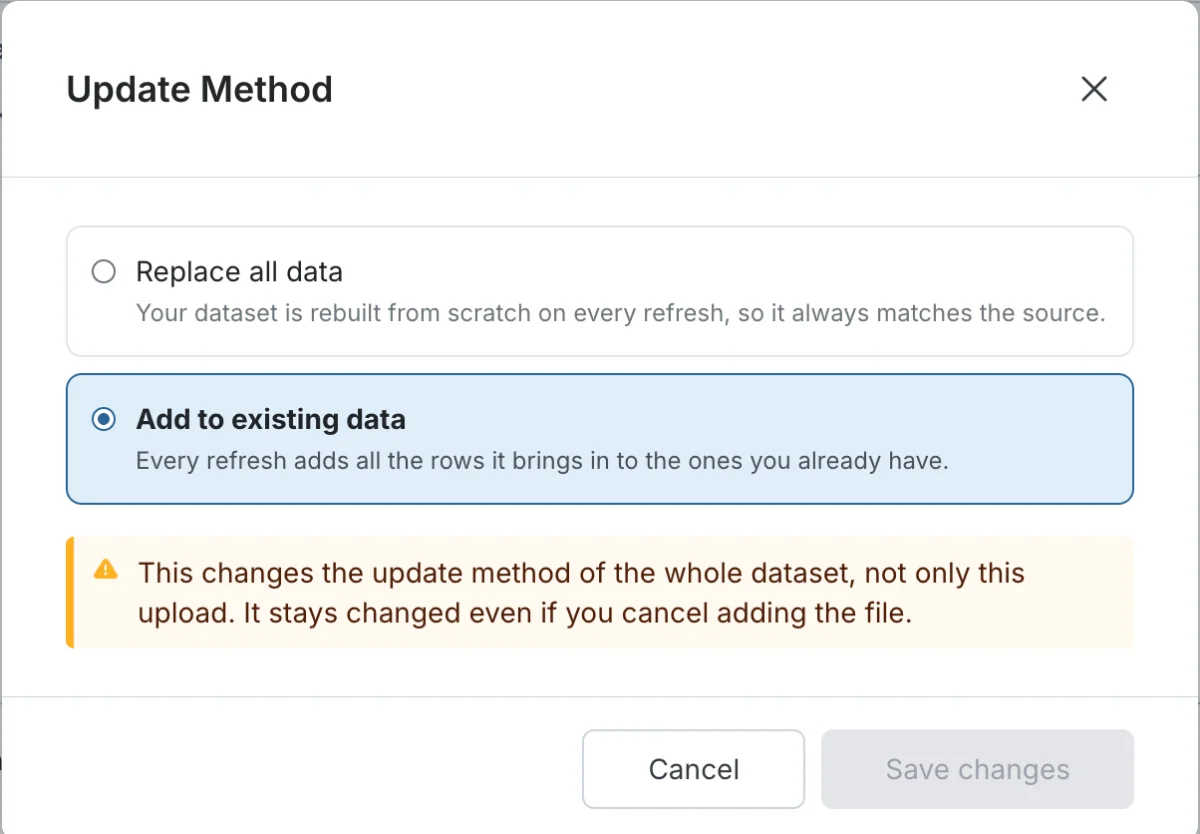
| Add to existing data | Appends new rows to the existing dataset. Previous data is kept. | Incremental loads such as daily sales, event logs, transaction feeds |
| Replace all data | Deletes all existing rows and inserts the new data | Full snapshots such as weekly inventory exports or complete dimension tables |
Changing the Update method saves it to the dataset straight away, even if you then select Cancel: "This changes the update method of the whole dataset, not only this upload. It stays changed even if you cancel adding the file." The same setting applies to both Upload file and Select existing.
Previous data can't be recovered once replaced. Consider keeping a copy of important history before you replace it. See Batches: see and fix what arrived.
Add a file to a dataset
Prerequisite: Edit-level access to the dataset, and a file in a supported format.
- Drag a file onto the drop zone, or click Upload file to browse your computer.
- Choose the Update method: Add to existing data or Replace all data.
- Optionally set Column mapping (see the next section). This row is not shown for PDF files.
- If the update method is Replace all data and the file is not a PDF, select Replace and use the new file's columns when the file has new or renamed columns. The dataset's columns then become the file's columns.
- Click Submit. The button stays disabled until a file is selected.
A callout in the dialog explains that uploading a PDF replays the dataset's saved recipe automatically, while uploading a CSV or Excel file appends it directly by matching columns.
| Detail | Value |
|---|---|
| Maximum file size | 50 MB (Limits and quotas) |
| Accepted formats | The same as for file upload: CSV, TSV, PSV, TXT, XLS, XLSX, XLSM, XML, JSON, JSONL, NDJSON, ZIP, BZ2, GZ, TAR, 7Z, PDF, TIFF, TIF, JPEG, JPG, PNG, HEIC, HEIF, WEBP |
Result: the dialog closes and Mammoth processes the file in the background. A new row appears in the Batches list. It reads Applying recipe while Mammoth structures the file, or Pending if the batch needs your input, such as a column mapping, a sheet selection or a file password. Select a pending row to resolve it (see Resolve a pending batch).
Set column mapping and type rules for new files
The Column mapping line appears below the file drop zone. It shows whether the dataset's incoming-data rules are Default or Custom:
- Default: Mammoth maps columns by matching names and converts mismatched column types to text.
- Custom: the dataset has saved, non-default mapping rules.

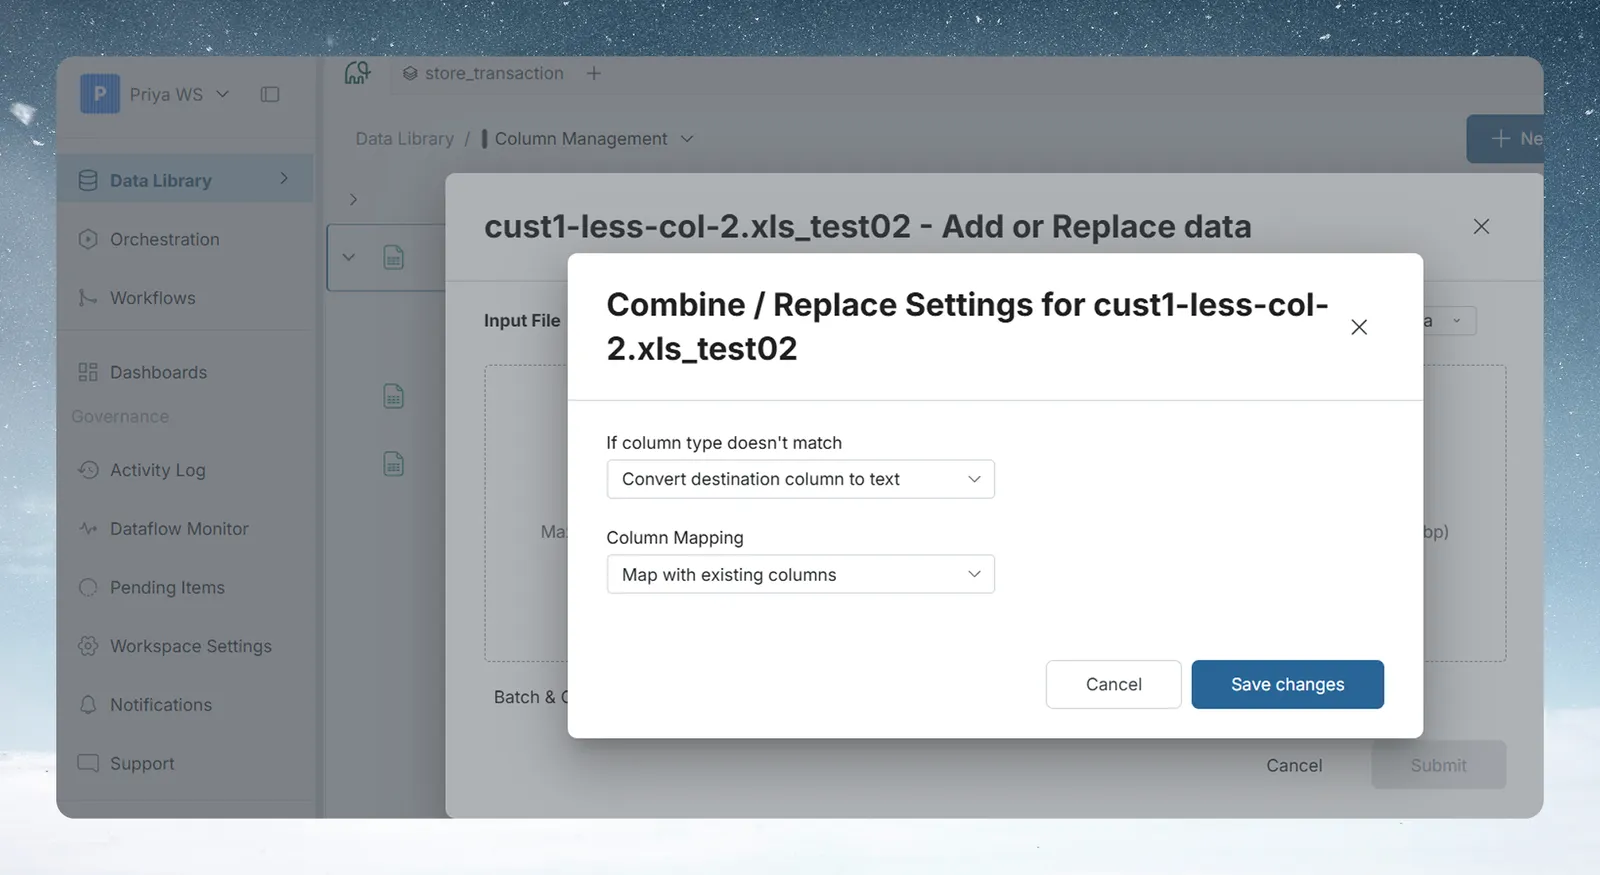
Select the row (a pencil icon appears when you hover) to open the Combine / Replace Settings dialog.
If column type doesn't match
| Option | What it does |
|---|---|
| Convert destination column to text (default) | Changes the destination column's type to Text so all incoming values fit. Broadest compatibility, with no data lost. |
| Convert incompatible values to null | Keeps the destination column's type. Incoming values that can't be cast to it are stored as null. |
| Do not update the dataset | Stops the operation if any column type mismatch is found. Use it when strict type integrity matters. |
Match columns with different names using aliases
| Option | What it does |
|---|---|
| Map with existing columns (default) | Matches incoming columns to destination columns by exact display name. No manual mapping needed. |
| Create new column mapping | You define one or more name aliases per destination column. Mammoth uses them to find the right incoming column even when the name differs between files. |
Use aliases when the same column has different headers in different files, for example Cust_ID, CustomerID or Customer id. With Create new column mapping selected, a table lists every destination column with its aliases:
| Element | What it does |
|---|---|
Alias pills (for example, Customer id ×) | The names Mammoth looks for in incoming data. Click a pill to edit its name; click × to remove it. Several aliases are joined with "or", so any match works. |
| + button | Adds a new alias for this column |
| Toggle | Turns mapping on or off for this destination column |
| Type icon and column name (right side) | The destination column's data type and name |
Tick All destination columns must be mapped to add new data only when its number of columns matches the existing dataset.
Click Save changes. The Column mapping line now shows Custom, and future loads use your saved rules.
Add another dataset's rows to a dataset
Prerequisite: Edit-level access to the destination dataset, and the source dataset is in the same project.
Pick the source dataset
- Choose Select existing.
- Open the Dataset picker and choose the source. It lists the other datasets in the project, plus the project's unprocessed PDF files (marked Unprocessed PDF).
- Check the data preview of the source columns and first rows.
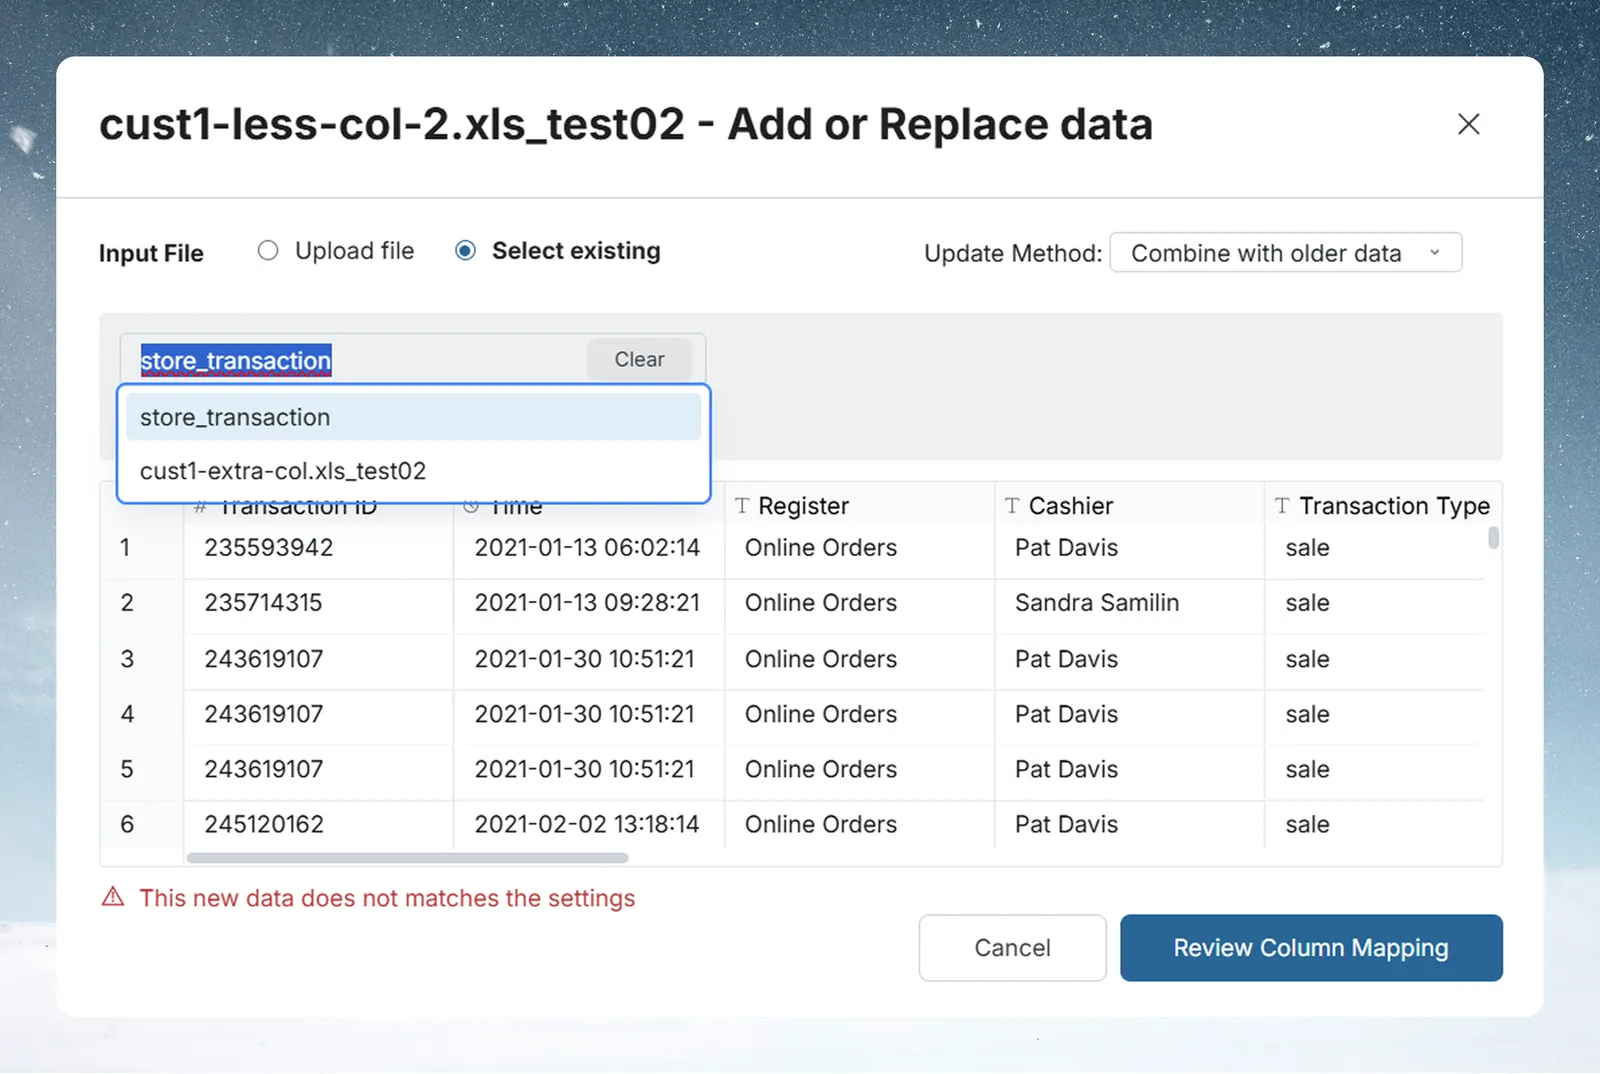
Datasets that hold unstructured data are marked with a warning icon and Needs structuring. They appear only when the destination dataset has a saved recipe, and they must be structured to match the destination before they can combine.
Two picks behave differently:
- Unprocessed PDF: Mammoth replays the destination's saved recipe on the PDF. There is no column mapping, and the button is Submit.
- Needs structuring: the button is Apply Recipe. It previews the destination's recipe applied to the source dataset, and nothing is written until you select Submit. Submitting confirms the recipe on the source and deletes the source dataset.
Check the update method
The Update method at the top of the dialog applies here too. Add to existing data appends the source rows and keeps previous data. Replace all data deletes all existing rows and inserts the source rows.
Keep or delete the source dataset
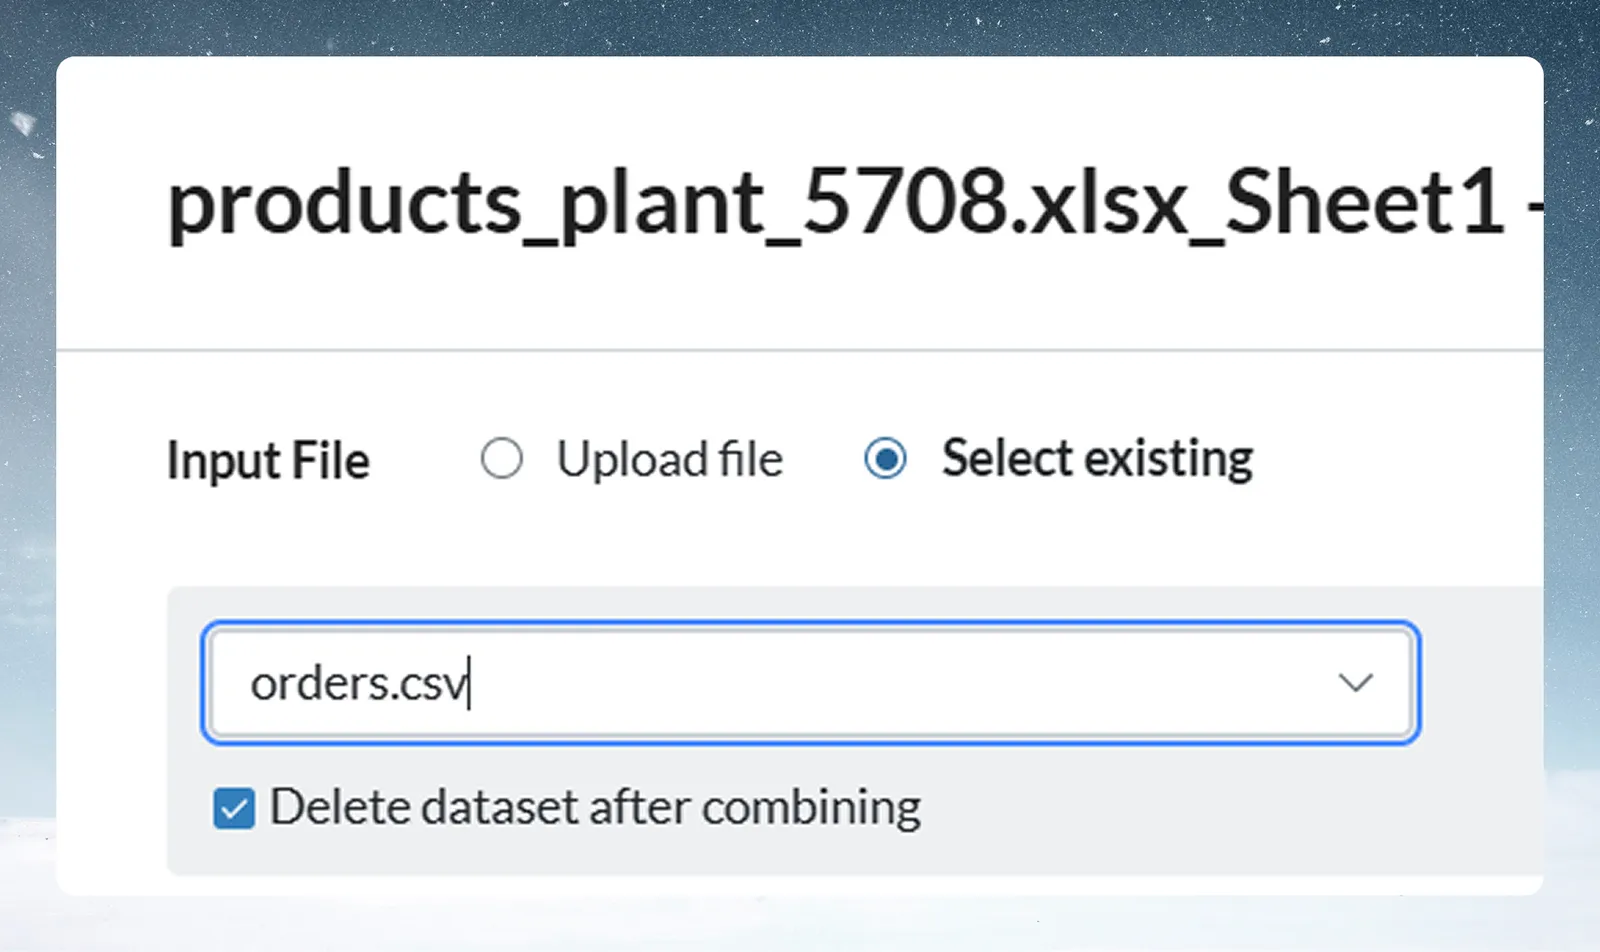
The Delete dataset after combining checkbox is ticked by default. It is hidden when you pick a PDF or a dataset that needs structuring. If left ticked, Mammoth permanently deletes the source dataset after the operation. Untick it to keep the source. Leave it ticked only when the source is a temporary staging dataset you no longer need.
Check that the columns match
After you pick a source, Mammoth checks whether its columns match the destination's.
| Outcome | What you see | What to do |
|---|---|---|
| Columns match | Green check: "New data matches the settings" | Click Validate or Submit, or Review Column Mapping to adjust |
| Columns differ | Red message: "These columns do not all match the dataset's, by name or by type. Review the column mapping to line them up." | Click Review Column Mapping and map the columns |
Map the columns when they differ
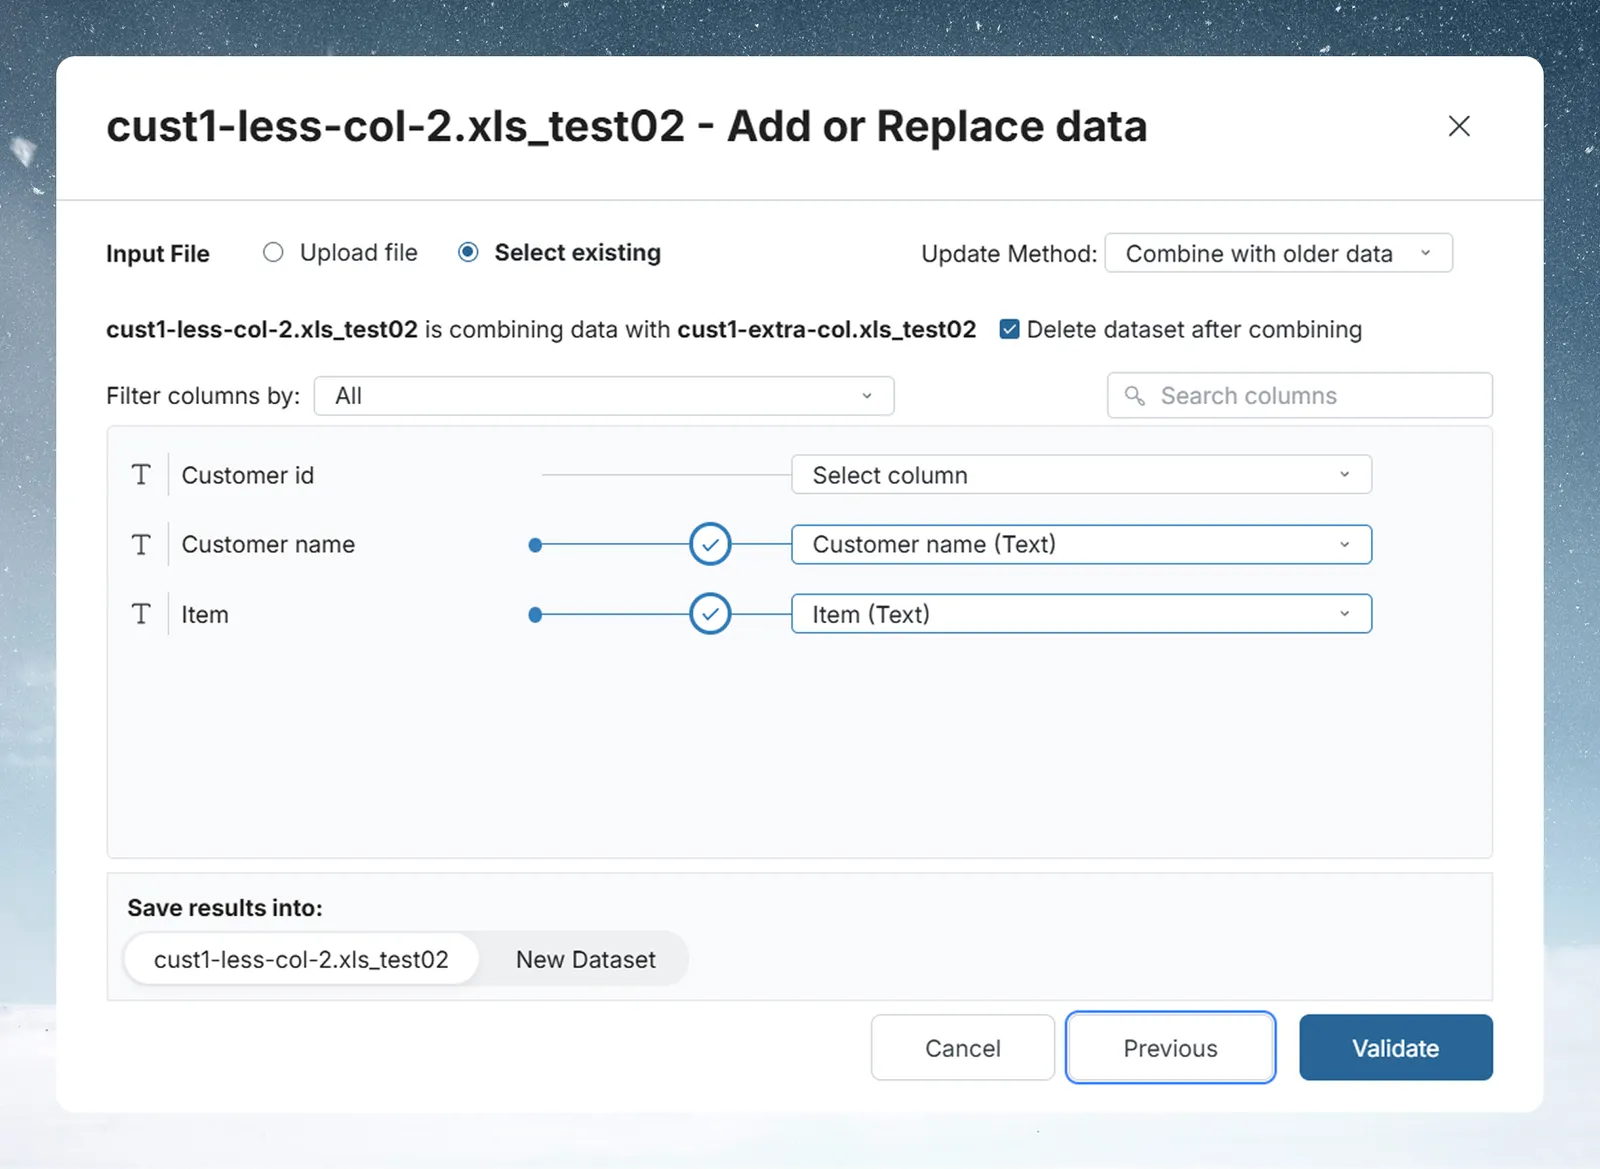
The sub-header confirms what is happening, for example "Daily Sales is combining data with orders.csv", with the Delete dataset after combining checkbox beside it.
The mapping table lists every destination column on the left (with its data type icon: T for Text, # for Number, ⏱ for Date / Time) and a Select column dropdown on the right for the matching source column.
- Use Filter columns by to show All, Matched or Unmatched columns.
- A column search appears when the dataset has many columns or when you start typing.
- When a mapped source column has a different type from the destination column, a selector lets you choose which type to keep.
- Validate is enabled once at least one column is mapped (and, for a new dataset, once it has a name). Unmapped columns are allowed.
- After a successful validation, the button becomes Submit.
Save the result as a new dataset
By default, the combined result overwrites the destination dataset. Set Save results into to New Dataset to keep both the source and the destination and write the output to a new dataset. You can name it (up to 300 characters). With New Dataset, Submit is available without validating.
Check what the change affects before you submit
When you click Validate, Mammoth checks for Views, pipelines or tasks that depend on the destination dataset and would be affected. If it finds any, a Review window lists them. Confirm you understand the impact before the final submit becomes available.
What happens after you submit
The dialog closes straight away and the operation runs in the background. For Select existing, a message confirms when the source dataset will be deleted. Mammoth:
- Appends or replaces the rows in the destination dataset.
- With Replace all data, deletes the previous batch records.
- With Delete dataset after combining ticked, removes the source dataset.
- Updates the batch count in the dataset panel.
- Reruns dependent Views and pipelines. A View whose incoming link has Auto-sync off is not rerun: the new batch stays pending, and Monitor shows "new batch received, auto-sync off" with Preview and Process buttons (see Views).
- Writes an Activity Log entry recording what happened, who triggered it and when.
With Add to existing data, the batch count goes up by one per operation. With Replace all data, the previous batches are removed and one new batch appears. It is created suspended if all the previous batches were suspended.
Follow progress in the Batches section of the dataset panel or in the Activity log.
Troubleshooting adding and replacing data
| Symptom | Cause | Fix |
|---|---|---|
| Add data isn't offered | The dataset is fed by a connection or follows a link | Use Retrieve or Get the latest instead |
| "These columns do not all match the dataset's, by name or by type." | Column names or types differ | Click Review Column Mapping, or set aliases with Create new column mapping |
| The new batch shows Pending | It needs a column mapping, a sheet selection or a file password | Select the row to resolve it (see Resolve a pending batch) |
| The update method changed although you cancelled | Changing Update method saves straight away | Set it back in the dialog or in the dataset's settings |
| A View didn't update after the new data | Auto-sync is off on its incoming link | Click Process in Monitor, or turn Auto-sync on (see Views) |
| The source dataset disappeared | Delete dataset after combining was ticked, which deletes the source permanently | Untick it next time you want to keep the source |
Related
- Batches: see and fix what arrived: every load is a batch you can suspend or delete.
- Combine datasets: put the rows of several datasets together from the list.
- Combine incoming data: add or replace from new files on their own.
- Refresh a dataset: refresh a connected dataset on a schedule with the same add or replace logic.
- Activity log: every batch operation with time and user.
Something wrong? support@mammoth.io