Invite and manage members of your Mammoth workspace
You invite people, set their roles and remove them in Workspace Settings → User Management. Inviting, changing workspace roles and removing users need the Workspace Owner role; Workspace Members can open the section and see everyone, but can't change anything except their own membership. Project Admins can also manage people in their own projects.
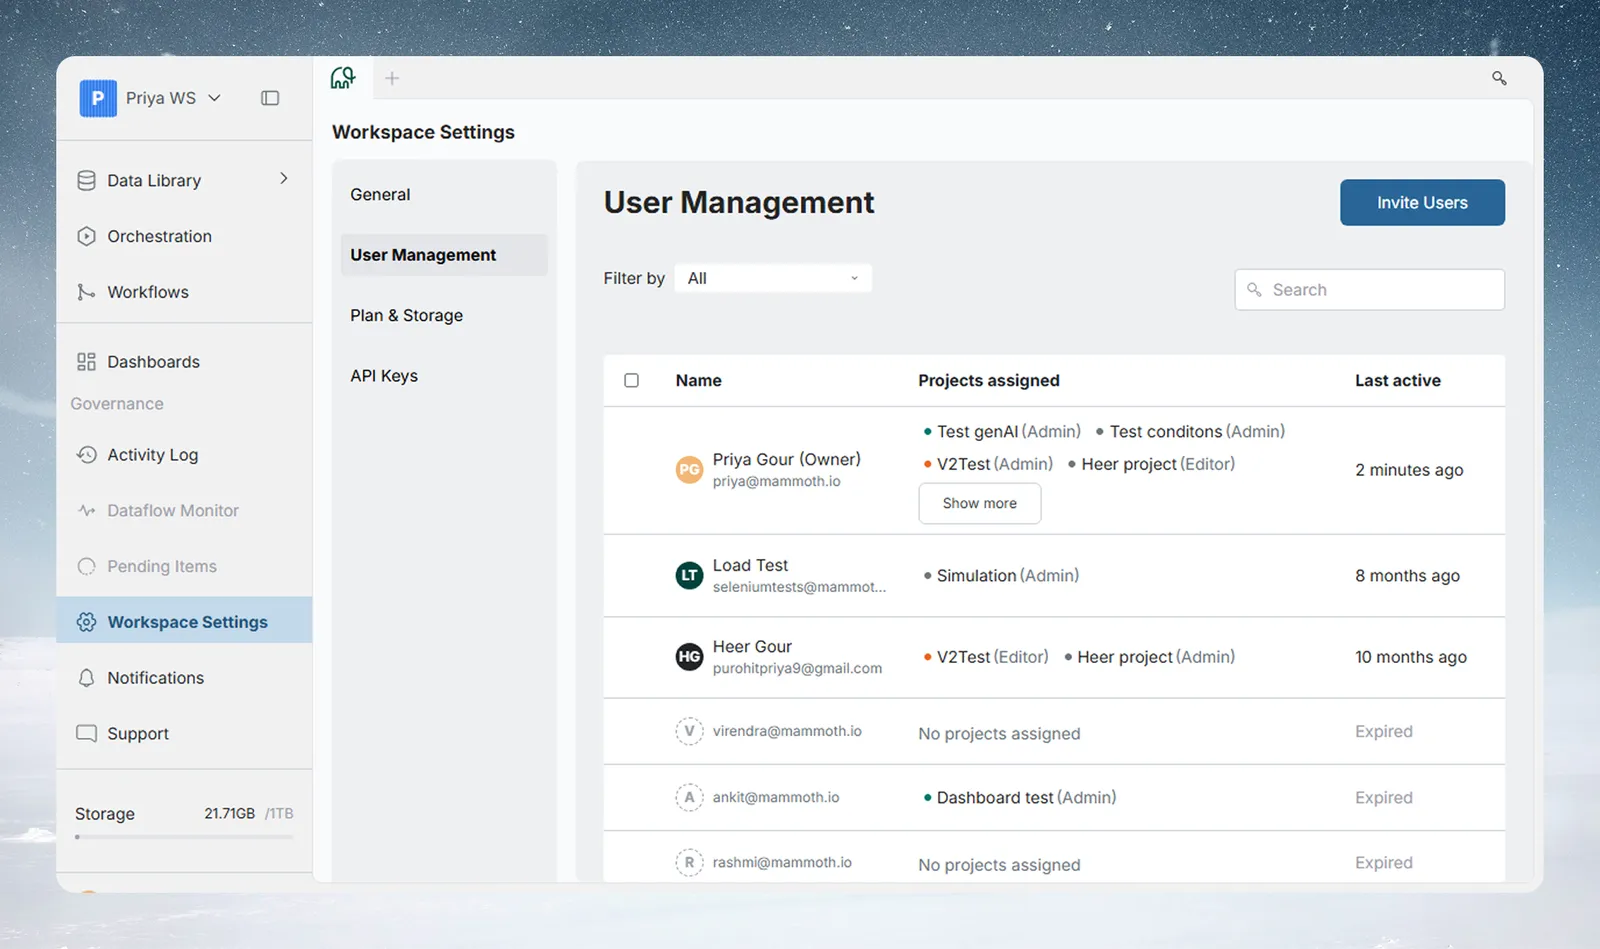
For Members, Invite Users is disabled, with the tooltip "You can't invite users to this workspace. Contact the Workspace Owner." Anyone whose role can't view workspace users sees "You don't have permission to view the people in this workspace. Contact a Workspace owner if you need access."
Who can manage members
| Action | Who can do it |
|---|---|
| Invite users, reinvite, cancel invitations | Workspace Owners |
| Change someone's workspace role | Workspace Owners. Only an Owner can make someone an Owner or change an Owner's role |
| Remove users from the workspace | Workspace Owners |
| Add users to projects | Workspace Owners, and Project Admins of that project (from the project's Manage Users) |
| Change someone's project role | Workspace Owners, and Project Admins of that project |
| Remove someone from a project | Workspace Owners, and Project Admins of that project |
| Leave the workspace, delete your own profile | Everyone, for themselves |
Mammoth checks these on the server as well as in the app. Custom roles can grant some of them: see Workspace and project roles, permissions and custom roles.
Invite users to your workspace
You need the Workspace Owner role.
- Open Workspace Settings → User Management.
- Click Invite Users (top right). The Invite users to workspace dialog opens.
- In Enter email addresses to invite, type or paste one or more addresses. Separate them with commas, semicolons, spaces, tabs or new lines. You can also type the name of an email group.
- Optionally tick Assign to Projects and pick projects. Invited users are added to them when they accept.
- Click Invite.
Mammoth shows "Users invited successfully." Invited users receive an email and appear in the user table as invited. For what they see, see Join a workspace from an invite.
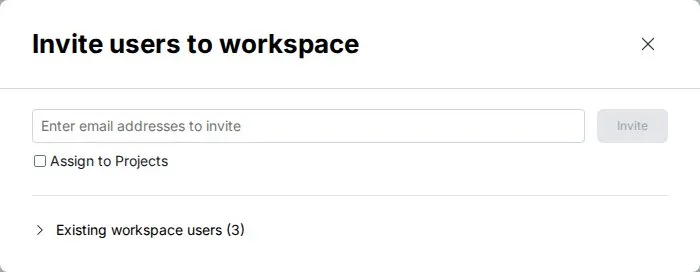
Tick Assign to Projects when you invite, so new members can start the moment they accept. After a bulk invite, use the No projects assigned filter to find anyone still waiting for project access.
Messages when inviting
| Message | Why |
|---|---|
| "The email address is not valid" | An address is badly formed |
| "You can invite up to 250 email addresses at a time. Please reduce your list." | More than 250 addresses in one go |
| "User already exists in the given workspace." | The address is already a member or invited |
| "You only have 2 seats left in this workspace. Please reduce the number of emails or upgrade your plan." | You're inviting more people than you have free seats. Owners on self-serve plans get Upgrade; other plans get Contact support |
During a trial, the dialog can also show "Inviting members is available on" followed by the plans that include it.
Change or remove existing users from the invite dialog
Existing workspace users is a collapsible list of current members, with the count in its title, for example Existing workspace users (12). From it you can:
- Change someone's workspace role with the role selector. "Only a Workspace Owner can change or remove an Owner."
- Use Reinvite on pending invitations.
- Mark users for removal with the trash icon, and Undo a pending removal.
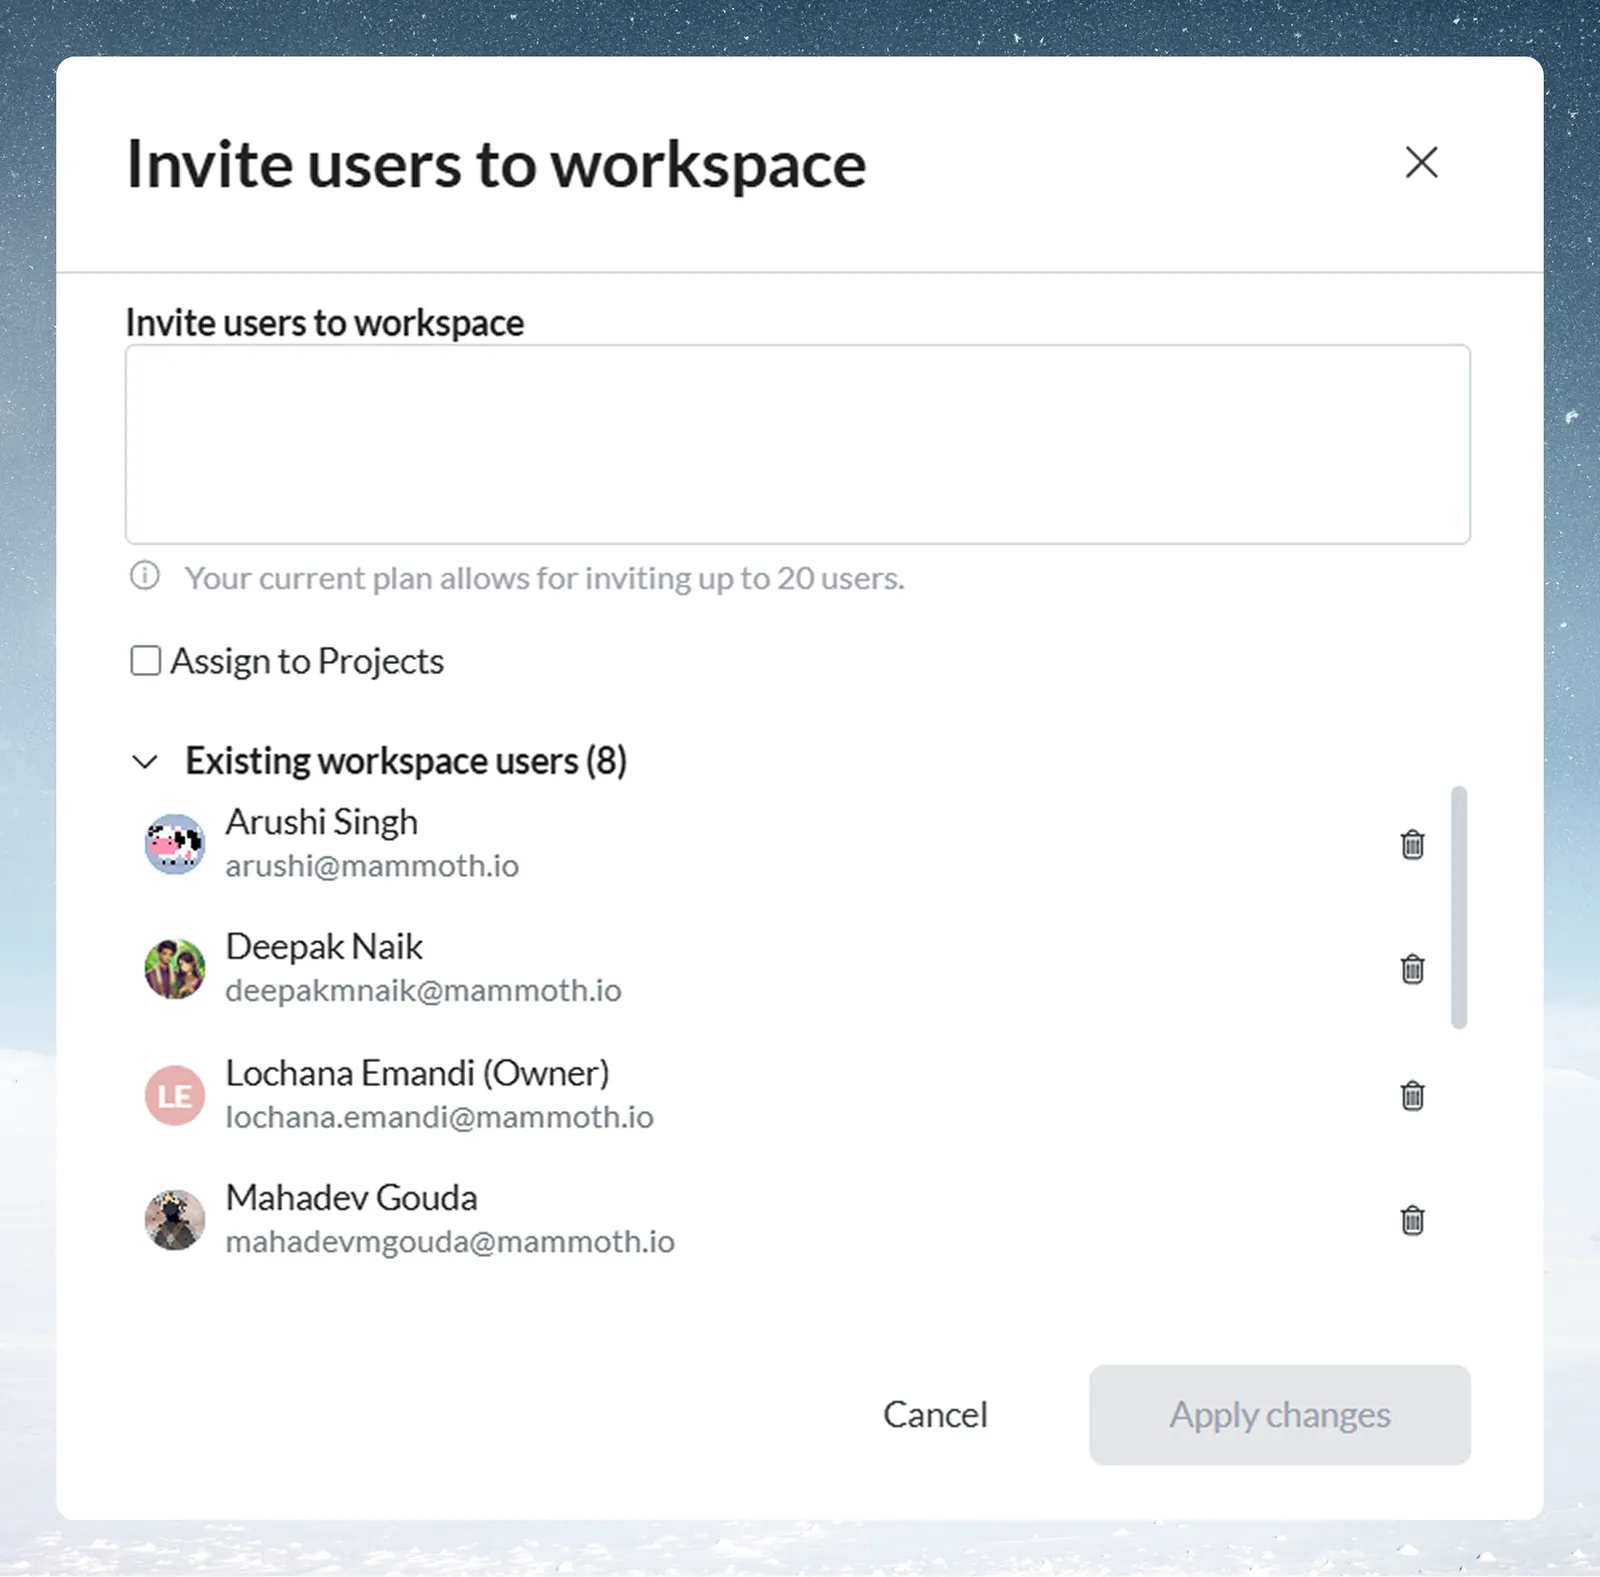
Apply changes appears only when you have marked users for removal. Click it to remove them.
Seats and trial banners
Two banners can appear above the user list:
- During a trial on a self-serve plan: "Multi-user editing is available on" followed by the plans that include more than one seat, and how many seats the lowest of those plans supports. Owners see Choose a plan. Click the X to dismiss it. Invite Users also shows a Trial pill.
- After a trial or downgrade, when more members have edit access than the plan has seats: "Invited users have lost edit access. Upgrade to restore it." Only Owners on self-serve plans see this banner. Upgrade opens the plan picker.
Pending invitations count towards seats. Ask-only guests never take a seat. See Billing and plans for seats per plan.
Find people with filters and search
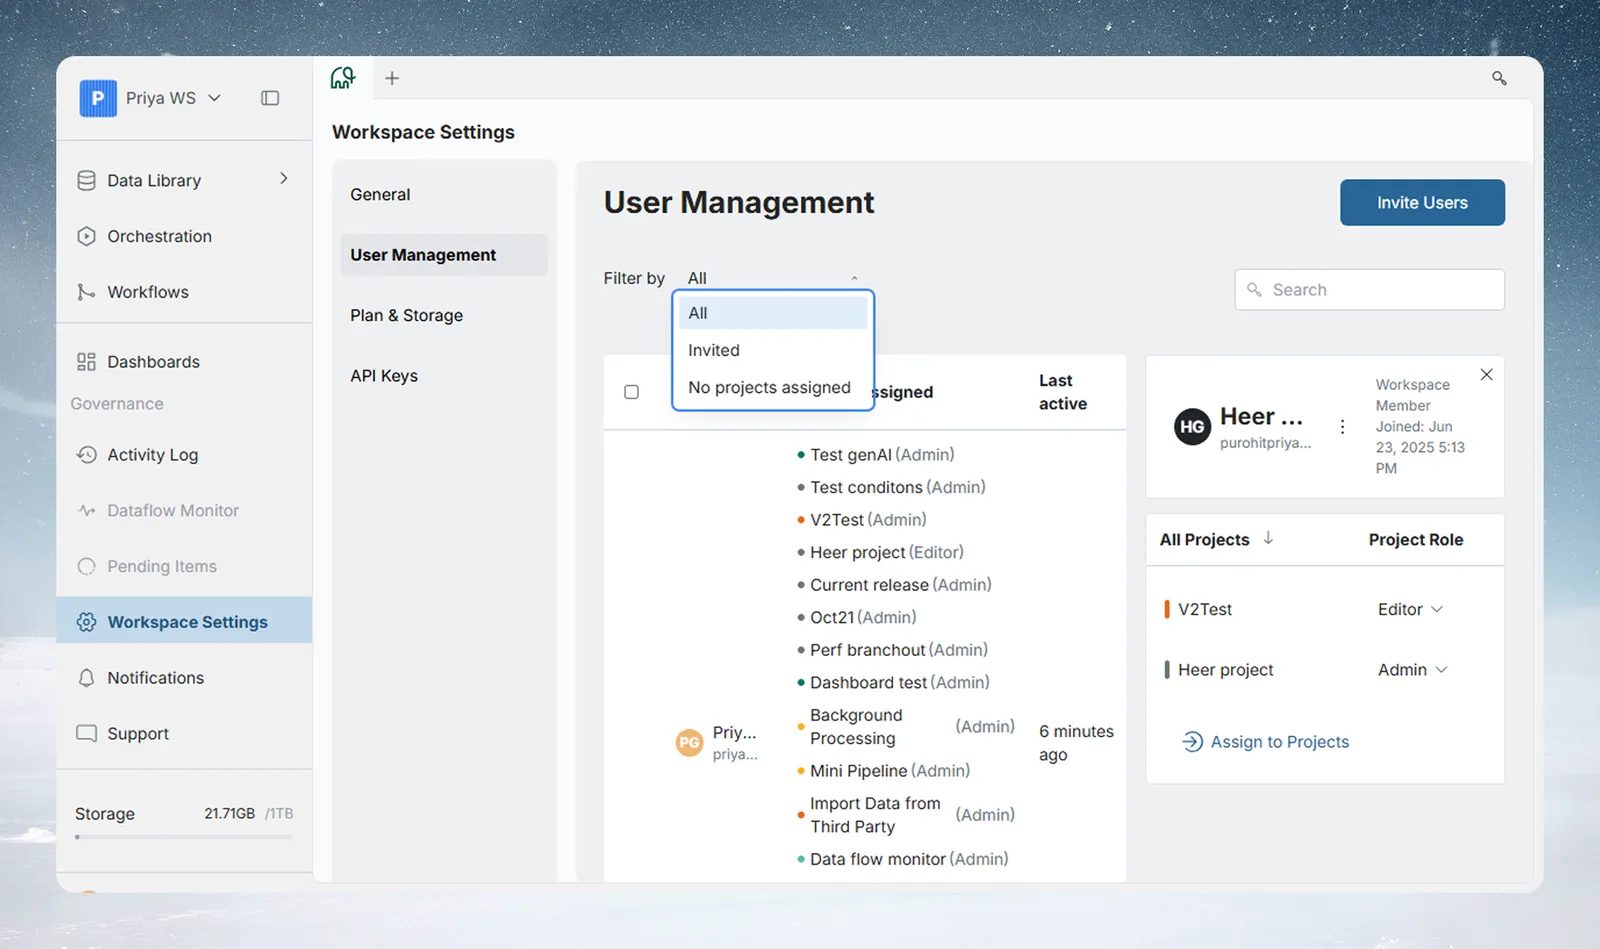
| Filter by option | Shows |
|---|---|
| All | Everyone in the workspace (default) |
| Invited | Users with pending, unaccepted invitations |
| No projects assigned | Users not yet added to any project |
Type in the search field beside the filter to narrow the list by name, or by email for invited users. When nothing matches, you see "We couldn't find any matches for your search."
Columns in the user table
| Column | What it shows |
|---|---|
| Name | Avatar, full name, email, and an "(Owner)" label for Workspace Owners. Click the sort icon to sort |
| Projects assigned | Each project as a coloured dot, project name and role. Use Show more / Show less when a user belongs to many projects |
| Last active | Relative time (for example, "2 minutes ago"). Hover for the full timestamp. Pending and expired invitations show their own actions here instead |
Click any row to open that user's side panel.
Resend or cancel an invitation
For Workspace Owners, a pending invitation shows two buttons in the Last active column:
- Reinvite: sends the invitation email again.
- Cancel Invitation: opens the Cancel Invitation dialog.
To cancel:
- Click Cancel Invitation. The dialog asks "Are you sure you want to cancel this user's invitation to the workspace?" and explains "The user will no longer be able to join the workspace unless re-invited."
- Tick "I understand that canceled invitations can't be recovered."
- Click Remove Invitation.
An expired invitation shows "Invitation expired" with a Reinvite button.
Add many users to projects or remove them at once
Owners can tick users with the checkboxes to show the bulk action bar:
- Assign to Projects: opens a project multi-select. All selected users are added to the chosen projects at once.
- Remove from workspace: opens Remove users from workspace, which lists the selected users and asks you to confirm with Remove Users.
Selecting only yourself hides Remove from workspace. To leave, see Leave a workspace.
Manage one person from the user side panel
Click a user row to open their panel on the right.
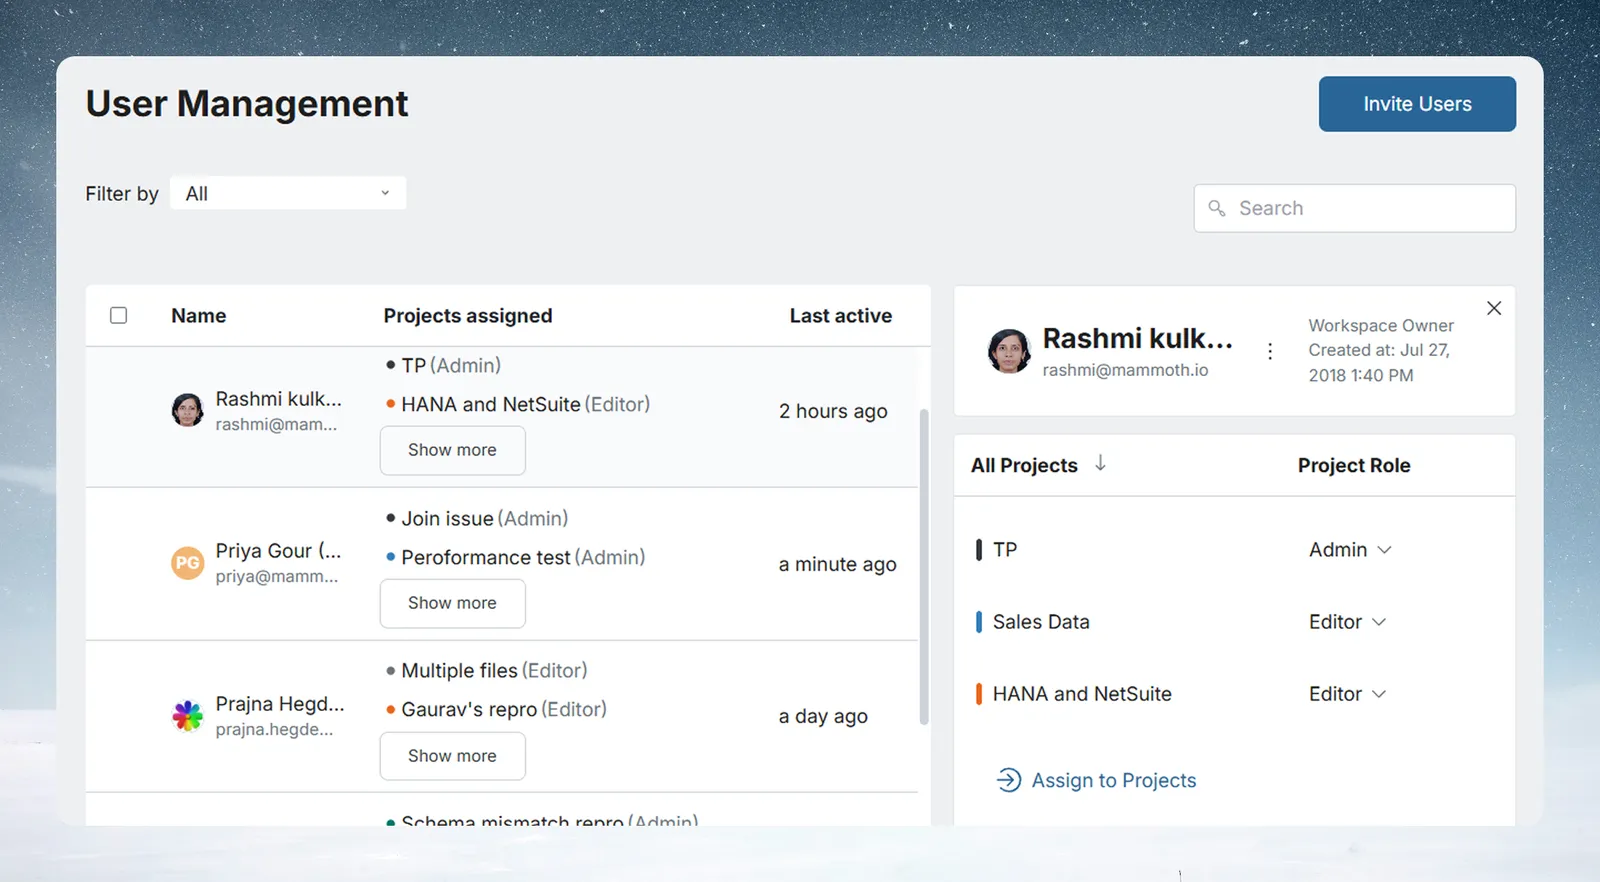
The panel shows:
- The user's avatar, full name and email.
- Their workspace role (Workspace Owner, Workspace Member or a custom workspace role). Click it to open the role menu.
- A "Joined" date ("Created at" for an Owner).
- Every project they belong to, under All Projects and Project Role, with a role dropdown per project.
- Assign to Projects, to add them to more projects.
A user with no projects shows "No projects assigned" and "Assign this user to a project to get started".
Change someone's project role
- In the user's panel, click the role dropdown next to a project name.
- Pick Project Admin, Project Editor, Project Viewer or a custom project role.
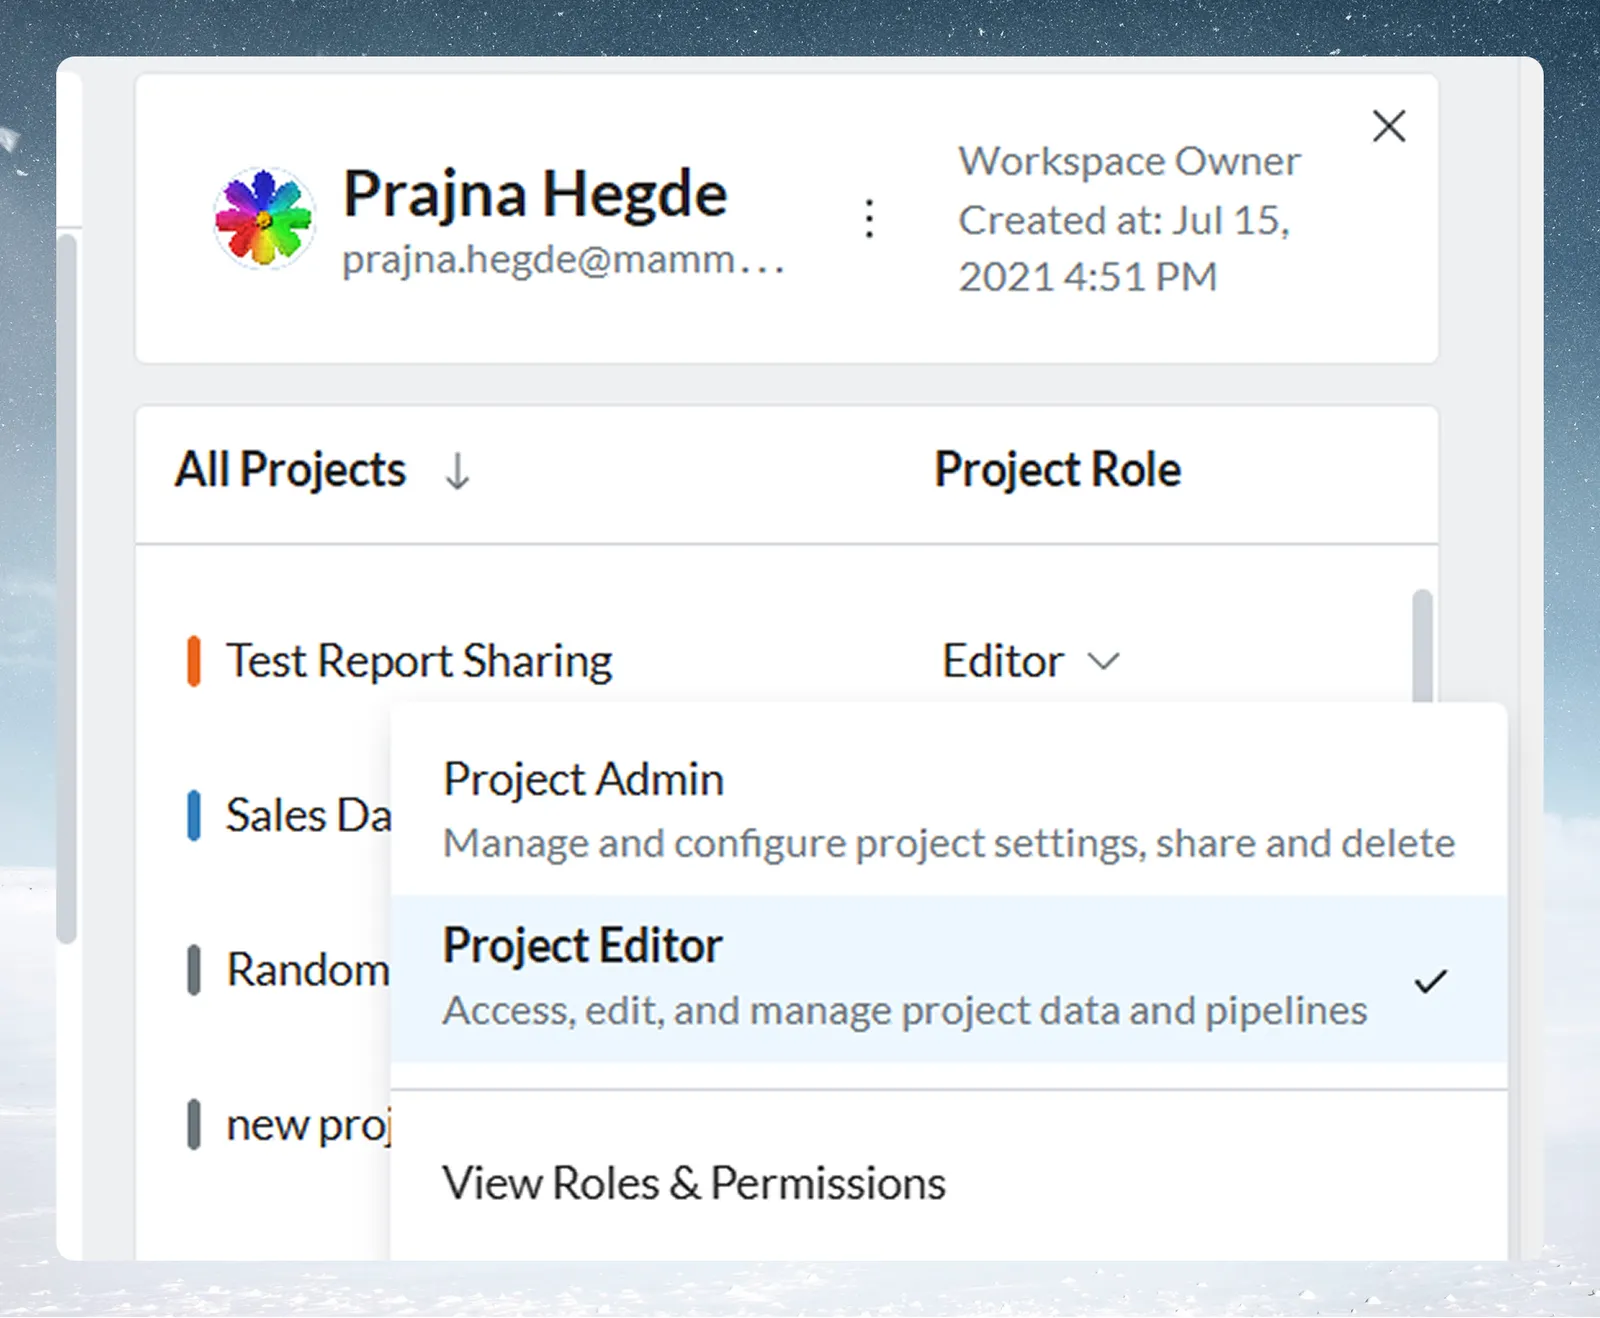
| Role | What they can do |
|---|---|
| Project Admin | Manage and configure project settings, share and delete |
| Project Editor | Access, edit, and manage project data and pipelines |
| Project Viewer | View Data Library items (read-only) |
Custom project roles are listed after these, with their description. The change applies at once, with the message "User project role changed successfully." The View Roles & Permissions link at the bottom of the dropdown opens the full permission list.
When in doubt, give Project Editor. Give Project Admin only when the person needs to manage project membership, create Live Connections or change project settings. Use Project Viewer for people who only need to look.
Remove someone from one project
Click the trash icon next to a project to open Remove user from that project. It warns that the user will lose access to that project's files. Confirm to remove them from that project only.
On your own panel the icon is a leave icon instead, which opens Leave the project.
Tip: Workspace membership is unaffected
Removing a user from a project removes only their project access. They stay in the workspace and can be re-added to the project at any time.
Change a workspace role or remove a user from the workspace
Click the user's workspace role at the top of their panel to open the role menu.
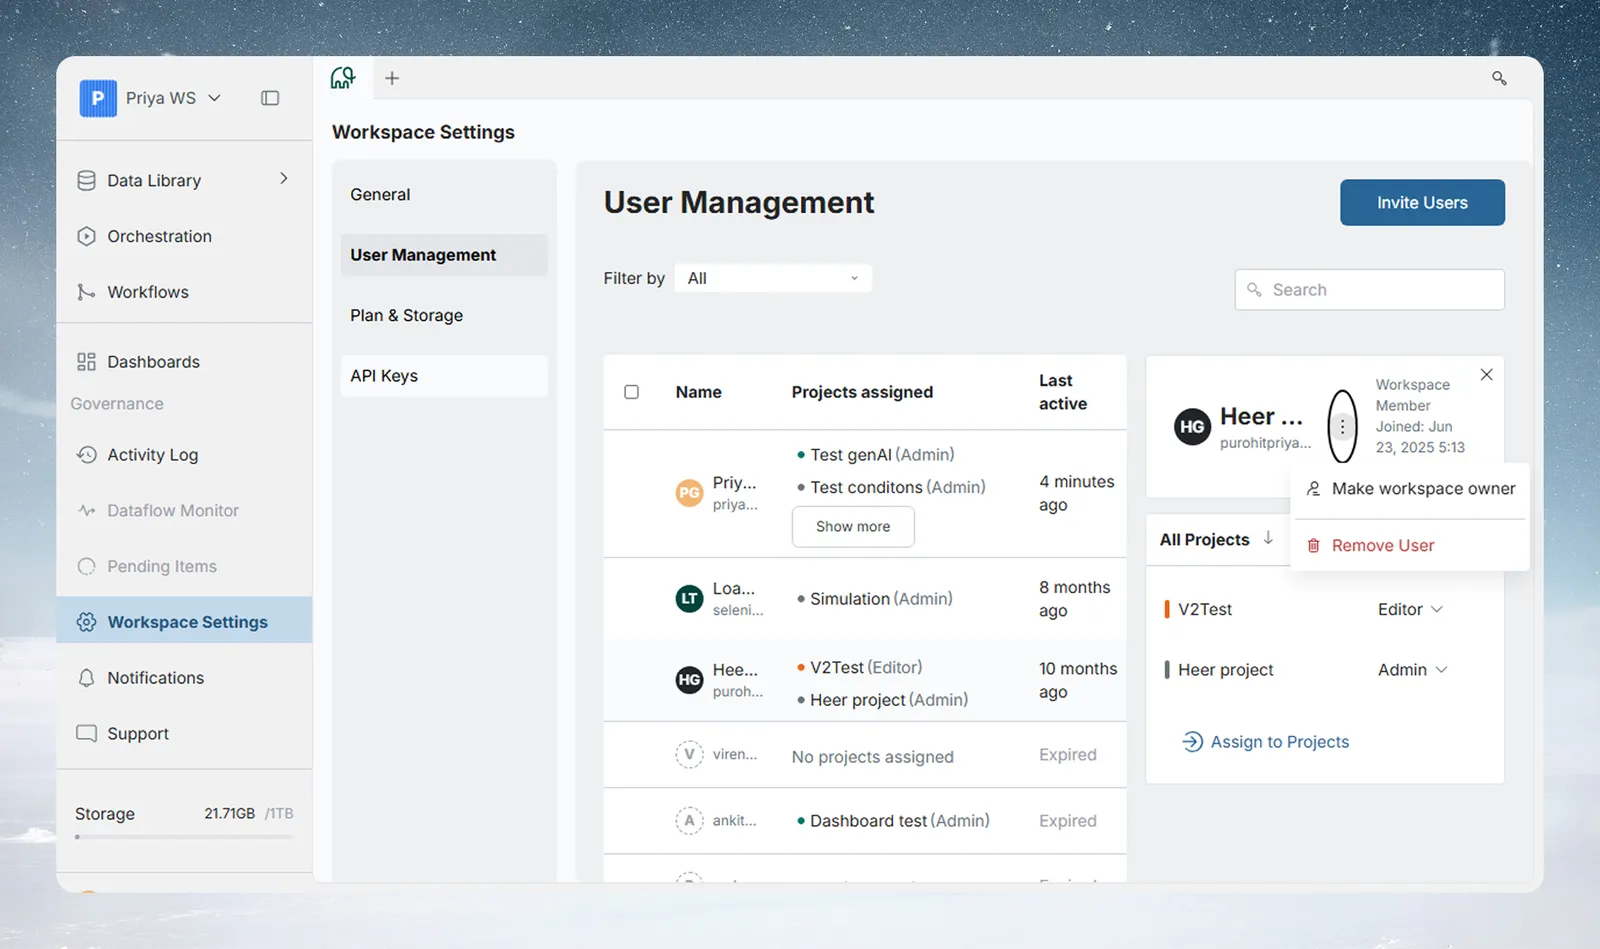
When an Owner views another user, the menu offers:
| Option | What it does |
|---|---|
| Workspace Owner / Workspace Member, then any custom workspace roles | Picks a role. The current one has a check mark. Making someone an Owner opens Make workspace owner, which warns that it grants them full control over the workspace; confirm with Make owner. Changing an Owner to Member opens Change workspace role; confirm with Change role |
| View Roles & Permissions | Opens the workspace permission list |
| Remove User | Opens Remove user from workspace. Confirm with Remove User |
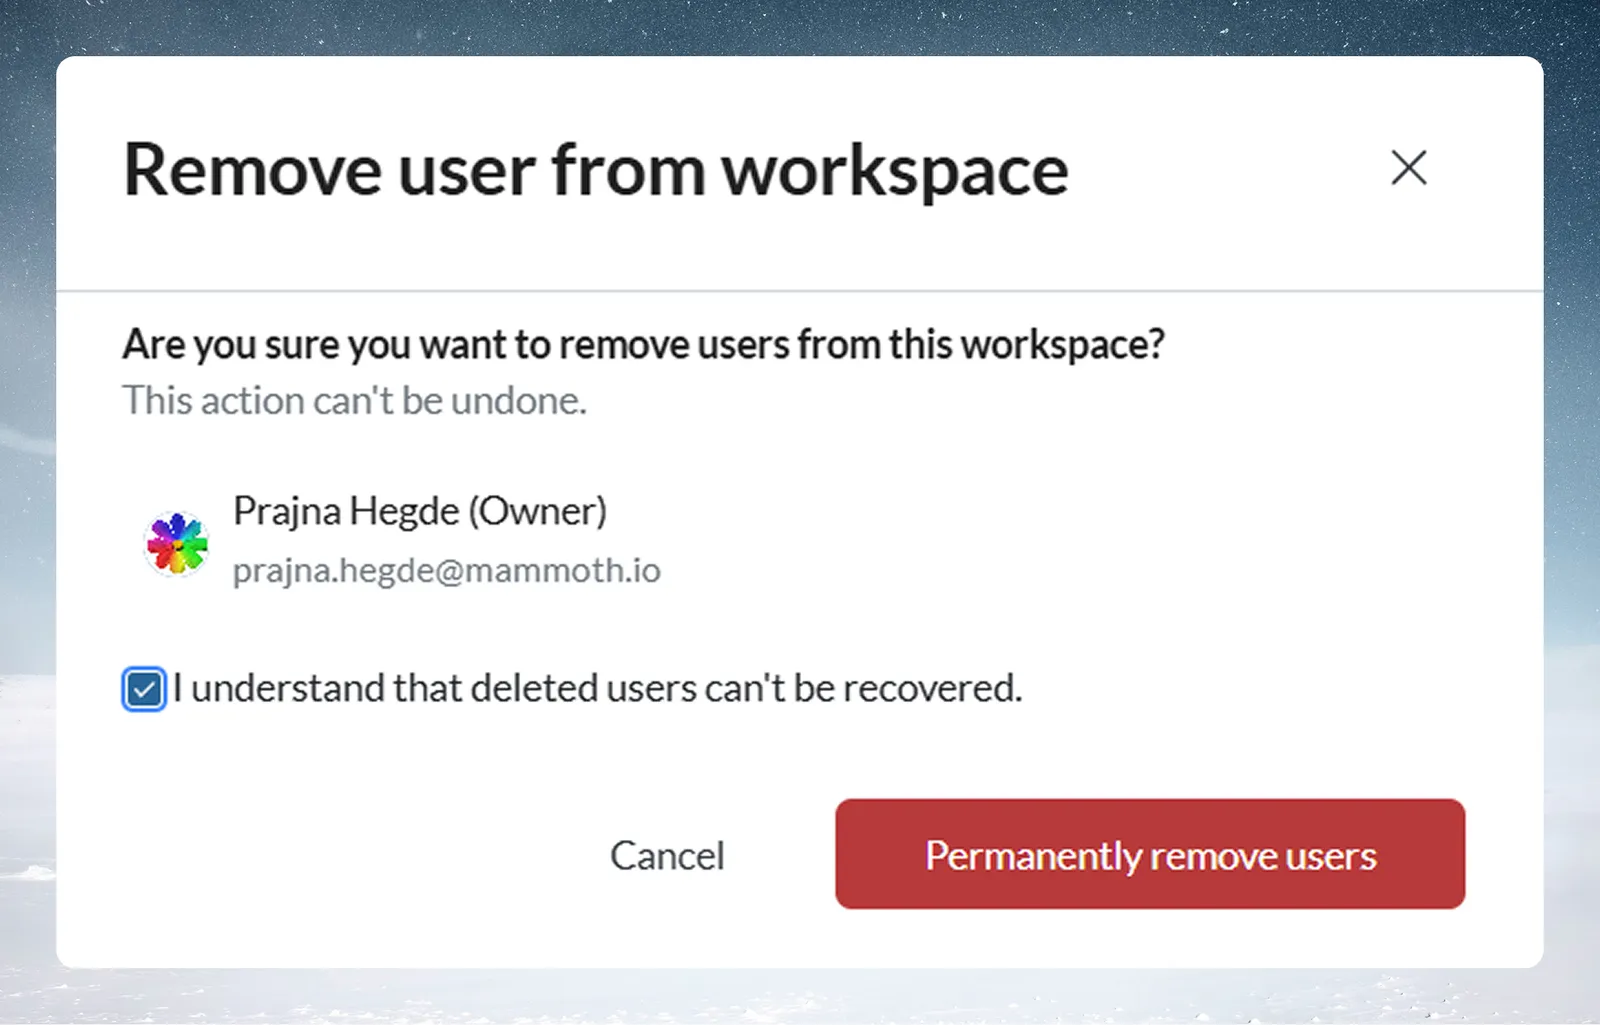
A workspace can have several Owners, and making someone else an Owner doesn't change your own Owner role. Each Owner has full control, including billing, user management, external keys and workspace deletion, so give it only to people who need it.
On your own panel, the menu offers View Roles & Permissions, Leave Workspace and Delete Profile.
What changes when roles change or users are removed
- Workspace role changes (Owner, Member or a custom workspace role) and project role changes (Admin, Editor, Viewer or a custom project role) take effect immediately. There is no grace period.
- Removing a user from the workspace removes their workspace and project role assignments, so all their project access goes at once. Their account isn't deleted, and their memberships in other workspaces are unaffected.
- Project Admins can remove users from their project without affecting workspace membership.
Invite people from outside your organisation
External users are people whose email domains are not part of your organisation.
- A Workspace Owner can invite them to the workspace from User Management, then add them to projects.
- A Project Admin can invite them directly to a project from the project's user management. See Share a project and set project roles.
Invited users get an email with an activation link. Until they accept, they exist only as a pending invitation. Role and project assignments are stored with the invitation and applied when they accept. External users work under the same roles as everyone else, with no special permissions or limits beyond the invitation step. You can cancel a pending invitation before it's accepted; a Workspace Owner removes active workspace access.
Workspace guests who only use Ask
Info: Available on Enterprise plans
Guests come with the AI Agent, which is available on Enterprise plans.
A guest is someone you invite to ask the AI Agent questions, from the AI Agent section of Settings (People → Invite to a room). Guests join free and never take a seat. They see only Ask, and they read only the projects and files you pick for them. In the AI Agent people list, a guest shows as "Not a member · free" (or "Invited · free" until they accept). A guest is not a Workspace Member and doesn't appear with the roles above. See Invite guests to Ask.
Leave a workspace
- In User Management, open your own row and click your role at the top of the panel.
- Click Leave Workspace. The dialog, for example Leave Acme Analytics, warns: "Leaving will remove your access to all projects and datasets in this workspace."
- Click Leave Workspace.
You can also click Leave workspace in the footer of Profile Settings.
If you are the only Owner, Mammoth opens Review Workspaces instead:
- If the workspace has other members, choose one under Select the new owner ("Choose a member").
- Click Transfer & Leave Workspace.
- Type
DELETEin the box ("Type "DELETE" to confirm:") and click Leave Workspace.
The page reloads and the workspace no longer appears in your workspace list.
Delete your profile
Delete Profile permanently deletes your Mammoth account. Start it from your own role menu in User Management, or from Delete profile in Profile Settings. It opens a short wizard:
- Read the warning: "Deleting your profile will affect all workspaces where you are a member or owner."
- In Review Workspaces, check every workspace you belong to. Each is marked "You're a member", "Shared ownership" or "You're the only owner".
- For a workspace where you're the only owner and others are members, pick a new owner under Select the new owner. A workspace with no other members shows "This workspace will be automatically deleted when your profile is deleted."
- Click Transfer & Delete my Profile.
- At "Are you sure you want to delete your Mammoth profile?", type
DELETEand click Yes, Delete My Profile.
warning: Delete Profile is irreversible
Deleting your profile permanently removes your account, along with the workspaces only you own and their settings, users, data and projects. This cannot be undone.
Limits
| Item | Limit |
|---|---|
| Email addresses per invite | 250 |
| Seats | Set by your plan. Pending invitations count; Ask-only guests don't |
Troubleshooting
| Symptom | Cause | Fix |
|---|---|---|
| Invite Users is greyed out with "You can't invite users to this workspace. Contact the Workspace Owner." | You're a Workspace Member | Ask a Workspace Owner to invite the person |
| "You only have 2 seats left in this workspace..." | The invite needs more seats than are free | Invite fewer people, or upgrade the plan |
| "Invited users have lost edit access." | A trial ended or the plan was downgraded with more editors than seats | Upgrade, or remove members to get within the seat limit |
| A new member sees You are not in a project yet | They weren't added to any project | Use Assign to Projects in their side panel |
| "Invitation expired" | The invite wasn't accepted in time | Click Reinvite |
Related
- Workspace and project roles, permissions and custom roles: every permission by role.
- Share a project and set project roles: add people from inside a project.
- Invite guests to Ask: free, Ask-only access.
- Billing and plans: seats per plan.
- Audit logs: see who invited or removed someone.
Something wrong? support@mammoth.io