Workspace settings in Mammoth: General and Email groups
Workspace Settings is the control panel for your workspace: who has access, what they can do, storage, plan and how outside tools connect. Open it with the gear at the bottom of the left sidebar. Most controls are for Workspace Owners; Workspace Members see the same pages with fewer controls.
Settings opens with a list of sections on the left. On a phone, you first see the list, and each section opens as its own page.
Sections of Workspace Settings
| Section | What you can do here | Who sees it | Guide |
|---|---|---|---|
| General | Rename the workspace, check storage and plan, manage projects, restrict export destinations | Everyone. Rename and export destinations: Owners | This page |
| User Management | Invite users, change workspace and project roles, remove users, leave the workspace | Owners and Members (Members can only view) | Invite and manage workspace members |
| Roles & Permissions | See what each workspace and project role can do, and create custom roles | Owners, and roles with Manage custom roles (workspace and project) | Roles, permissions and custom roles |
| Email groups | Save a list of emails under one name to use in any invite | Everyone | This page |
| Plan & Storage | See your plan, seats and storage, manage billing, free up storage | Everyone. Plan and billing controls: Owners | Billing and plans, Storage |
| API Keys | Connect an AI assistant or the CLI, create API tokens, add external AI keys, register OAuth apps | Owners and Members | API keys and connected apps |
| AI Agent | Choose who can ask the AI Agent, and invite guests | People who manage agent access, when the agent is available in the workspace (available on Enterprise plans) | Set up AI Agent access |
| Connected apps | See and revoke third-party apps you allowed to access your Mammoth data | Everyone | Connected apps |
What the General section shows
The General section shows your workspace name and your role, a storage summary, the current plan and the list of projects. Workspace Owners also see the Export destinations card.
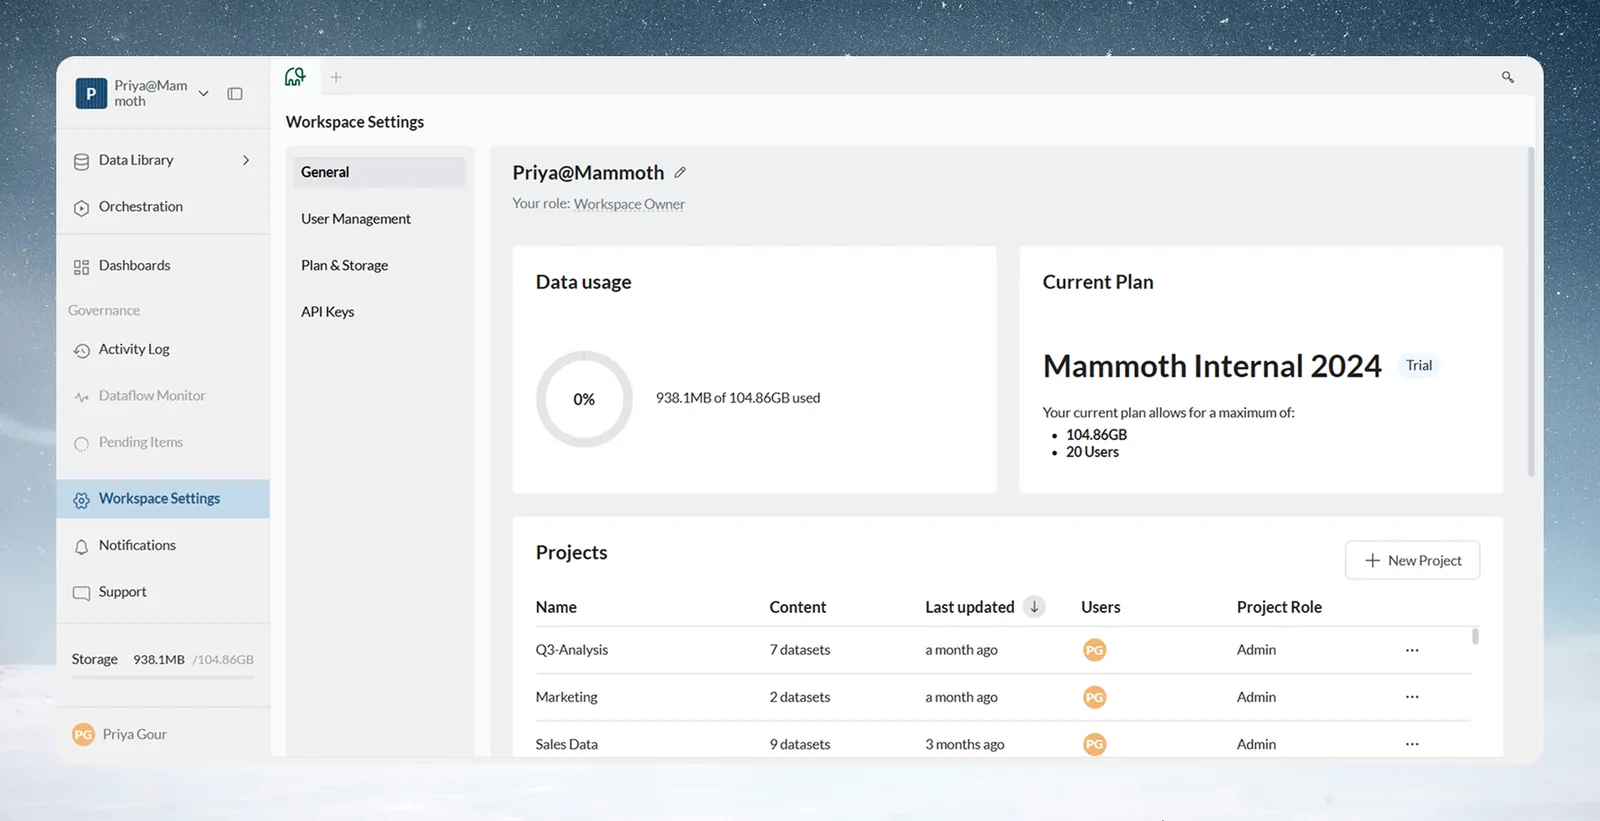
Next to Your role, click your role name to see what that role can do.
Rename your workspace
You need the Workspace Owner role.
- Open Workspace Settings → General.
- Click the pencil icon next to the workspace name. The Rename Workspace dialog opens.
- Enter a different name, up to 63 characters.
- Confirm.
For anyone who isn't an Owner, the pencil is disabled, with the tooltip "Your role doesn't have permission to perform this action".
Find your workspace ID
Hover over the workspace name in General to see the workspace ID.
Check storage use on the Data usage card
The Data usage card shows how much of your allocated storage is in use. Hover over it for the exact figures. It warns you at 80% and at 100%, and Owners who can change the plan get a Contact support button from 80%. For the warning levels and how to free space, see Check and free up workspace storage.
See your current plan
The Current Plan card shows your plan name, its status (Active or Trial), and the storage and number of users the plan allows.
A Change Plan button appears for Owners on self-serve plans, except during a trial. When a downgrade is scheduled, the card says so and offers Keep my plan. See Billing and plans.
Manage projects from the projects table
The projects table lists every project in your workspace.
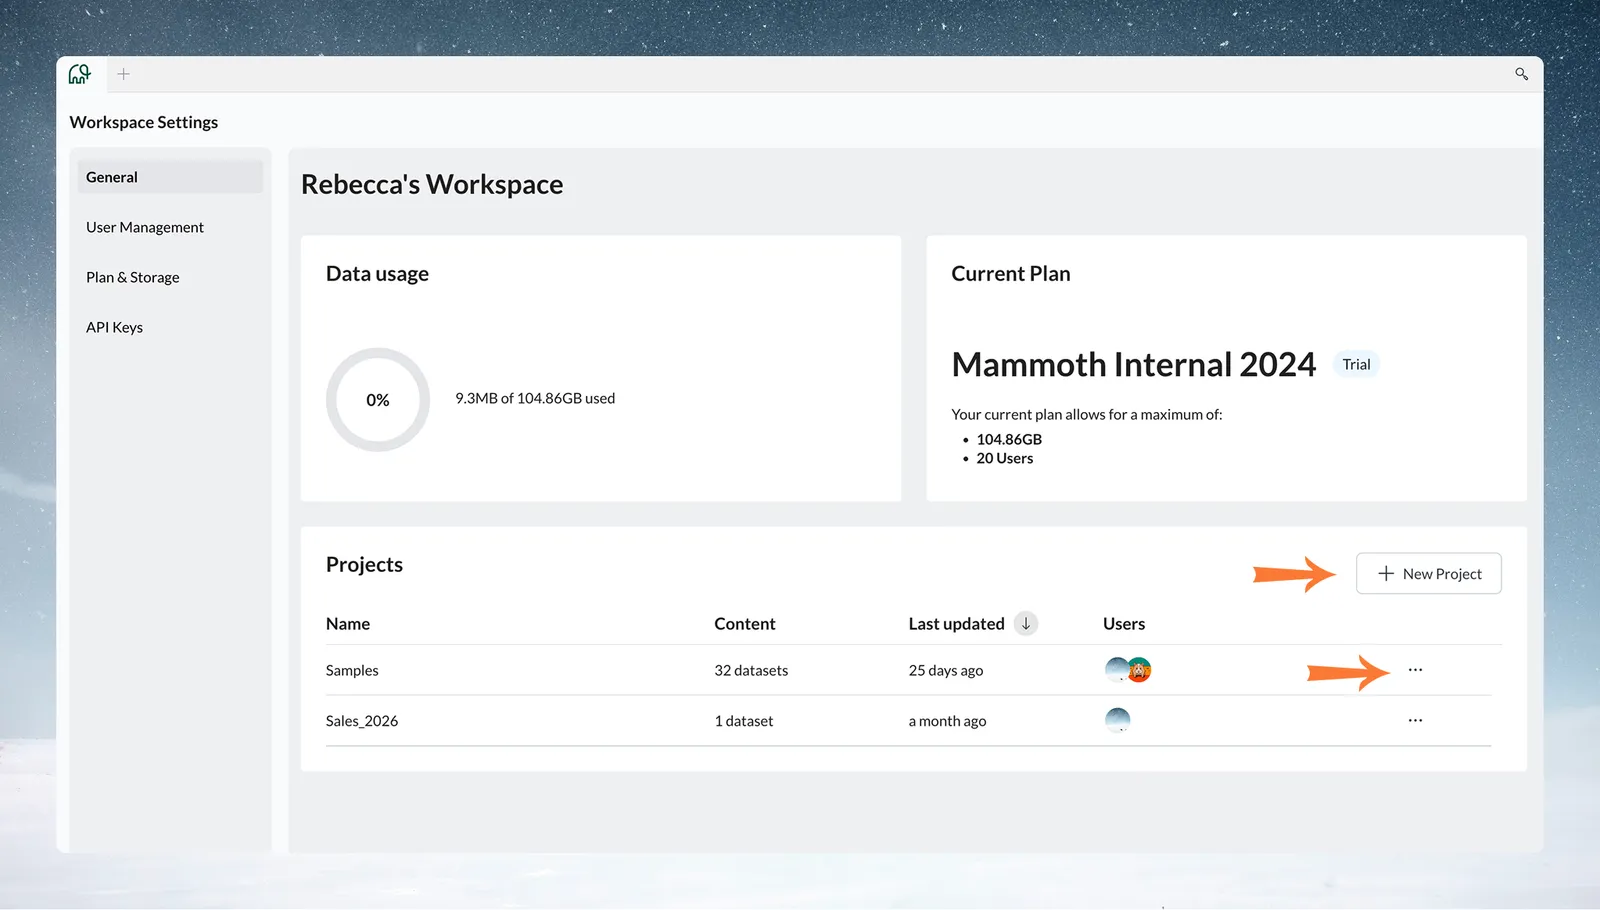
| Column | What it shows |
|---|---|
| Name | Project name (click to open it) |
| Content | Dataset count (for example, "3 datasets") |
| Last updated | How recently the project was changed |
| Users | Avatars of the users who have access to the project |
| Project Role | Your role in that project: Admin, Editor or Viewer, or a dash if you are not in it |
| ⋯ menu | Per-project actions |
Click New Project (top right) to create a project. The ⋯ menu offers Project Settings, Manage Users, Leave Project or Join Project, and Delete Project, depending on your role. If your role can't delete the project, Delete Project is greyed out. See Create and manage projects.
Limit where exports can send data with Export destinations
The Export destinations card controls where the AI custom export ("Somewhere else") may send this workspace's data. Only people who can rename the workspace (Workspace Owners) see this card.
- Turn on Only allow approved hosts.
- Type a host you approve in the host field, for example
api.example.com. - Click Add. Repeat for each host.
- Click Save.
| Option | What it does |
|---|---|
| Only allow approved hosts | When on, custom destinations can only send to the hosts in the list |
| Host field and Add | Adds a host to the list |
| Save | Saves the list |
With no hosts added, the list reads "No hosts approved yet." Before you save, Mammoth warns you when the list would stop exports you already have, for example "Saved exports send to api.example.com. With this list they stop at their next run." Saved exports that send anywhere else stop at their next run. With the restriction on and no approved hosts, every custom destination in the workspace stops sending at its next run.
For how custom destinations work, see Send data to a database or BI tool.
Save a list of emails as an email group
An email group is "A shortcut for a list of emails. Type its name in any invite." Open Email groups in Settings to see every group, with the columns Group, People, Made by and Last used.
- Click New group.
- Enter a Name, for example "Finance team".
- Add the emails.
- Click Create group.
You can also save a group from any invite field once you've typed two or more emails.
| Rule | Detail |
|---|---|
| Who can use a group | Anyone in the workspace |
| Who can change or delete it | The person who made it, or a workspace admin |
| Changing a group | Affects future invites only. People already invited keep their access |
| Deleting a group | Removes nobody's access |
AI Agent and Connected apps sections
The AI Agent section appears only for Workspace Owners. The AI Agent and Ask are available on Enterprise plans. There you choose who can ask the agent and invite workspace guests: see Set up AI Agent access.
The Connected apps section lists third-party apps you allowed to reach your Mammoth data, with Revoke. See API keys, AI assistants and connected apps.
Get SSO, enforced MFA or an IP allowlist
SSO, enforced (workspace-wide) MFA and IP allowlisting are not settings in the app. Mammoth sets them up for your workspace on request. Contact your Mammoth account team. See Security: sign-in, data security and compliance.
Related
- Invite and manage workspace members: the User Management section.
- Workspace and project roles, permissions and custom roles: the Roles & Permissions section.
- Check and free up workspace storage: Data usage and Manage storage.
- API keys, AI assistants and connected apps: the API Keys and Connected apps sections.
- Billing and plans: the Plan & Storage section.
Something wrong? support@mammoth.io