Create, leave and delete projects
A project groups related datasets and automations in a workspace and controls who can open them. Every dataset belongs to exactly one project. Any Workspace Owner or Workspace Member can create one from the project selector in the Data Library breadcrumb (New Project), and the creator becomes its Project Admin.
What a project does
- Organises data: groups datasets and automations for one initiative, team or business area.
- Controls access: decides who in your workspace can see and edit it.
- Sets shared date defaults: a Dates preset (US, UK / Europe, International (ISO) or Not set), or Customise reading and display… for how uploaded files are read and how new date columns are shown.
A workspace can hold many projects. Each one has its own datasets, access settings and members:
WORKSPACE
 └── Project A  (e.g. "Marketing Analytics")
 │    ├── Dataset: Campaign Performance
 │    ├── Dataset: Ad Spend
 │    └── Automation: Weekly Report Refresh
 │
 └── Project B  (e.g. "Finance Reporting")
 │    ├── Dataset: Revenue by Region
 │    └── Dataset: Budget vs Actuals
 │
 └── Project C  (e.g. "Product Insights")
      └── Dataset: User Engagement
A project's life usually runs: create it, set its access level, invite collaborators, add datasets and automations, adjust settings, share with new members as the team grows, and delete it when it's no longer needed (deleting is irreversible).
Who can create projects
All workspace roles can create projects: Workspace Owner and Workspace Member. The creator is automatically Project Admin on the new project, and this can't be changed at creation time.
If your plan has a project limit and you have reached it, New Project is blocked with "You have reached the project limit on your plan. Contact your admin to upgrade."
Create a project
- In the Data Library, click the down arrow next to the current project name in the breadcrumb. The project selector opens, listing every project you can access.
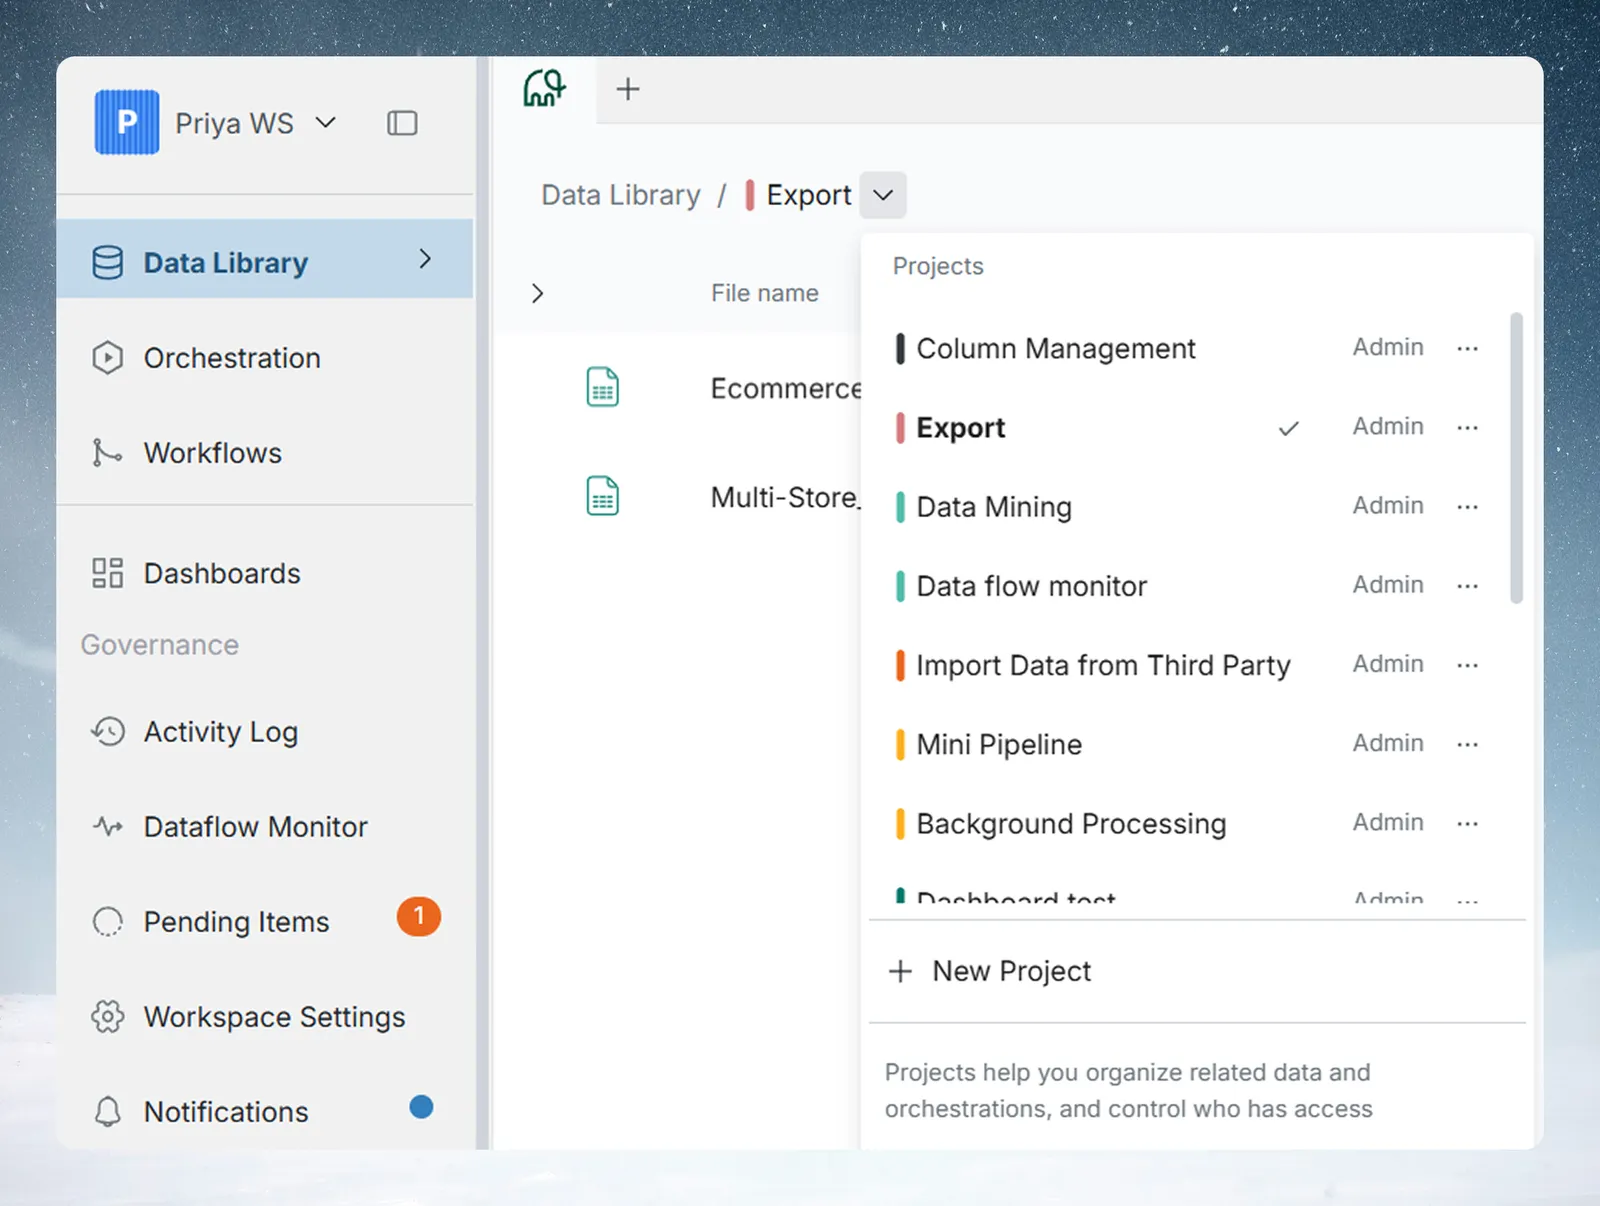
- Below the list, click New Project. The New Project dialog opens. You can also click New Project in the projects table in Workspace Settings.
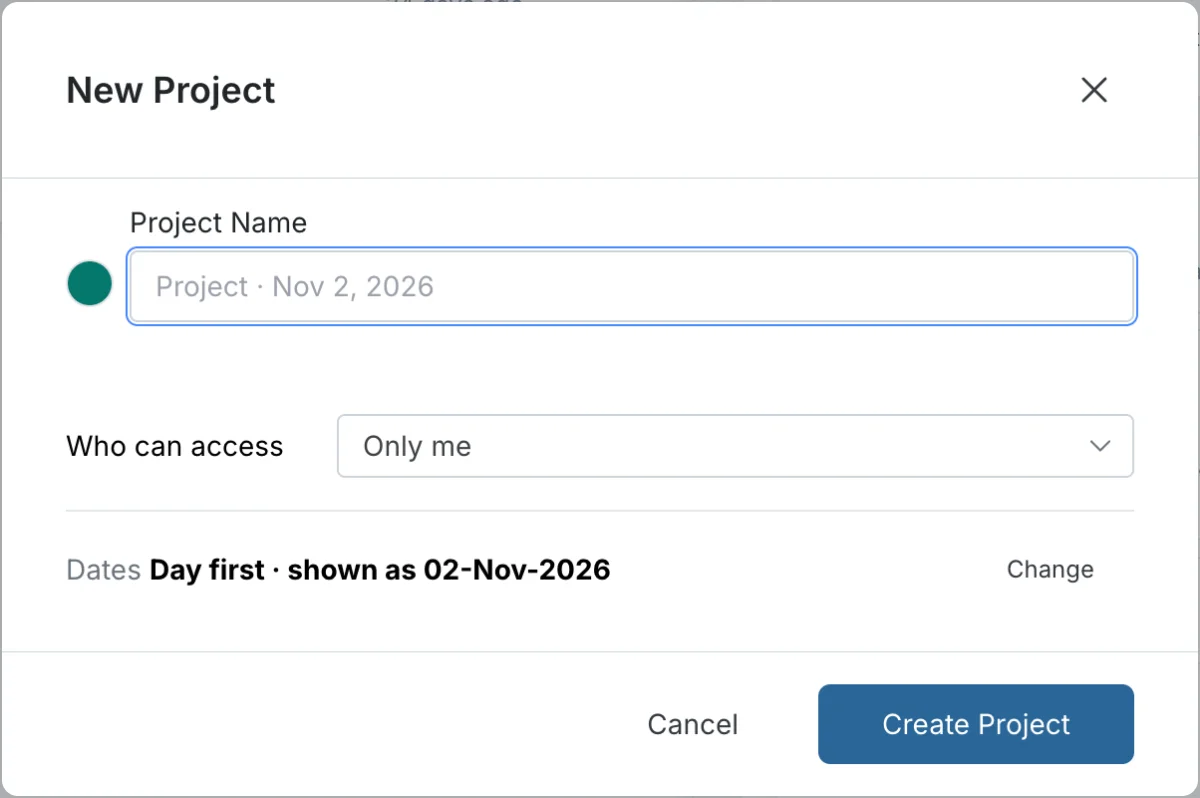
- Fill in the fields (see the table below).
- If you chose Some people in this workspace, search for users and give each a role: Project Admin, Project Editor or Project Viewer. They're added when you create the project.
- Click Create Project.
The project is created at once and you're switched into it.
| Field | Details |
|---|---|
| Project Name | Up to 63 characters. The empty field suggests a name with today's date, such as "Project · Nov 4, 2026". Press Tab to take it. If you leave the field empty, the project gets that name |
| Project colour | One of 8 preset colours. A random colour is pre-selected each time you open the dialog. Use colour to tell projects apart in the project selector |
| Dates | Starts on US if your browser time zone is in the US, otherwise UK / Europe. Click Change to pick US, UK / Europe, International (ISO) or Not set, or click Customise reading and display…. See Project settings |
| Who can access | Who can see the project. New projects start as Only me |
If your role can't view the workspace's users, Some people in this workspace is greyed out.
Choose who can access a project
| Access level | Who has access |
|---|---|
| Everyone in this workspace | All current workspace members, plus any members added to the workspace later |
| Some people in this workspace | Only the users you select. You control the list |
| Only me | Only you. No other workspace members can open the project until you share it |
You can change access at any time in Project settings.
What happens after you create a project
- You're added as Project Admin.
- The project appears in the project selector straight away.
- With Some people in this workspace, the users you picked are added in the same step.
- With Everyone in this workspace, all current workspace members are added.
- You can start adding datasets and automations.
Pick a clear project name
Good names help teammates find a project quickly: "Marketing Analytics - Q2 2025", "Finance Reporting - FY2025", "Customer Insights - Product Team" or "Sales Pipeline". Avoid "Project 1", "Test", "My Data", single letters, or abbreviations without context.
Open the project menu
Click More options (three dots) next to any project in the project selector. The menu shows the actions your role allows.
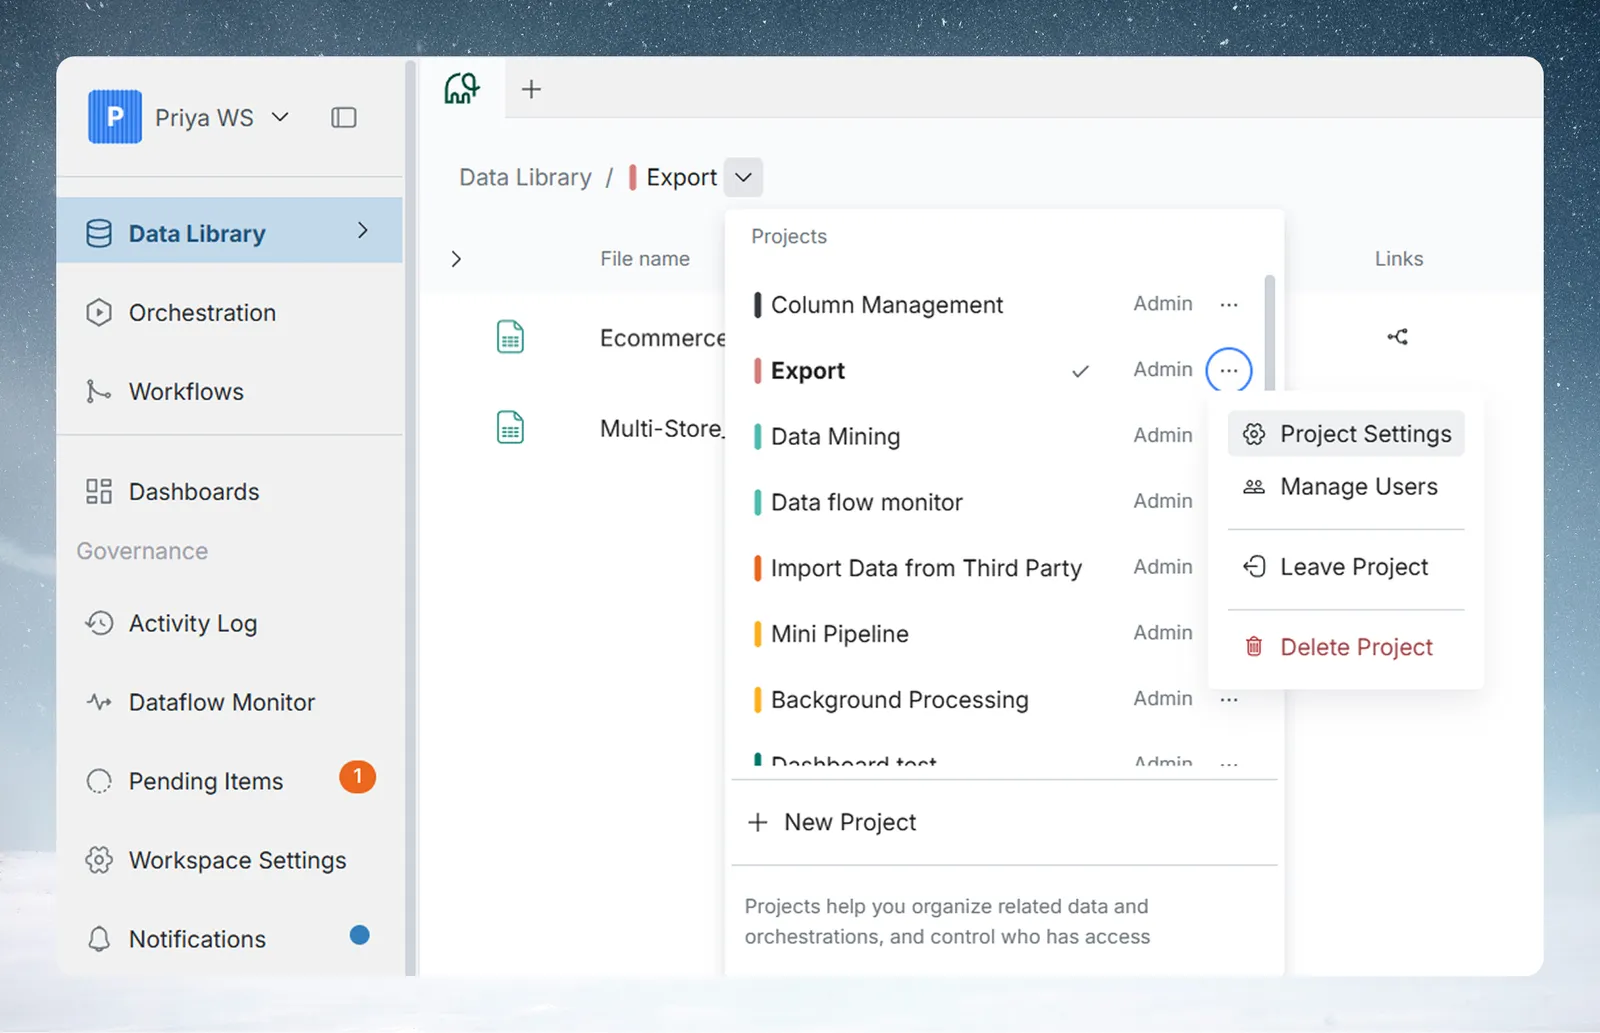
| Menu item | Who sees it | What it does |
|---|---|---|
| Project Settings | Project Admins | Opens the settings to rename, recolour, change date settings or change access |
| Manage Users | Project Admins, Workspace Owners | Opens Manage Project Users |
| Leave Project | Any project member | Removes your own access to the project |
| Join Project | Workspace Owners who are not members | Adds you to the project as Project Admin |
| Delete Project | Project members (greyed out unless you are a Project Admin) and Workspace Owners | Permanently deletes the project and everything in it |
Leave a project
You need to be a member of the project.
- Open the project selector.
- Click More options (three dots) next to the project.
- Click Leave Project.
- Read the dialog, for example "Are you sure you want to leave Finance Reporting? You will lose access to the Project and its contents."
- Click Leave.
Your access is removed at once. You can also leave from your own row in the Share Project or Manage Project Users window, where the last option reads Leave Project.
Join a project as a Workspace Owner
Workspace Owners who are not members of a project see Join Project in its menu. Joining adds them as Project Admin. An Owner must join as an admin to edit the project's settings.
Delete a project
Deleting a project permanently removes it and all its datasets, automations and contents for all users. There is no undo.
You need to be a Project Admin on that project, or a Workspace Owner (even without being a project member).
- Open the project selector.
- Click More options (three dots) next to the project.
- Click Delete Project (shown in red).
- In the confirmation dialog, type
DELETEin capitals. - Click Delete.
The project and its contents are permanently removed.
Limits
| Item | Limit |
|---|---|
| Project name | 63 characters |
| Project colours | 8 presets |
| Projects per workspace | Set by your plan. See Limits and quotas |
Troubleshooting
| Symptom | Cause | Fix |
|---|---|---|
| Delete Project is greyed out with "You need to join the project as an admin to delete it" | You aren't a Project Admin on it | Ask a Project Admin, or a Workspace Owner can delete it |
| "You have reached the project limit on your plan. Contact your admin to upgrade." | Your plan's project limit is reached | Delete a project or upgrade the plan |
| You can't see a project | It's set to Some people or Only me and you aren't in it | Ask its Project Admin to add you |
| Some people in this workspace is greyed out | Your role can't view the workspace's users | Pick another access level, or ask a Workspace Owner |
Related
- Project settings: rename, recolour, set dates or change access later.
- Share a project and set project roles: add people and set their roles.
- Workspace and project roles, permissions and custom roles: what each role can do.
- Core ideas: how projects, datasets and Views fit together.
- Invite guests to Ask: let people ask about a project's data without opening it.
Something wrong? support@mammoth.io