Export to Snowflake, BigQuery, PostgreSQL or SQL Server
Mammoth can write a View into a table after every pipeline run: another Mammoth dataset, a database Mammoth hosts for you, or your own database or warehouse. Click Export in the View toolbar, then pick a card on the Mammoth Managed or External Destinations tab. Send to Dataset, Snowflake and Databricks are on every plan; the other databases need a paid plan, and Mammoth-managed databases need Pro (see Export destinations by plan).
What every export shares (when it runs, send only new rows, run history, Auto-sync) is on Export data after every pipeline run.
Send a View to another dataset
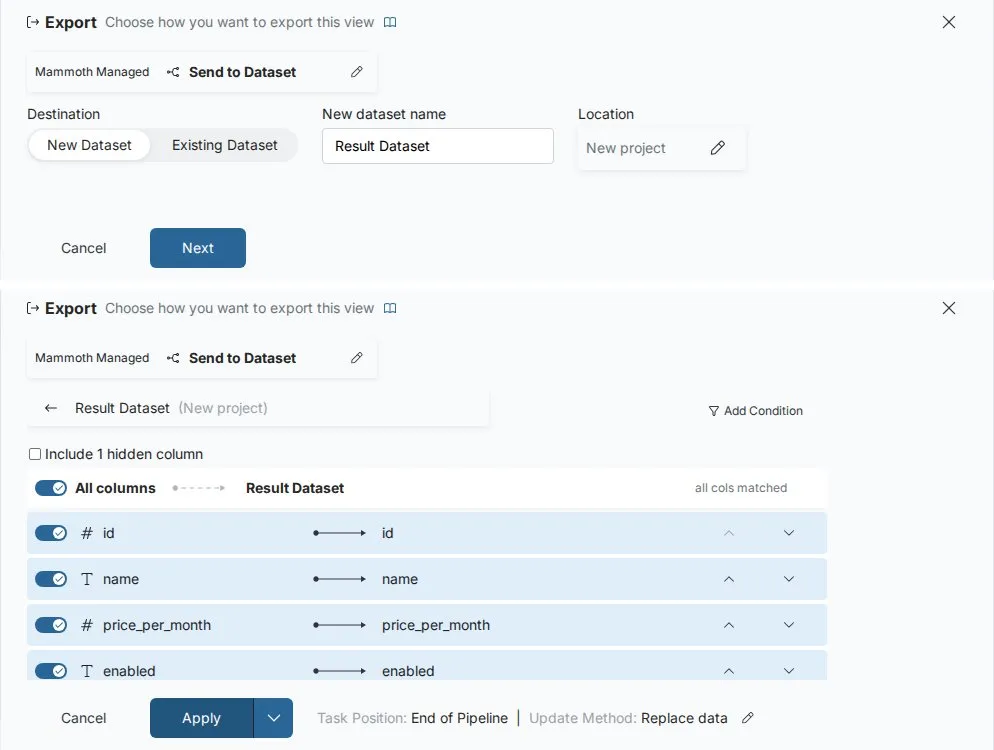
Send to Dataset pushes the current View's output into another Dataset, which can be in a different Project. Use it to pass processed results downstream in a multi-stage pipeline. Unlike New dataset in the Save a copy popover, it creates a persistent pipeline task that refreshes the Dataset on every run.
- Click Export, open the Mammoth Managed tab and click Send to Dataset.
- Choose New Dataset or Existing Dataset.
- New Dataset: enter a name and pick a Location (a folder, which can be in another Project).
- Existing Dataset: select a Dataset from the picker.
- Click Next.
- On the second step, set what is sent:
- A filter condition, to send only matching rows.
- Include hidden columns, to send columns hidden in the grid.
- The column list, which maps each column to the destination. For an existing Dataset, Hide already-mapped columns helps you find the ones still to map.
- Each time this runs (see below).
- Task Position, in the form footer: click the pencil icon and tick Keep at the end of the Pipeline to keep the task at the end of the pipeline.
- Click Apply.
| Each time this runs | What happens |
|---|---|
| Keep this view's rows up to date | Swaps the rows this View sent last time for its new ones. Rows other Views sent to the same Dataset stay |
| Add a new copy of all rows | Keeps every earlier run too, so totals grow on each run |
If other Views also send to the Dataset, an Also fed by note names them. If you switch an existing task from Add a new copy of all rows to Keep this view's rows up to date, the next run also removes the copies this View added on earlier runs.
Auto-sync for this task is switched from the step's options menu.
Get a Mammoth-managed BigQuery or PostgreSQL database
Mammoth provisions a fully managed Google BigQuery or PostgreSQL instance on demand: no credentials to configure, no infrastructure to manage. Each appears as its own card on the Mammoth Managed tab, alongside Send to Dataset and Live link. They need the Pro plan.
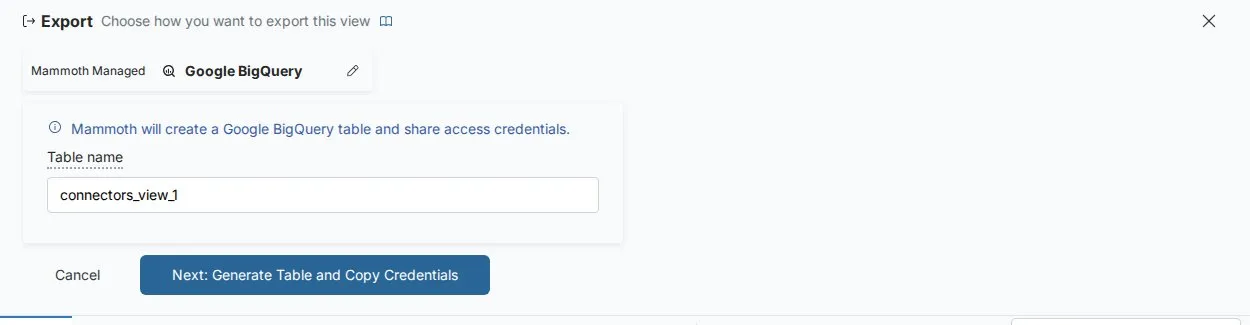
- Click Export, open the Mammoth Managed tab and click the Google BigQuery or PostgreSQL card.
- Enter the destination table name (auto-filled from your Dataset and View names).
- Click Next: Generate Table and Copy Credentials.
- Mammoth creates the table, showing progress messages as it works, then opens the Database Credentials dialog.
- Use those credentials to connect your BI tool (Tableau, Power BI, Looker) directly.
| Managed database | Credentials you get |
|---|---|
| PostgreSQL | Host, port, username, password, database and table, with a Copy all credentials button |
| BigQuery | The dataset and table, a Service Account Email to paste into tools such as Power BI, and a downloadable Service Account JSON key file. Keep the key secure |
The managed database table is replaced in full on each pipeline execution (drop and recreate). Managed databases have no Keep-at-end option. A workspace that is over its managed-database limit gets an error when it creates a managed table.
Supported external databases and warehouses
You provide the credentials; Mammoth delivers the data after each pipeline run.
| Destination | Default port or credential type | Typical use |
|---|---|---|
| Google BigQuery | (JSON key file) | Cloud analytics, Looker integration |
| Snowflake | (password or key pair) | Cloud data warehouse |
| Databricks | (personal access token) | Lakehouse tables in Unity Catalog |
| Elasticsearch | 9243 | Search index, operational dashboards |
| SQL Server | 1433 | Microsoft ecosystem, Power BI |
| MySQL | 3306 | Web application backend |
| PostgreSQL | 5432 | General-purpose database, Tableau/Power BI |
| Amazon Redshift | 5439 | AWS data warehouse |
The footer of the export form shows the task's Position (default: end of pipeline) and Update method. Click the pencil icon to change them (see Task position and update method).
Allow Mammoth's IP address in your firewall
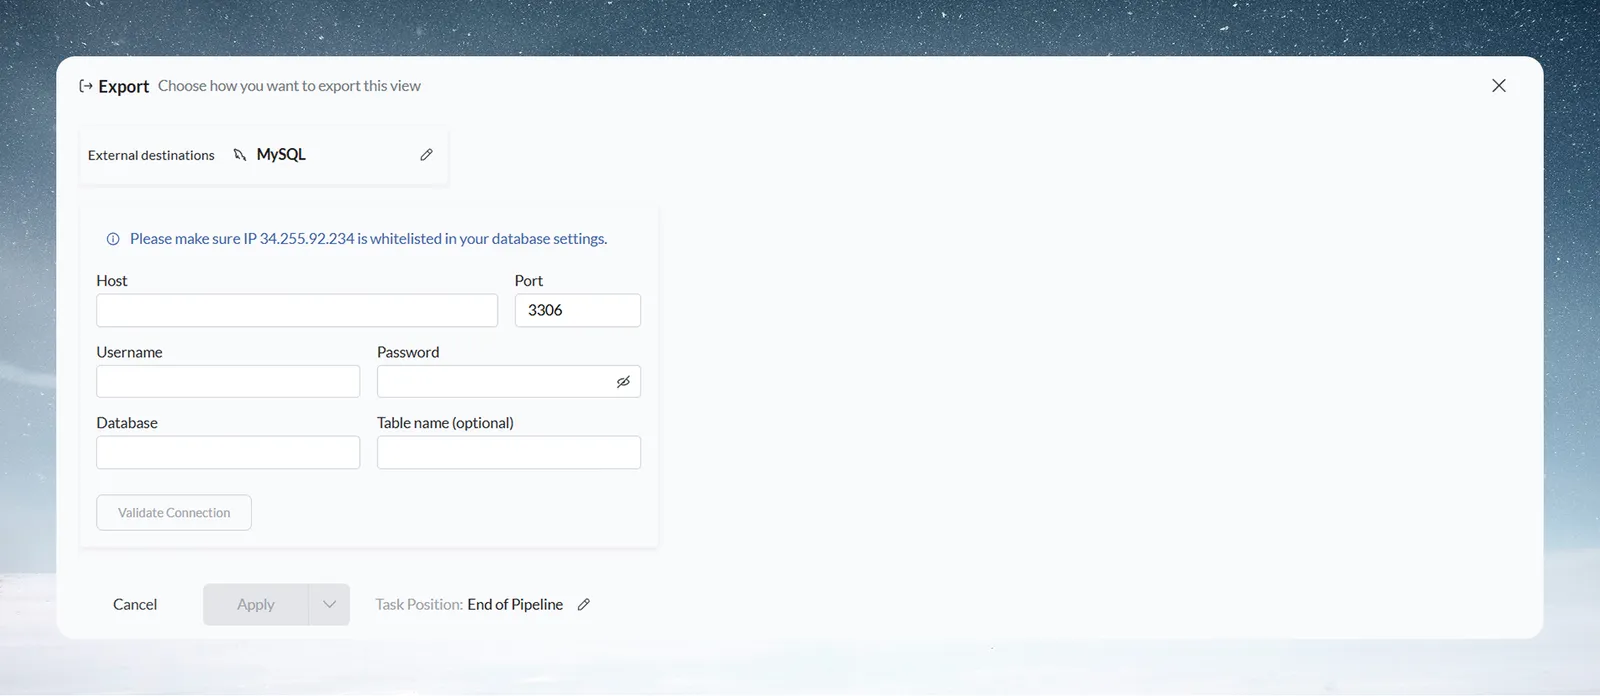
Whitelist Mammoth's IP address (34.255.92.234) in your database firewall before clicking Validate Connection. The required IP is shown at the top of the database, warehouse and Elasticsearch forms. See Allow Mammoth through your firewall.
Export to Google BigQuery
BigQuery uses a JSON service account credentials file, not a username and password.
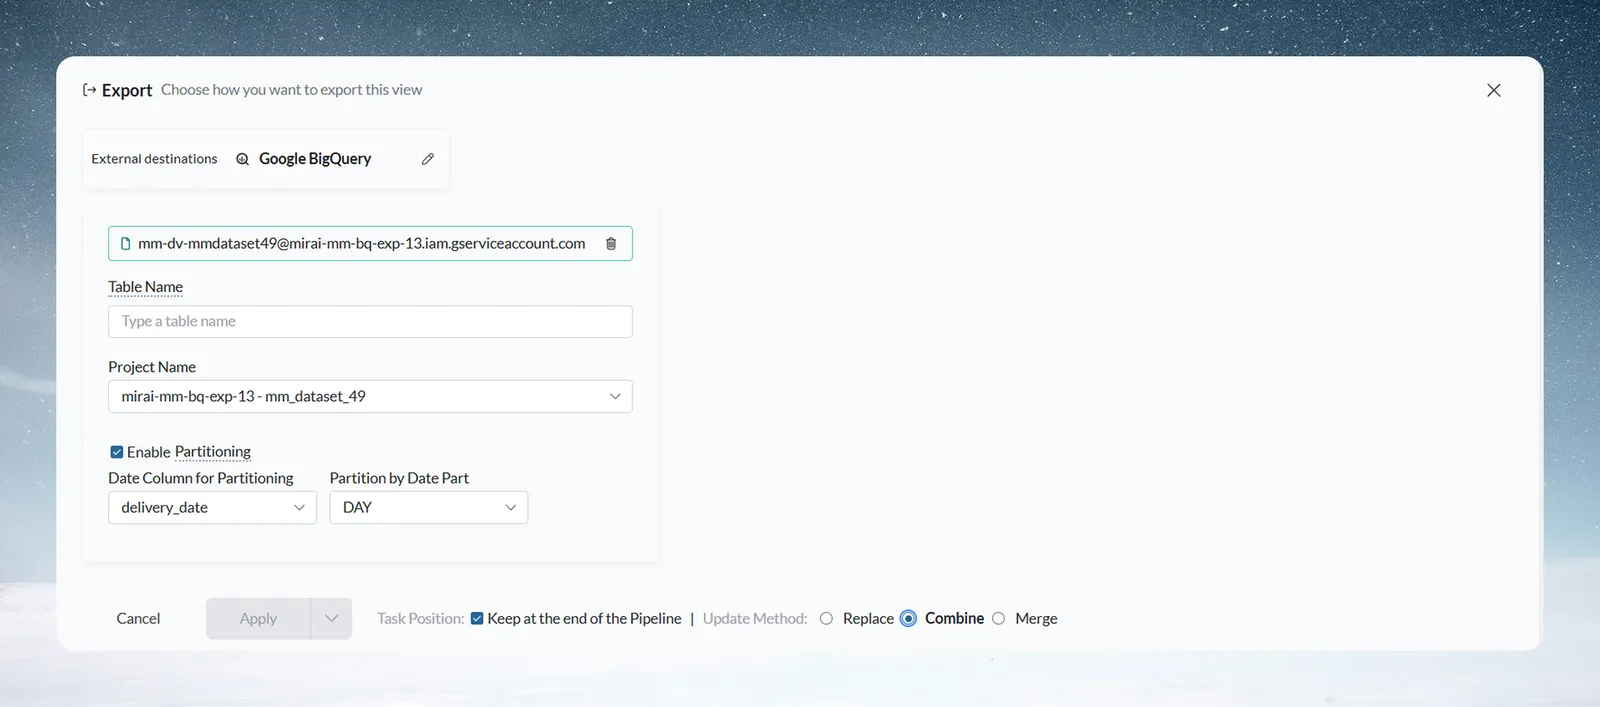
- Upload your BigQuery service account JSON file. If you have saved more than one connection, pick one from the Connection dropdown; an icon next to it deletes a saved connection.
- Enter the Table Name.
- Select your Project Name from the searchable dropdown (populated from your credentials). Each entry represents a project/dataset pair.
- Choose the Update method in the form footer: Replace, Combine or Merge.
- If using Merge, select the Reference Column values used as merge keys.
- Optionally enable Partitioning (requires a DATE column in the View).
Mammoth also writes a reference table named ref_<table> alongside the data table in the BigQuery dataset.
Partition a BigQuery table by date
Partitioning is available when the View contains DATE columns.
- Tick the Partitioning checkbox and select a date column as the partition key.
- Choose the partition granularity: Day, Month, or Year.
When editing an existing BigQuery export, the Partitioning checkbox is only enabled if the Update method is Replace. When creating a new export, Partitioning can be set up alongside Combine or Merge too.
Export to PostgreSQL, MySQL, SQL Server or Amazon Redshift
These four databases share the same form.
| Field | What to enter |
|---|---|
| Host | Your database server hostname or IP address |
| Port | Pre-filled with the connector's default (3306 for MySQL, 5432 for PostgreSQL, 1433 for SQL Server, 5439 for Redshift) |
| Username | A database user with write permissions |
| Password | The database user's password |
| Database | The name of the target database |
| Table name (optional) | If left blank, Mammoth uses a default name derived from the Dataset and View |
- Allow Mammoth's IP address in your firewall.
- Fill in the fields, or pick a saved connection (below).
- Choose Replace, Combine or Merge as the Update method in the form footer. With Merge, pick at least one Reference Column.
- Click Validate Connection.
- Click Apply.
Validate Connection confirms Mammoth can reach your database: it creates and then drops a test table. Apply only checks that the required fields are filled in. It isn't blocked by a failed or skipped validation, so validating first is the only way to catch bad credentials before the export runs.
Include hidden columns: a checkbox appears if your View has columns that are hidden in the grid. Enable it to include those columns in the export output.
Column names longer than 63 characters make the export fail, so shorten them first.
Reuse a saved database connection
PostgreSQL, MySQL, SQL Server, Amazon Redshift and SFTP exports remember the connection details you use. Once you have one saved, the form shows a Connection dropdown ("Select a saved connection") above the fields.
- Pick a saved connection to fill the form from it. A summary of the connection appears under the dropdown.
- Click Enter details manually to clear it and type new details.
- When you apply new details, Mammoth reuses an identical saved connection if there is one, so repeated exports to the same place don't pile up duplicates.
- If the saved connection was removed, the form says "This saved connection is no longer available. Enter the connection details below."
- If the list can't load, you see "Couldn't load saved connections. You can still enter details manually."
Google BigQuery has its own Connection dropdown for saved key files (see Export to Google BigQuery). To manage saved connections, see Manage saved connections.
Export to Snowflake or Databricks
Snowflake and Databricks share one warehouse form. Table and column names are created exactly as written (quoted), so they are case-sensitive.
| Snowflake field | What to enter |
|---|---|
| Authentication | Password or Key pair |
| Account identifier, Username | Your Snowflake account and user |
| Password, or Private key (PEM) and Private key passphrase (optional) | The password, or the key pair |
| Warehouse, Database, Schema | Where the table goes |
| Role (optional), Table name (optional) | The role to use and the table to write |
| Databricks field | What to enter |
|---|---|
| Server hostname, HTTP path, Personal access token | Your SQL warehouse connection |
| Catalog, Schema | Where the table goes |
| Staging volume (optional) | A Unity Catalog volume such as /Volumes/main/sales/landing. With it, data is bulk-loaded with COPY INTO; without it, rows are inserted in batches, which is much slower for large Views |
| Table name (optional) | The table to write |
Both forms show Mammoth's IP address to allow in your firewall, an Include hidden columns checkbox and Validate Connection. Choose Replace, Combine or Merge as the Update method; with Merge, pick at least one Reference Column.
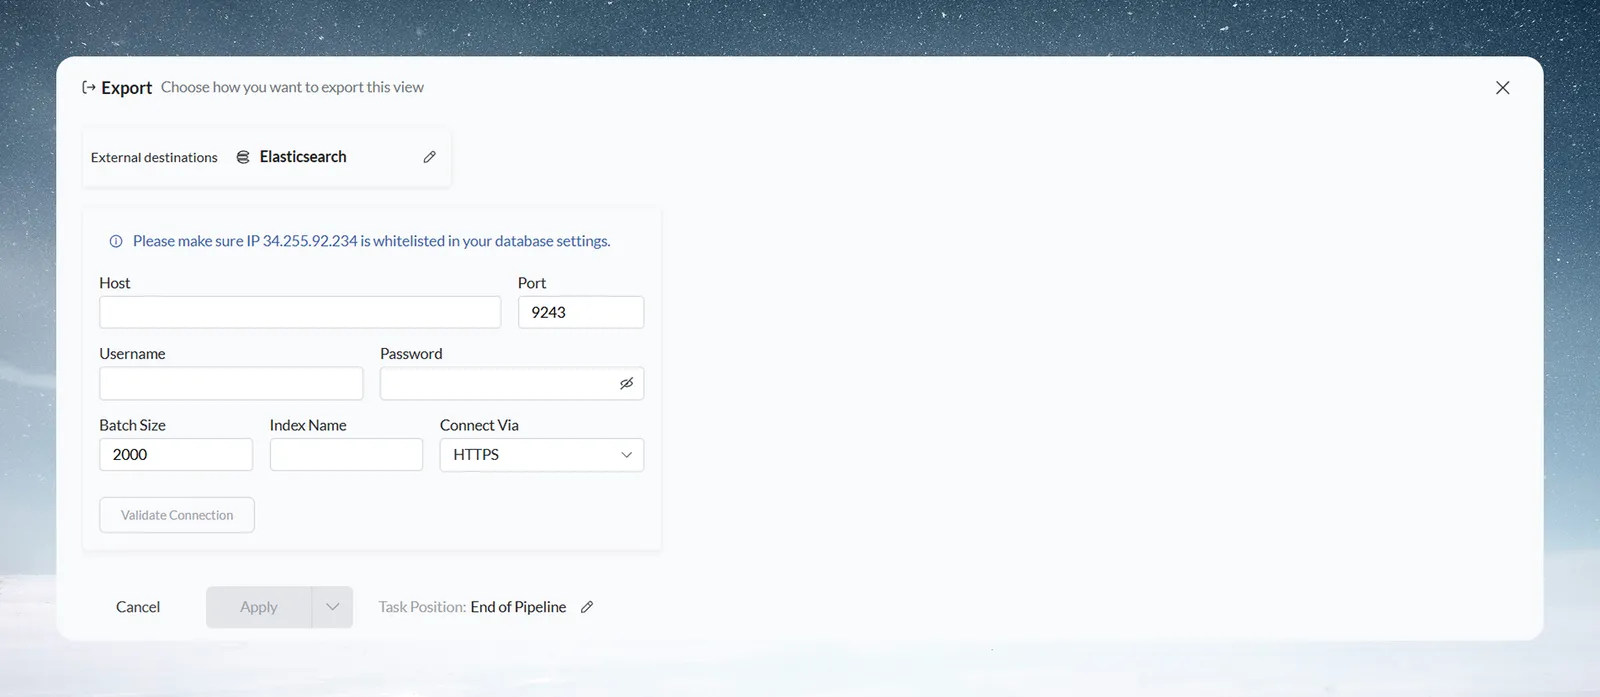
Export to Elasticsearch
| Field | What to enter |
|---|---|
| Host | Your Elasticsearch server hostname |
| Port | Default 9243 |
| Username | Elasticsearch username |
| Password | Elasticsearch password |
| Batch Size | Number of records per batch (default: 2,000) |
| Index Name | The Elasticsearch index to write to |
| Connect Via | HTTPS or HTTP (default: HTTPS) |
Whitelist Mammoth's IP address (34.255.92.234) in your Elasticsearch firewall, then click Validate Connection before Apply. Apply isn't gated on a successful validation, so validating first is the only way to catch bad credentials before the export runs.
Include hidden columns is available if your View has hidden columns. Elasticsearch is replaced on every run, so it can't send only new rows.
Limits
| Item | Limit |
|---|---|
| Column name length (PostgreSQL, MySQL, SQL Server, Redshift) | 63 characters |
| Elasticsearch batch size | 2,000 records by default |
| Live links per View | 1 (see Live links) |
Troubleshooting database exports
Validate Connection fails
Cause: Mammoth's IP address (34.255.92.234, shown in the form) is not allowed in your database firewall, or the credentials lack permissions. Validate Connection checks for CREATE TABLE and DROP TABLE permissions.
Fix: Add the IP address to your firewall allowlist. Also grant INSERT permission, which the data delivery needs once the export runs.
Schema conflict error
Cause: This applies to database and warehouse exports using the Combine or Merge update method, where the destination table persists between runs. The View's columns no longer match the destination table's columns, so the run fails.
Fix: Delete and recreate the destination, or adjust the View to match the original column structure.
Merge fails
Cause: The Reference column is missing from the View or the destination table, or the names or data types don't match.
Fix: Confirm the Reference column exists in both with matching names and compatible data types.
The export fails on long column names
Cause: A column name is longer than 63 characters.
Fix: Shorten the column name in the View (see Rename, format and sort columns).
For a destination that doesn't update, see Troubleshooting exports.
Related
- Export data after every pipeline run: plans, when it runs, run history and Auto-sync.
- Send to files, apps and APIs: SFTP, SharePoint, Google Sheets, Email, Tableau and REST API.
- Live links: a CSV URL for Power BI and Excel.
- Allow Mammoth through your firewall: IP addresses to allow.
- Manage saved connections: reuse database credentials.
Something wrong? support@mammoth.io