Set up your Mammoth workspace: team, projects and API access
Setting up a new workspace takes four steps: general settings, inviting the team, setting up projects, and API access. Most of it happens in Workspace Settings, at the bottom of the left sidebar. The Workspace Owner, an IT administrator, or the team lead responsible for data operations should do it, because it sets team structure, security policies and project organisation.
What a workspace and a profile are
A workspace is tied directly to your subscription and billing. It contains all your projects, datasets, users and security settings. The person who creates the workspace becomes the Workspace Owner, with control over billing, user invitations and API keys. Workspace Members are the people you invite, with permissions based on their roles.
A Profile is your personal Mammoth account, tied to your email address. It controls your sign-in credentials and MFA, personal settings, and access to one or more workspaces. A profile holds no data: data always lives inside a workspace. A profile is like an employee badge; it gives you access to buildings, but it isn't the building.
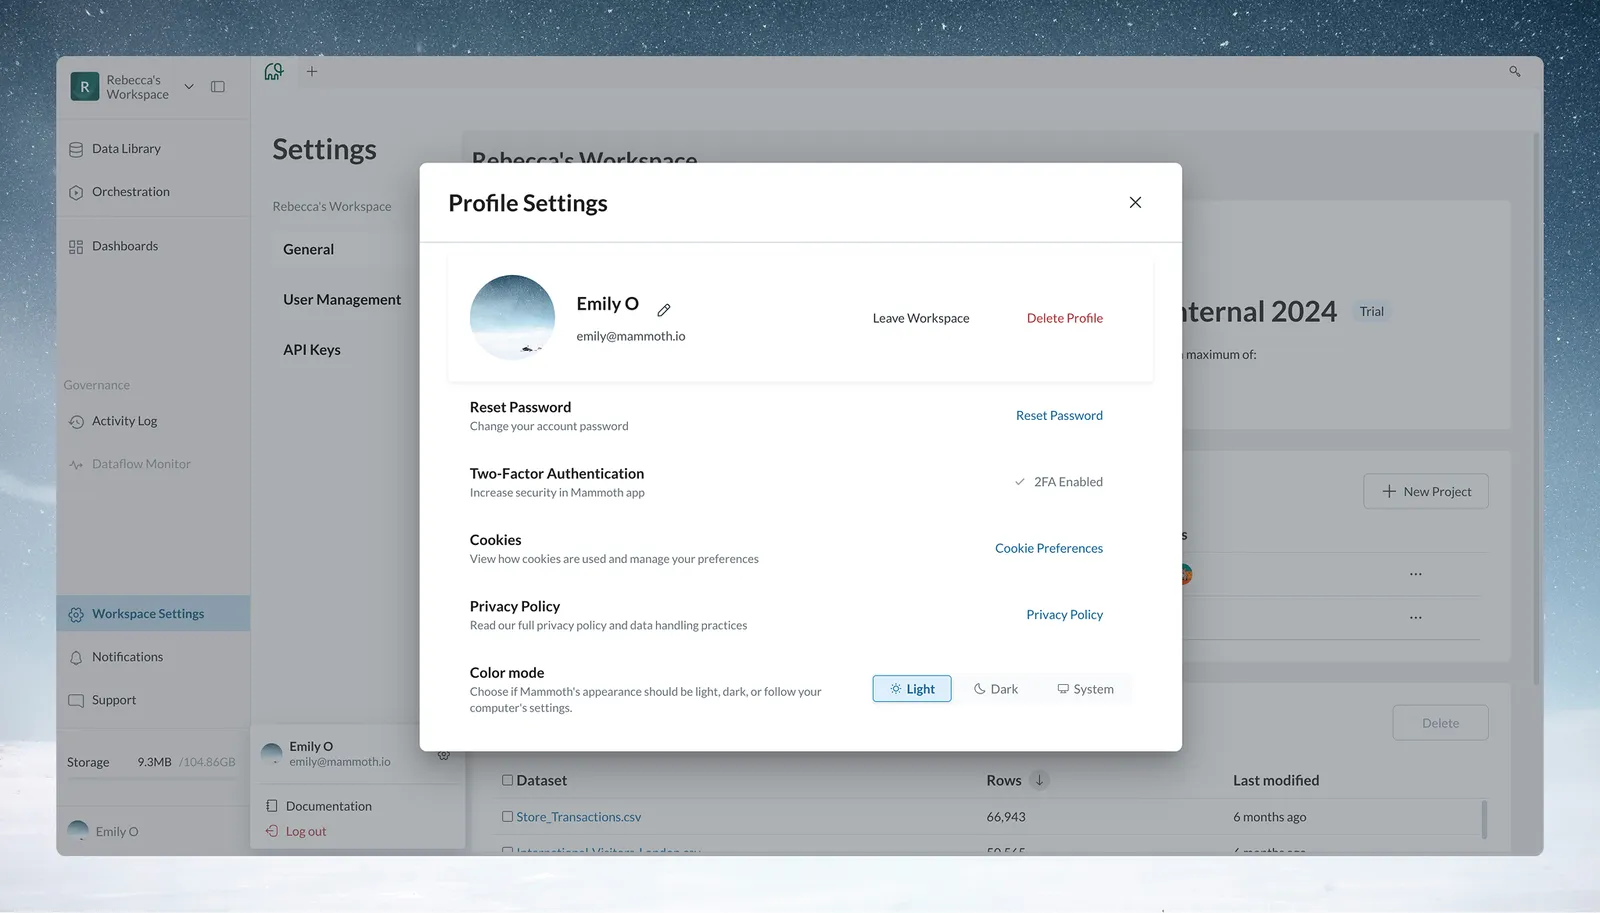
To open your profile, click your name at the bottom of the left sidebar, then the gear icon. Profile Settings lets you edit your name and picture, reset your password, turn on two-factor authentication (depending on your plan), and choose a Color mode (Light, Dark or System). See Your profile.
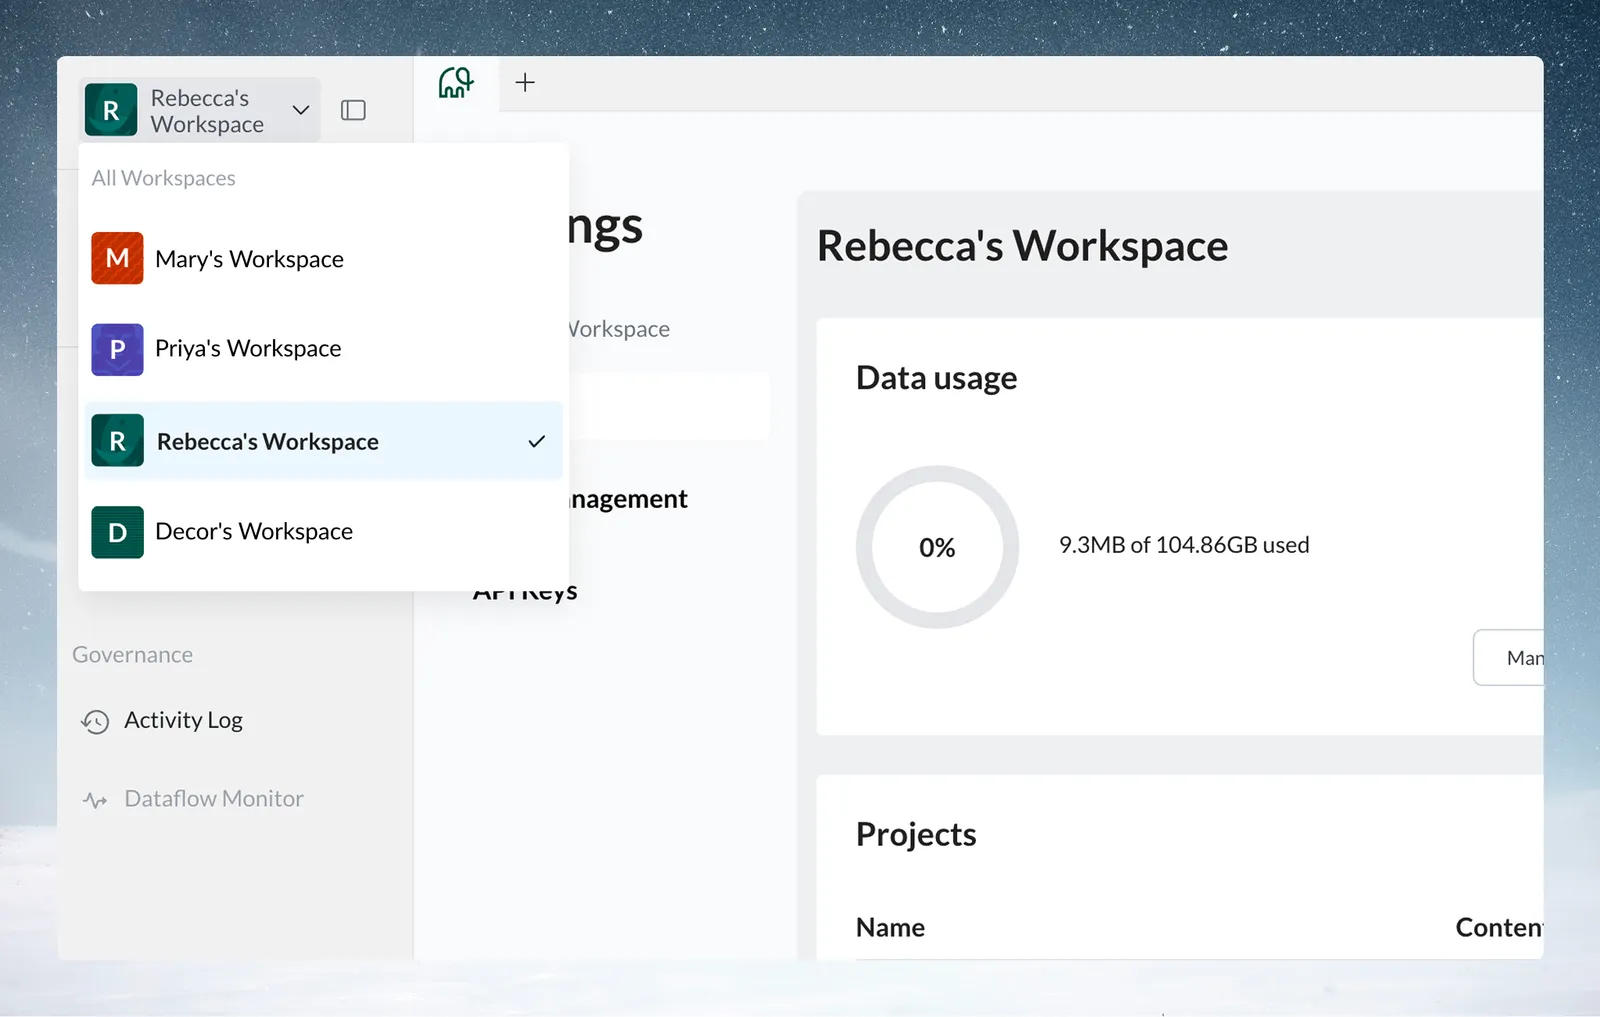
To move between workspaces, click the workspace name at the top of the left sidebar and pick one under All Workspaces. See Switch workspaces and find your way around Mammoth for the rest of the sidebar.
Before you start
Gather this before you configure anything:
- Team members list: names, email addresses and intended roles.
- Project structure plan: by department, client or workflow.
- Data sources inventory: databases, APIs and cloud storage you'll connect.
- Security requirements: whether you need SSO, enforced MFA or an IP allowlist. Mammoth sets these up on request; they aren't settings you turn on. See Security.
- Integration needs: scripts, AI assistants, the CLI, or BI tools such as Tableau or Power BI.
Choose a project structure
| Pattern | Example projects | Best for |
|---|---|---|
| Department-based | Sales, Finance, Operations | Teams that work independently on their own data |
| Client-based | Client_A, Client_B, Internal | Consulting firms and agencies with several clients |
| Process-based | Raw_Data, Transformation, Reporting | Central data teams running organisation-wide workflows |
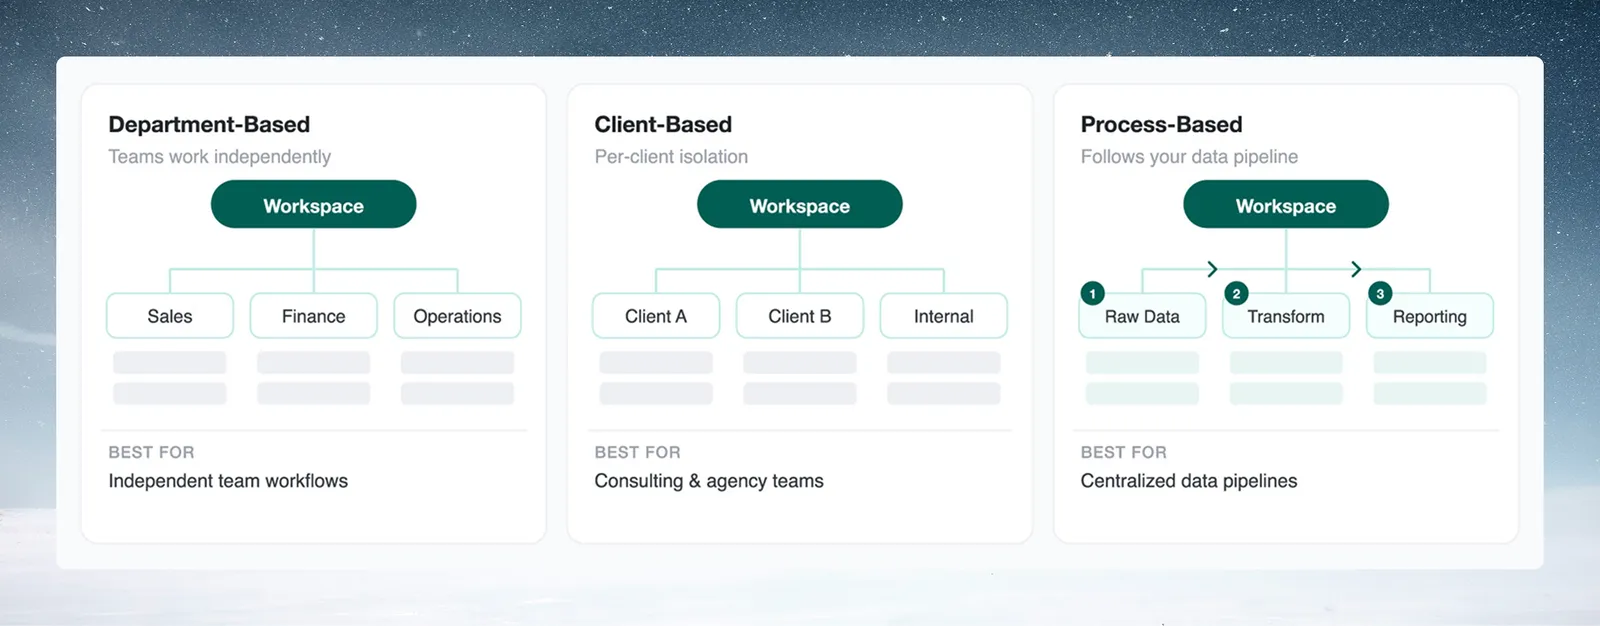
Start with two or three projects. You can add more later.
Open Workspace Settings
Click Workspace Settings at the bottom of the left sidebar. The settings page opens with a list of sections on the left.
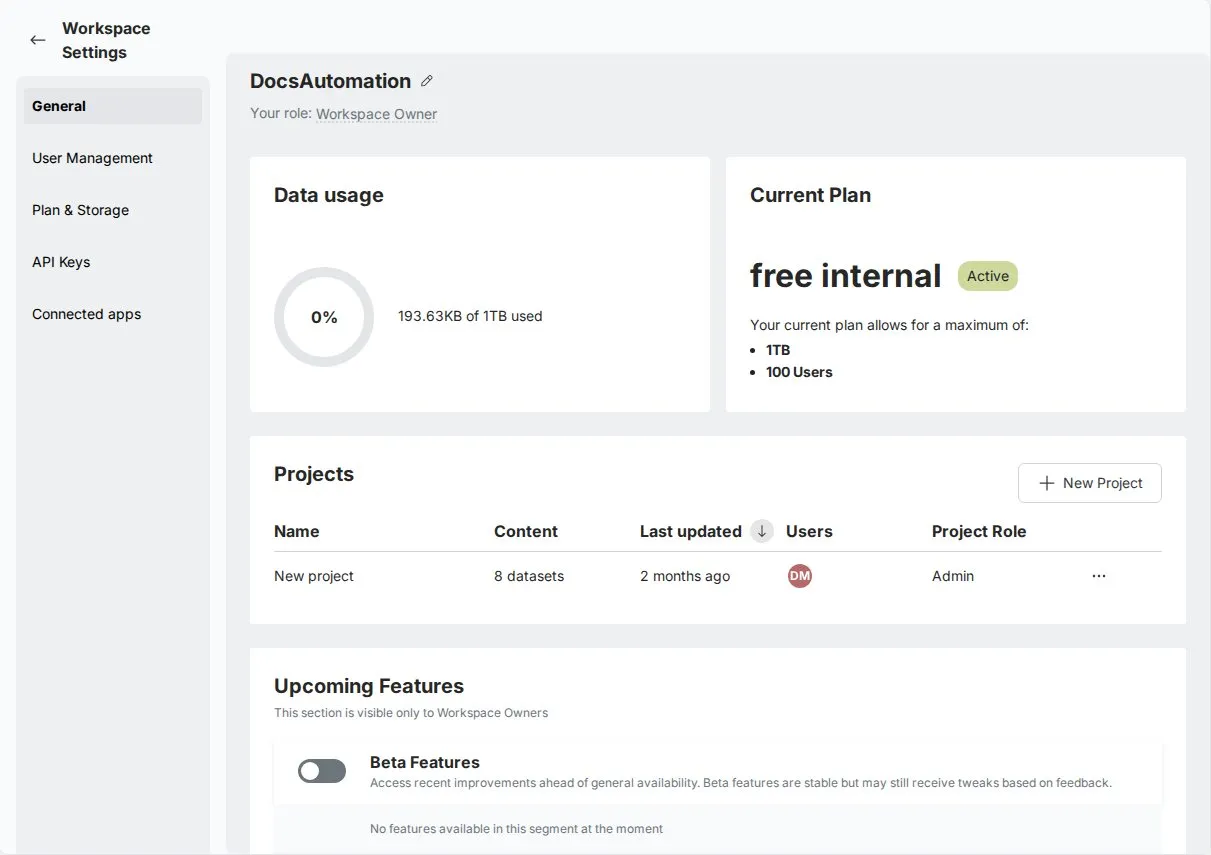
The sections appear in this order. Some show only for certain roles or plans:
| Section | What it holds |
|---|---|
| General | Workspace name, storage usage, current plan, projects, and (for Owners) Export destinations |
| User Management | Inviting team members and managing roles |
| Roles & Permissions | What each workspace and project role can do, and custom roles on the Pro plan (Workspace Owners, and roles with Manage custom roles (workspace and project)) |
| Email groups | Named lists of email addresses you can type into any invite field |
| Plan & Storage | Subscription plan details and storage management |
| API Keys | Connecting an AI assistant or the CLI, API tokens, external AI provider keys, and OAuth apps |
| AI Agent | Who can ask the AI Agent, and guests. Only Workspace Owners see this section (available on Enterprise plans) |
| Connected apps | Third-party apps you allowed to access your Mammoth data |
See Workspace settings for every option.
Step 1: Rename the workspace and check storage and plan
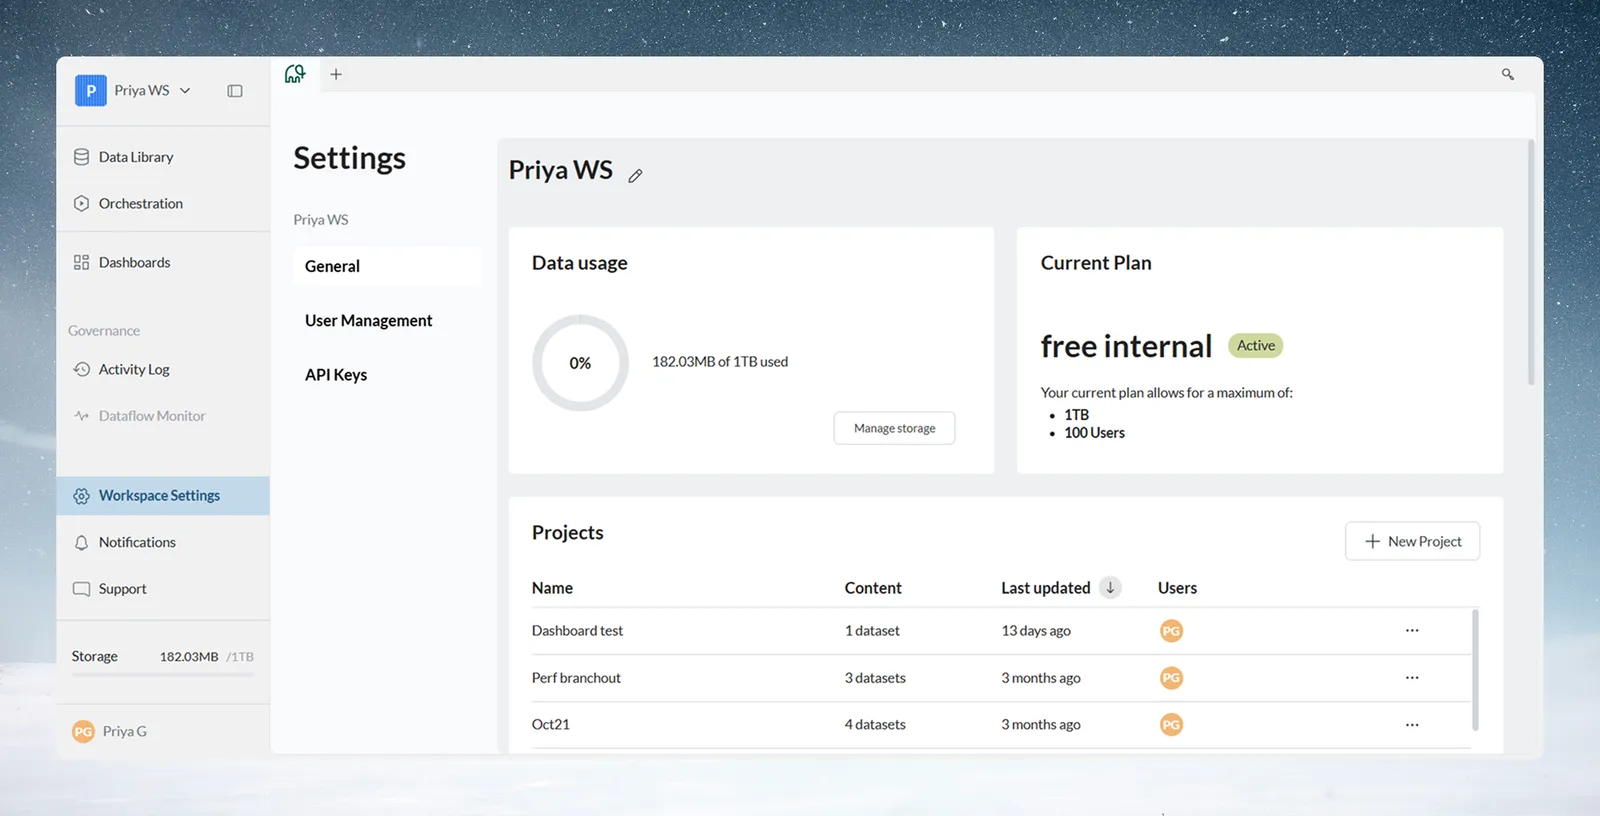
The General section gives an overview of the workspace.
- Click the pencil icon next to the workspace name.
- Enter a new name, up to 63 characters.
- Confirm.
Only Workspace Owners can rename the workspace. Use a clear name, so people with several workspaces can tell them apart.
The section also shows:
- Data usage: how much of your storage is in use. From 80% you see a "Storage almost Full" warning.
- Current Plan: your plan name, its status (Active or Trial), and the storage and users it allows. Owners on self-serve plans also see Change Plan here. See Billing and plans.
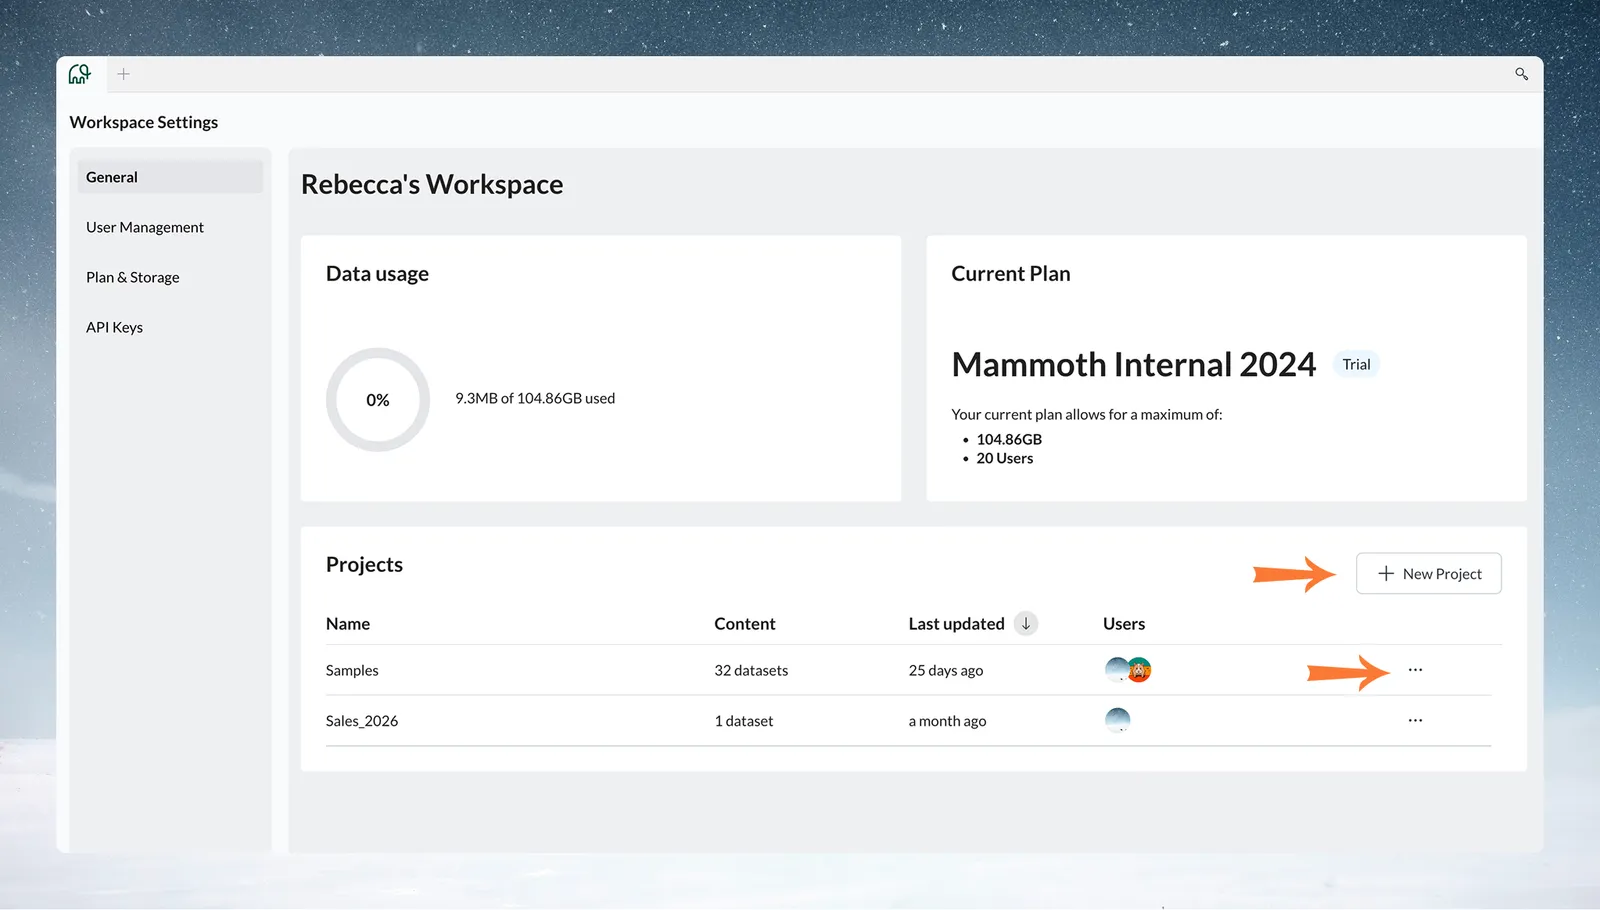
- Projects: every project with its dataset count, last updated time and assigned users. Create a project with New Project, or open more actions from the overflow menu (⋯).
Step 2: Invite your team to the workspace
You need to be a Workspace Owner. Assigning the right role at the start prevents permission problems later.
- In User Management, click Invite Users.
- Enter the email addresses. Separate several with commas, semicolons or spaces, or put each on its own line.
- Optionally tick Assign to Projects and pick the projects the invited users should join.
- Click Invite.
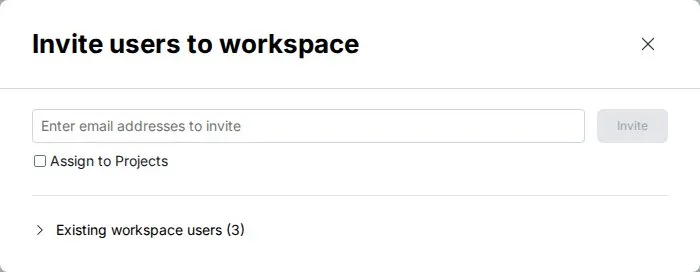
Invited users receive an email invitation. They create their Mammoth accounts from it and gain access to your workspace.
Which role to give each person
| Role | Give it to |
|---|---|
| Workspace Member | Most team members. It is the default and safest starting role: they work with data only in projects where they're granted access |
| Project Admin | Department heads or team leads who manage a project and add people to it |
| Project Editor | Analysts and business users who work with data but don't manage project access or membership |
| Project Viewer | People who only need to look at Data Library items, read-only. To share only dashboards, share the dashboard instead of adding people to the project |
| Workspace Owner | The person who created the workspace, plus anyone you promote. A workspace can have several Owners |
Start everyone as Workspace Member, and give project roles once you've created projects. This keeps people out of data until project boundaries exist.
To make someone an Owner:
- Click their row in User Management.
- Click their workspace role at the top of the side panel.
- Choose Workspace Owner.
- Confirm with Make owner.
See Members, roles and custom roles.
Step 3: Set up your projects
When a workspace is created, Mammoth creates a default project named New project, so you can start without creating one. You are its Project Admin by default, and you can rename, manage or delete it from the project menu.
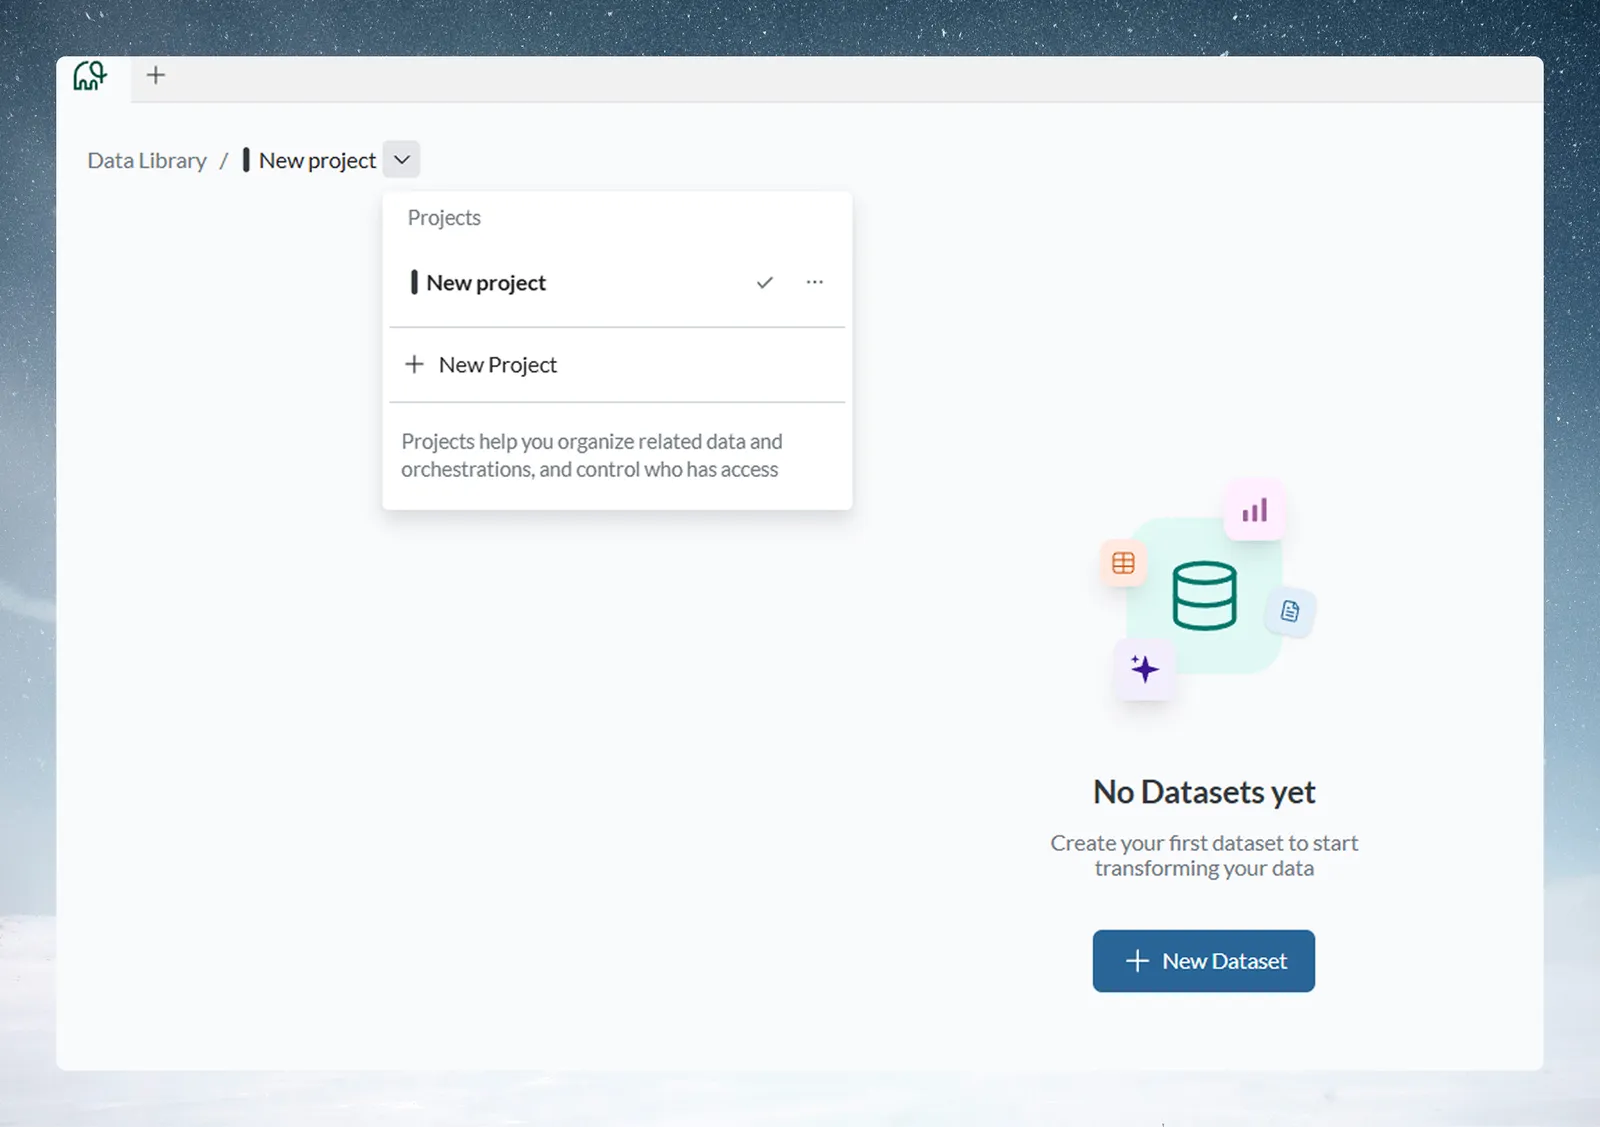
Open the project menu
Go to the Data Library and click the project selector (the dropdown arrow next to the current project name). Hover a project to see its overflow menu (...). What it shows depends on your role in that project:
| Your role | Menu items |
|---|---|
| Project Admin | Project Settings (rename, colour, Dates, who can access), Manage Users (add or remove workspace members and assign project roles), Leave Project, Delete Project |
| Project Editor | Leave Project, and Delete Project greyed out |
| Workspace Owner not in the project | Manage Users and Join Project, so you can add people to any project |
If you can't see Project Settings or Manage Users, you're in the project as an Editor. Ask your Project Admin for a role change.
Configure project settings
- Open the project's overflow menu and click Project Settings.
- Edit the Project Name, for example
SALES_Pipeline,CLIENT_AcmeorQ3-Analysis. - Pick a Project colour so the project is easy to spot in lists.
- Under Dates, click Set (or Change) and pick a preset (see the table).
- Under Who can access, pick an option (see the table).
- Click Save changes.
| Dates preset | What it does |
|---|---|
| US | Reads 06/12 as 12 Jun |
| UK / Europe | Reads 06/12 as 6 Dec |
| International (ISO) | Reads 06/12 as 6 Dec |
| Not set | No project default. Uploads are read day first, and new date columns keep their own format |
To set the two parts separately, click Customise reading and display…. Reading dates in uploaded files (Day first or Month first) applies to CSV, Excel and PDF files uploaded to the project. Showing dates sets the format for new date columns; any column can override it. This helps when sources use different date conventions.
| Who can access | Who gets in | Use it for |
|---|---|---|
| Everyone in this workspace | All workspace members, without an invitation | Shared reference data, company-wide reporting |
| Some people in this workspace | Only the people you tick in the user list, each with a role (Project Admin, Project Editor or Project Viewer) | Department or client projects with restricted data |
| Only me | Only you | Personal analysis, experiments, sensitive work in progress |
The project then uses the new name, date handling and access setting. See Projects.
Starter projects and naming
- A Sandbox or "Testing" project where people practise transformations and test pipelines without touching production data.
- At least one production project for your pattern: your first department, your first client, or your raw data ingestion project.
- A "Shared Resources" project for data several teams need, such as company-wide reference data, organisational hierarchies or common lookup tables.
Use names that say what the project is for, include department or client identifiers, and use prefixes to group related projects, for example SALES_Pipeline, SALES_Reports, CLIENT_Acme, CLIENT_Beta.
Each project keeps its own data. Connections and datasets in one project can't be opened from another. To move data across, a pipeline can push its output into a dataset in another project with Send to Dataset.
Step 4: Decide whether you need API access
API tokens are for scripts, integrations and CI. AI assistants (through the Mammoth MCP server) and the Mammoth CLI sign in with your Mammoth account instead, so they need no key. Both work on every plan.
You need an API token if you are:
- running Mammoth from a script, a CI job or a scheduled job;
- building custom applications that read or change Mammoth data;
- automating data workflows from external systems.
BI tools don't need a token. Send data to them with an export (for example Tableau Server/Cloud), or publish the view to a Mammoth-managed database and use Show credentials. See Send data to a database or BI tool. To connect an AI assistant, see Mammoth MCP server; for the CLI, see Authentication.
Skip this step if your team only uses the web app at first. Workspace Owners and Workspace Members can create tokens later.
Create an API token
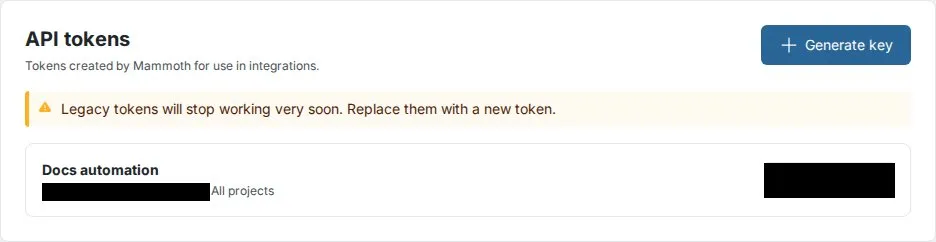
- Open the API Keys section and click Generate key in the API tokens card.
- In the Create API key dialog, enter a Name, such as "Nightly export script" or "Production Automation".
- Optionally tick Project scoped and select a project to limit the key to it.
- Click Create key.
- In API key created, click Copy secret, then Done.
- Store the secret in your password manager or secrets management system.
Mammoth shows the secret only once: "After this dialog closes, the secret is gone." If you lose it, remove the key and generate a new one. Treat tokens like passwords: don't commit them to code repositories, share them over unsecured channels or keep them in plain text files, and delete unused ones.
Add an external AI key (optional)
AI features such as Generative AI work without your own key, because Mammoth provides one. Add an external key only to choose the AI provider and model yourself. Only Workspace Owners can add keys.
- In API Keys, click Add external key in the External API keys card.
- Select the AI provider (OpenAI, Anthropic, Google or xAI) and click Next.
- Choose the Model.
- Enter a Key Name and paste your API key.
- Click Add External Key.
The key appears in the External API keys card. Keys can't be edited later; to change one, remove it and add a new one.
Setup checklist and next steps
- Workspace name configured
- Team members invited with roles matching their responsibilities
- Initial projects created
- API tokens generated, if you identified integration needs
- External API keys added, if you want to choose the AI provider
Then:
- Wait for team members to accept invitations and sign in.
- Add your first dataset. See Choose how to bring data in.
- Build a first pipeline. See Build your first pipeline.
- Set up an automation. See What you can automate.
- Create a first dashboard. See Create a dashboard.
Keep the workspace healthy
- Monthly: review User Management (the Last active column) for inactive accounts or access issues, and check the Data usage card in General.
- Quarterly: audit the project structure against how the organisation works.
- Security: rotate API tokens periodically, review permissions, and remove access for people who leave.
Example setups by team size
| Setup | Structure |
|---|---|
| Small team (5 to 10 users) | 3 to 5 projects by department. Everyone a Workspace Member, invited to projects by hand. Suits teams that coordinate access informally |
| Enterprise department (50 or more users) | One workspace per major department (you get your first by signing up; contact Support for more). 10 to 15 projects by function or team. A mix of Members and Project Admins. API integration with enterprise systems. MFA enforced for every member (set up by Mammoth on request) |
| Consulting firm | One workspace, one project per client plus one internal project. Client contacts added only to their own project as Project Viewer, or sent dashboards instead. API tokens for client reporting. Strict project isolation so no client sees another's data |
Troubleshooting workspace setup
| Symptom | Cause | Fix |
|---|---|---|
| A user didn't receive the invitation email | Spam filtering, a typo, or corporate email filtering | Check their spam or junk folder. Check the address spelling. Resend with Reinvite in the user table or in the Invite users to workspace dialog. Ask IT if corporate filtering blocks external invitations |
| You can't find Workspace Settings | You're in Ask mode, or you aren't an Owner | Look for Workspace Settings (the gear) in the bottom row of the left sidebar; it doesn't show in Ask mode. Most controls are Owner-only, so ask an existing Owner to make you one |
| Storage limit reached | Data usage is at 100%: "Automated data imports and pipelines are paused." | Open Plan & Storage > Manage storage, sort by Size, and delete datasets you no longer need, or change your plan for more storage |
| A team member can't open a project | Not invited, not activated, or no project access | Check they were invited to the workspace and clicked the invitation link to activate their account, then check their project access |
| An API token doesn't work | Copy error, removed key, or wrong project | Check the token has no extra spaces or line breaks and wasn't removed in API Keys. If it's Project scoped, check the request is for that project. Send it as Authorization: Bearer mm_.... See Authentication |
Related
- Create a workspace: start a new workspace.
- Workspace settings: every option in each section.
- Members, roles and custom roles: what each role can do.
- Projects: create, share and configure projects.
- Core ideas: how workspaces, projects and datasets fit together.
Something wrong? support@mammoth.io